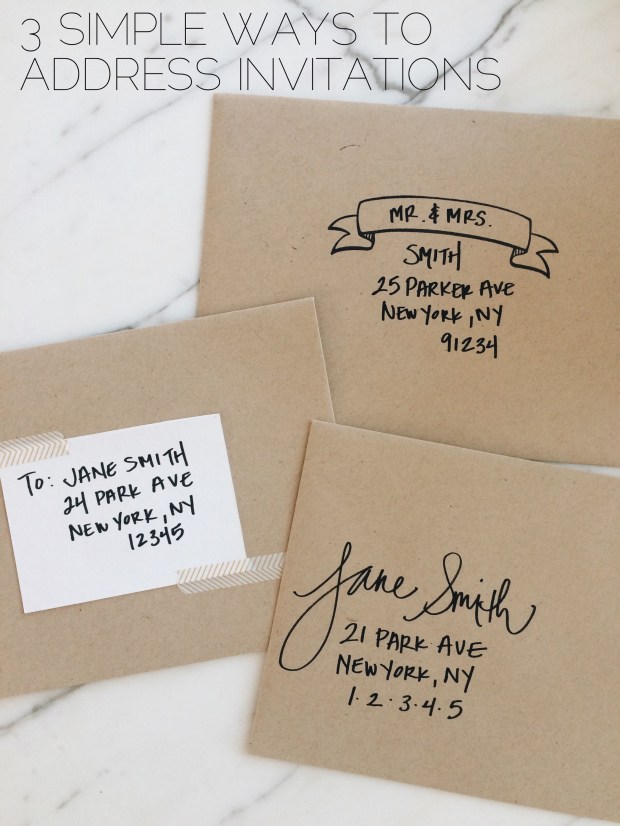
Even though it may not feel like it right now (in places other than Arizona), but spring is right around the corner. This means wedding season is about to kickoff! If you are planning a wedding and getting ready to send out your invitations, check out this week’s video for 3 easy ideas on how to add a little style to your envelopes.
It’s hot in Arizona, I mean REALLY hot, so when it comes to a beauty regime for the summer the theme is “less is more.” I’m talking tinted moisturizer, waterproof mascara, a bold lip color (that’s it). For the summer, I like to tone down the traditional red lip and go for more of a coral shade. I can’t live without the Nars Velvet Matte Lip Pencil in Red Square. It’s the perfect bright orange red, plus it’s rich with pigment, long lasting, moisturizing and no lip liner is needed.
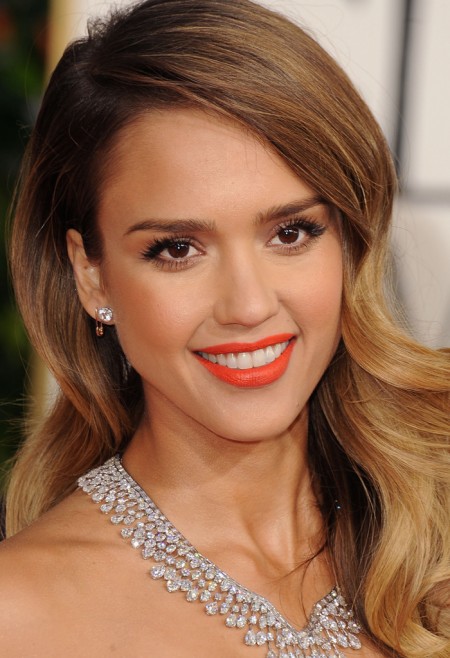
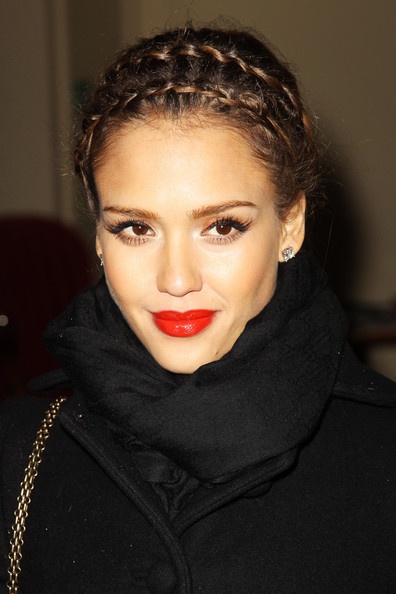
Go bold like Jessica Alba with a liquid lipstick, or get just a wash of color by using a gloss or balm. Check out my tutorial on how to keep the lipstick lasting all day.
Top Row:
Nars Lipstick in Heat Wave, Buxom Full Bodied Lipstick in Rogue, Hourglass Opaque Rouge Liquid Lipstick in Riviera (this is the color Jessica Alba is wearing)
Bottom Row:
Nars Gloss in Wonder, Bite High Pigment Matte Pencil in Zinfandel, Korres Lip Butter in Mango
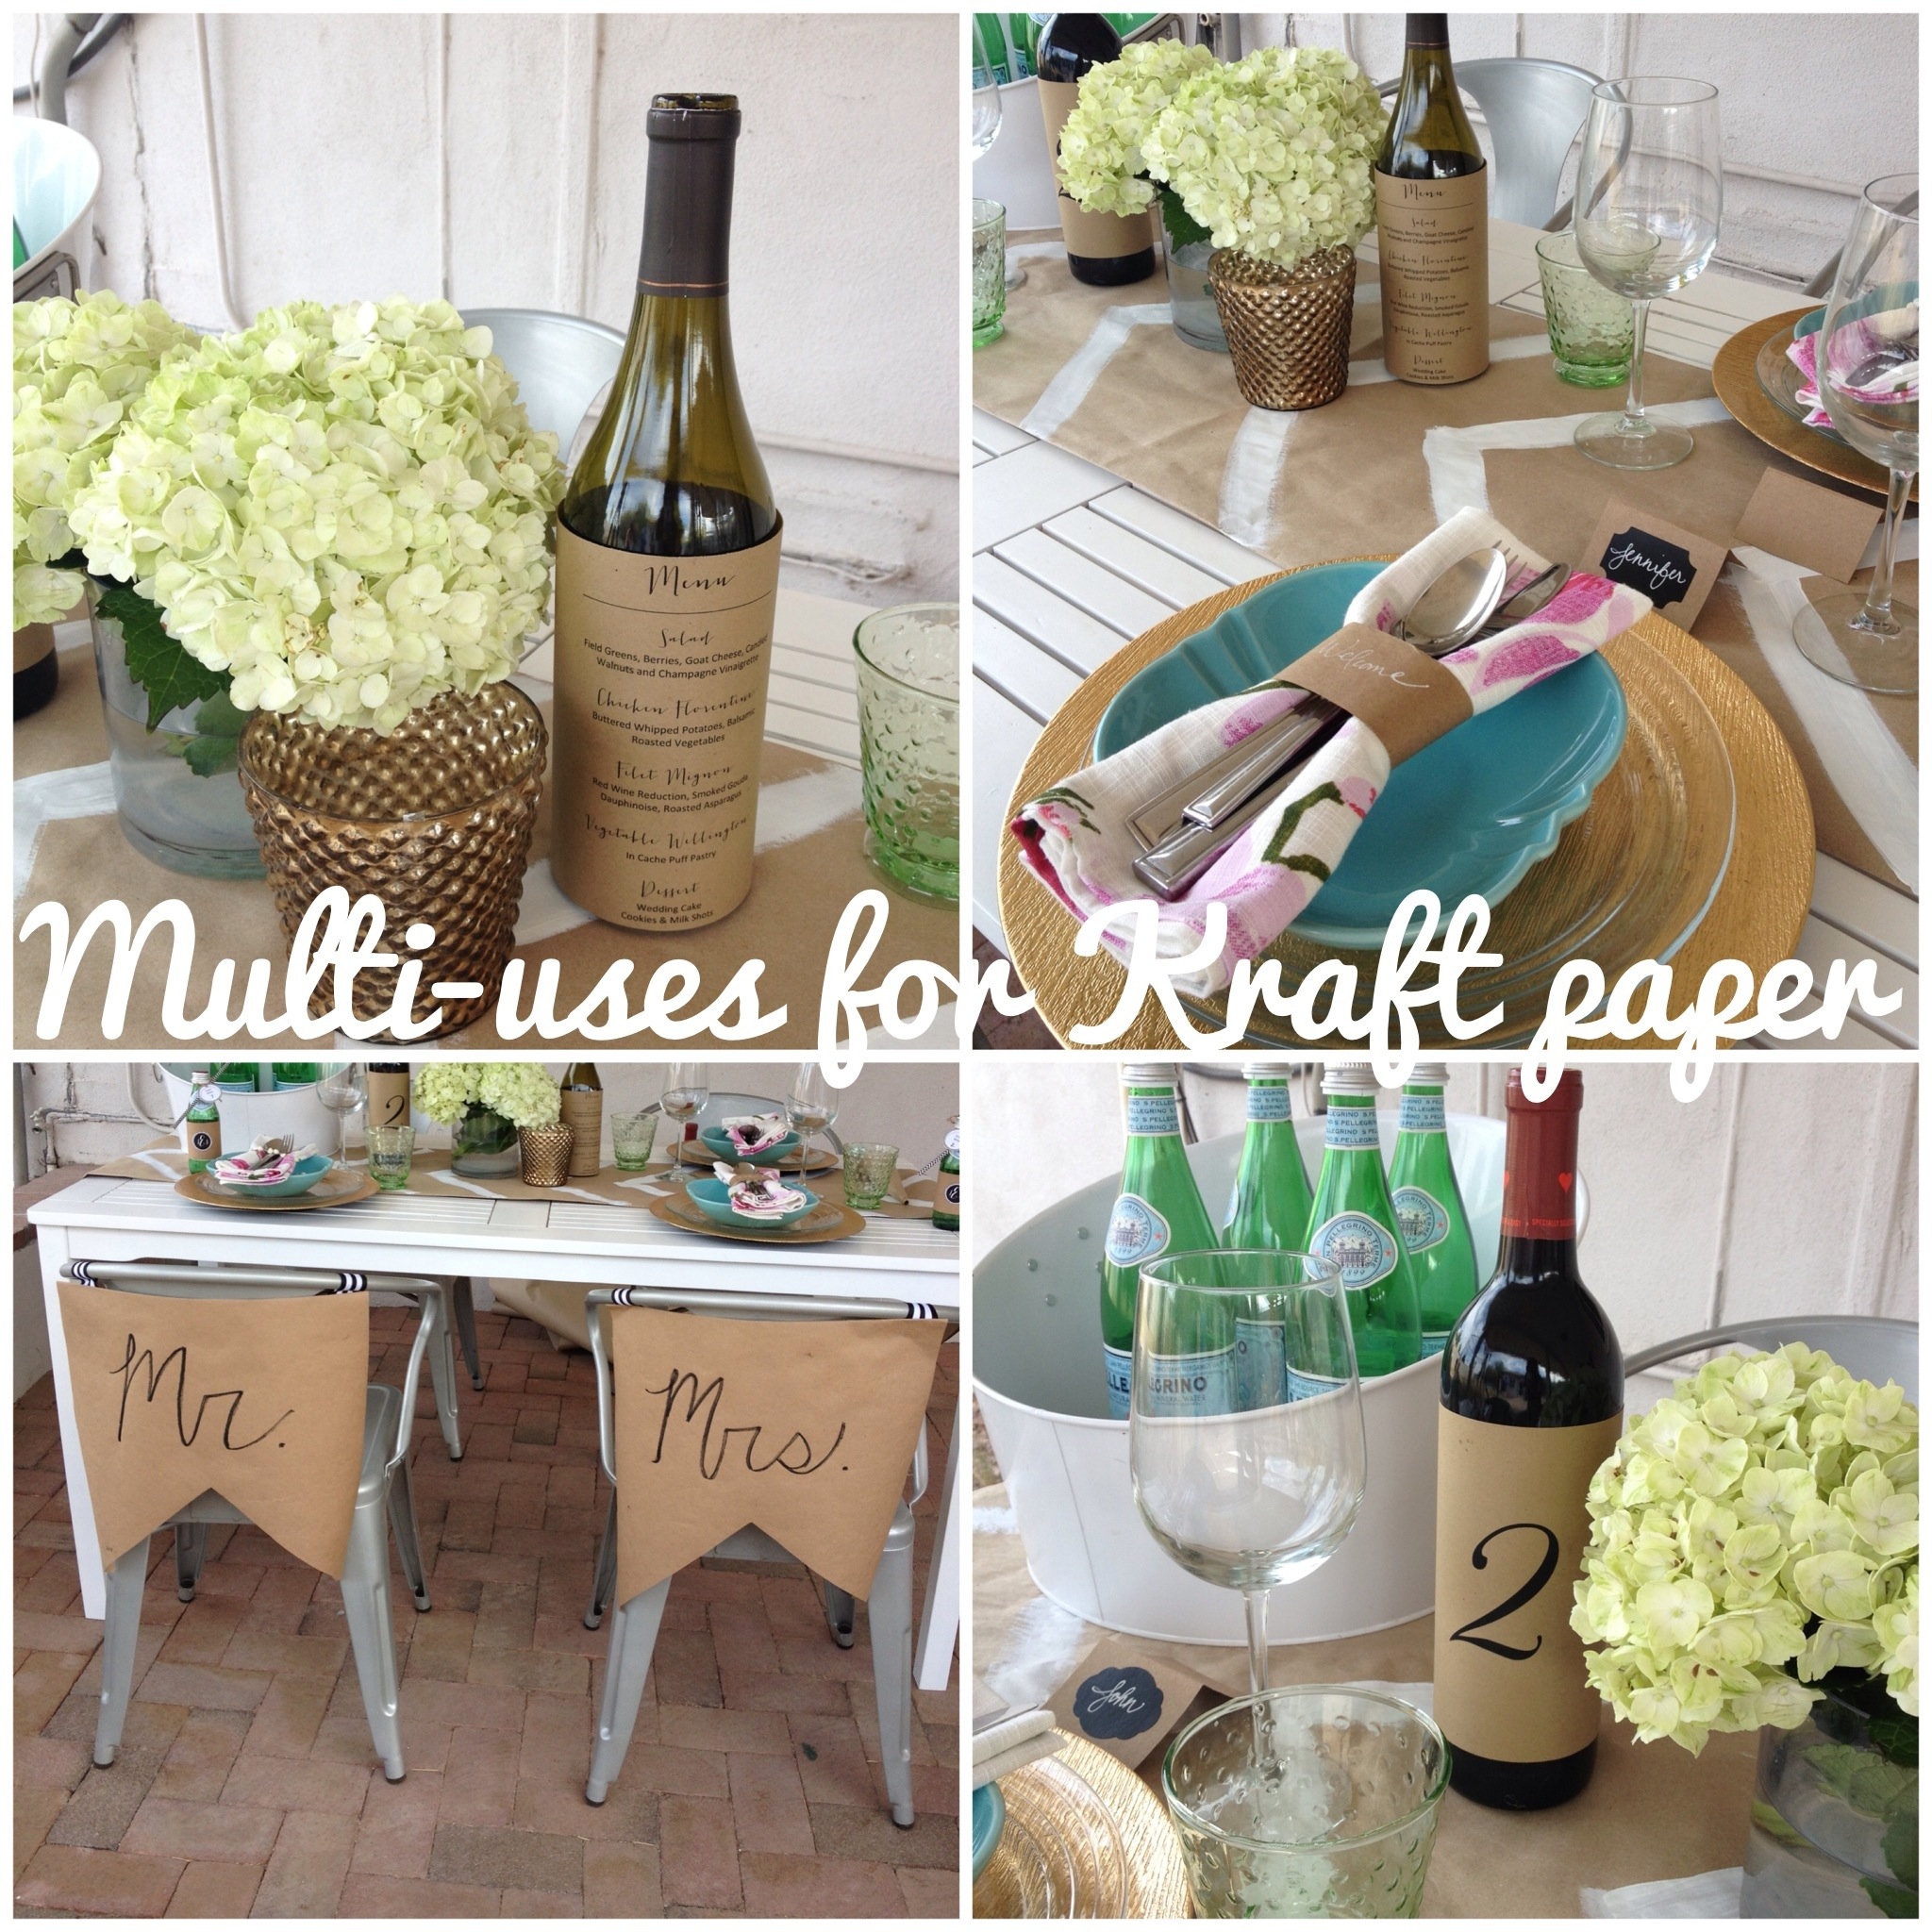
Can you believe it’s June 1st already? I know I say this every year but I really mean it, time is flying by! Summer is rolling in and outdoor entertaining is ramping up. To keep things simple, I wanted to share some ideas on easy ways to style your summer event with Kraft paper. The best thing about Kraft paper is that it has multiple uses, is inexpensive (I picked up my roll at the Dollar Store), easy to clean-up and recyclable. Check out the video for different uses which include wrapping wine bottles with your menus, creating custom napkin ring holders or a painted table runner.
Get more inspiration and places to purchase kraft items by checking out my Pinterest board.
I hope everyone had a wonderful Memorial Day! I definitely took advantage of the long weekend, soaked up some sun and did a whole lot of nothing. It was some much needed downtime and a good recharge but now it’s back to work (thank goodness it is a short week, right!?!).
As a continuation of my Summer Wedding DIY series, I’ll show you how to create a no sew bow. These are great styling accessories for your bridal party, ring bearer, flower girl or other wedding decor. You can create a no sew bow in just 6 easy steps. Head over to my Pinterest board for more ideas on how to incorporate bows into your event.
Thank you to all who helped me to reach the 1,000 subscriber goal on the YouTube channel! I’m so grateful. Please share a comment and let me know what tutorials you would like to see in the future.
How to create a no sew bow:
Cut a piece of ribbon 12.5 inches long (this will make a bow about 6 inches long).
Cut another piece of ribbon 3 inches long.
Take your 12.5 inch long piece of fabric, fold the ends together and secure with a drop of hot glue.
Take your 3 inch long piece of fabric, fold in the sides and secure with a drop of hot glue.
Pinch together the middle of the larger piece of ribbon to form the bow.
Glue the smaller piece of fabric around the middle.
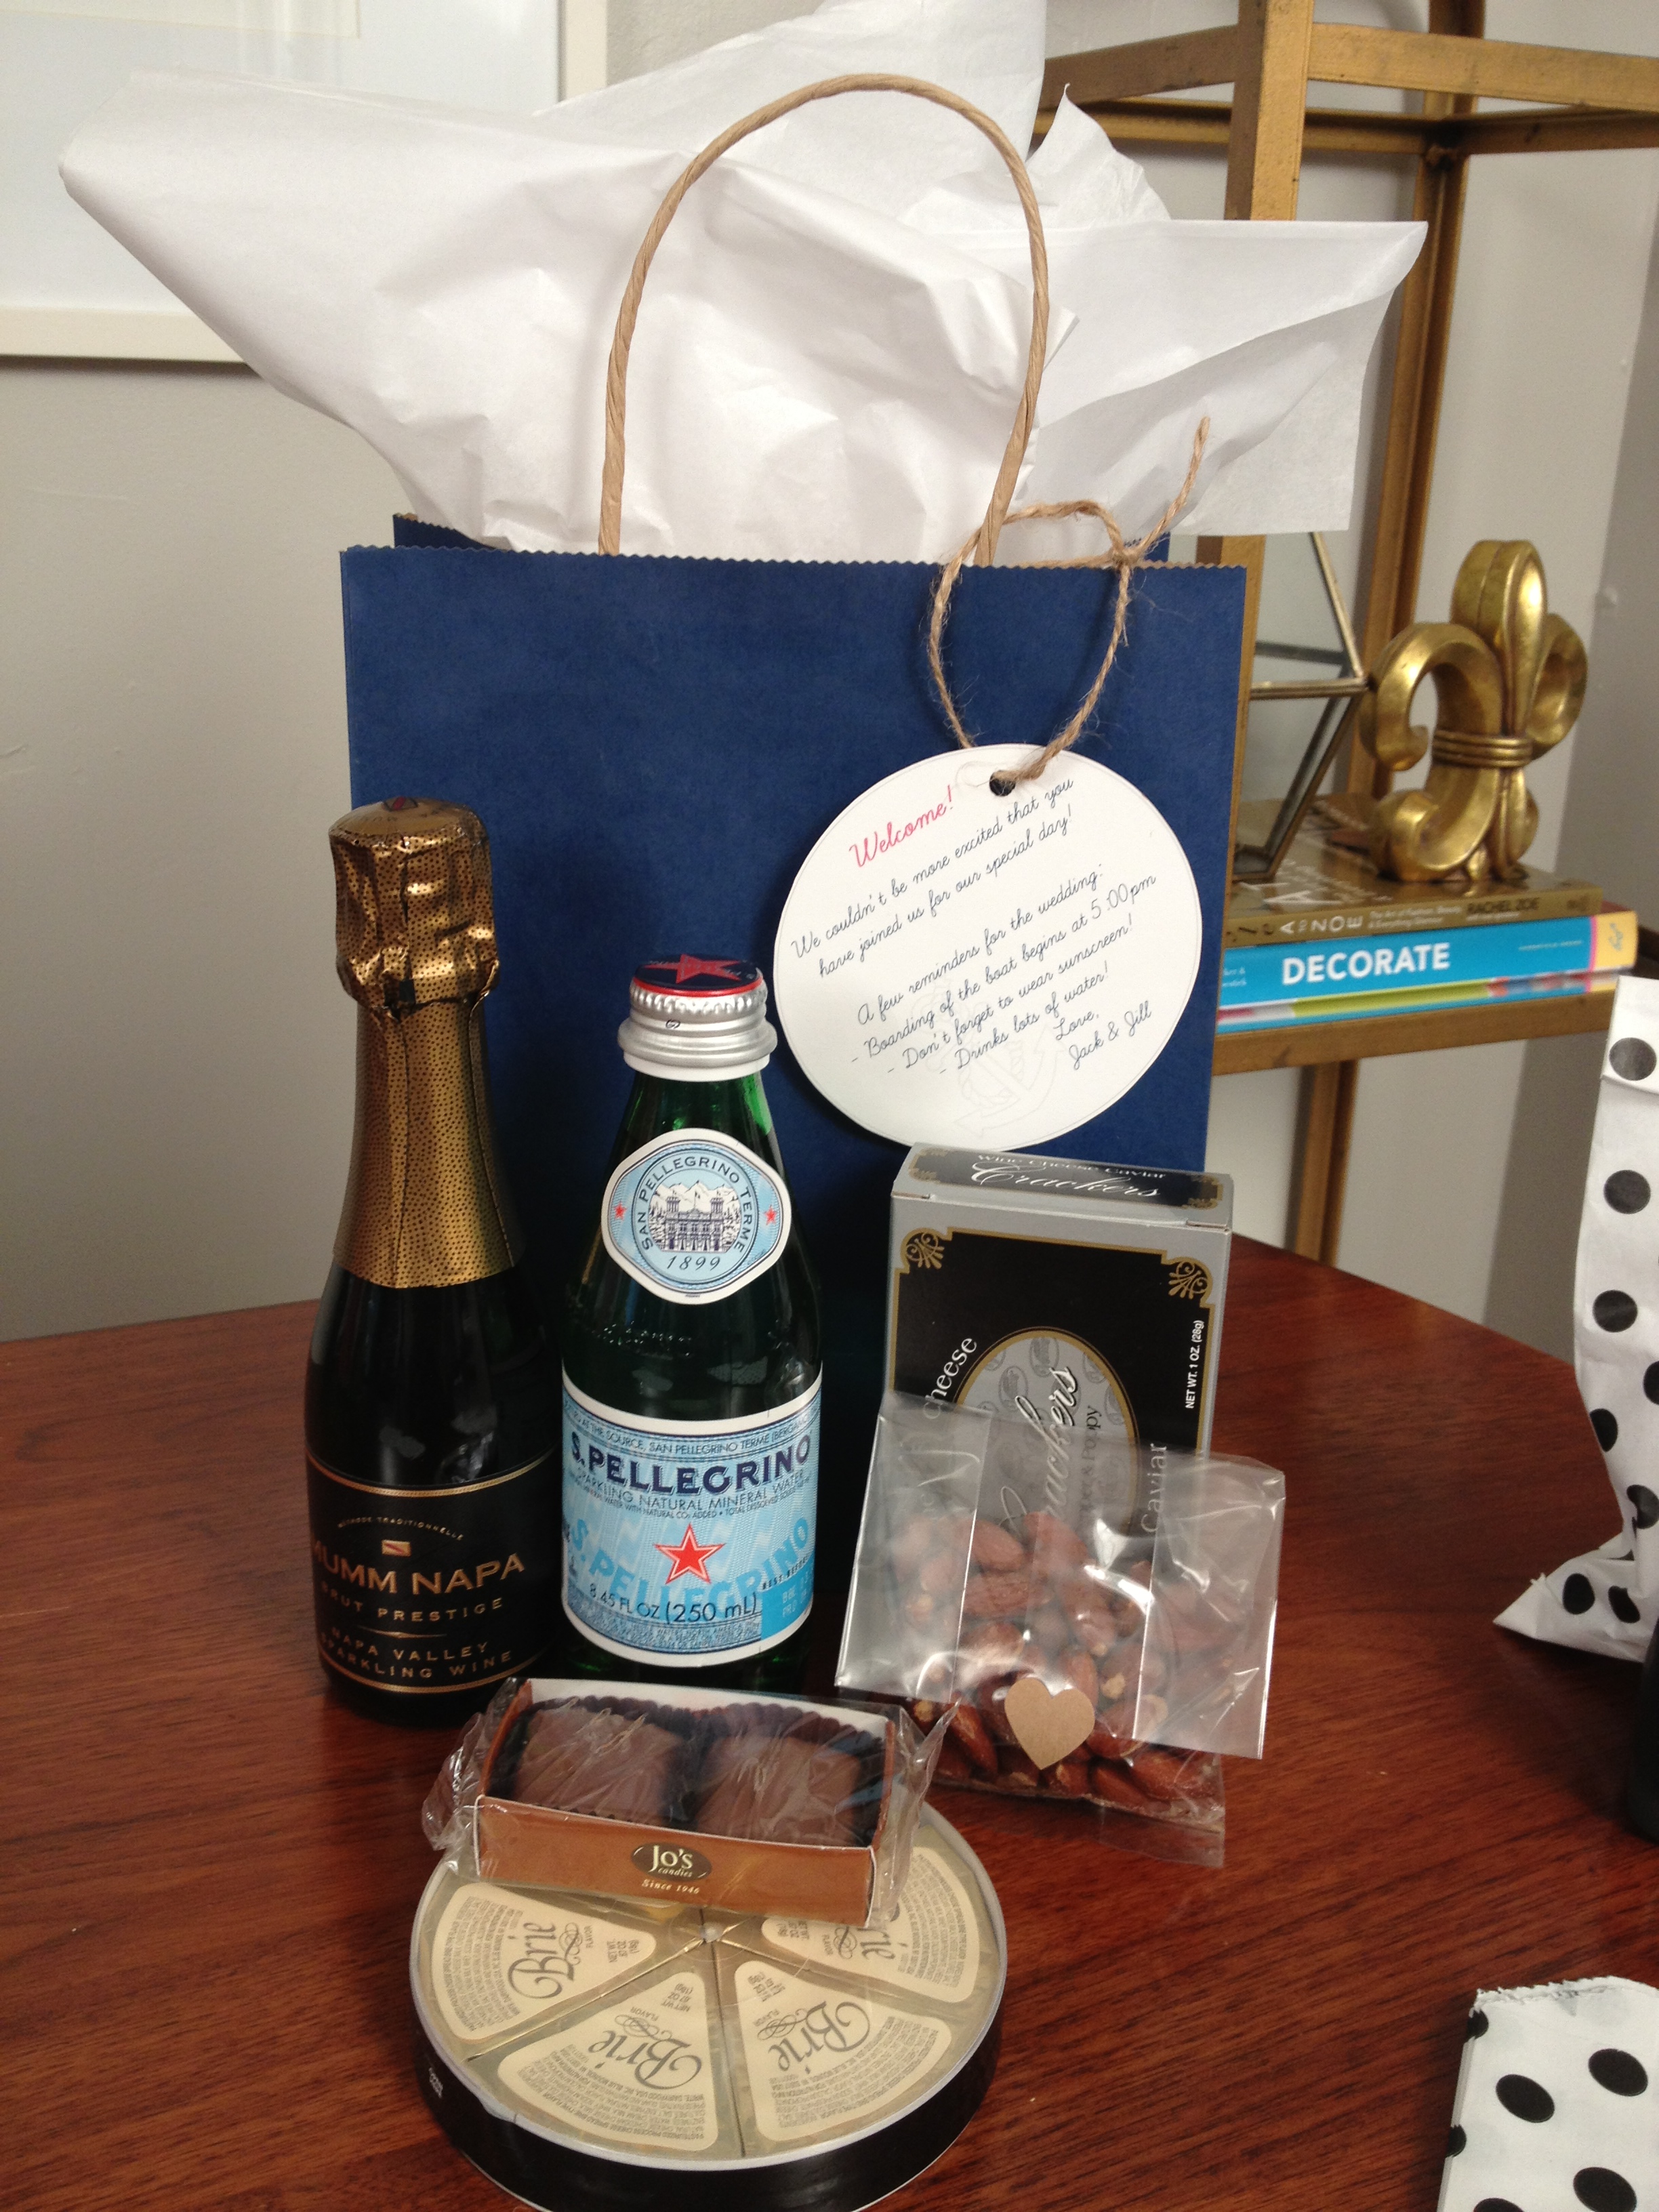
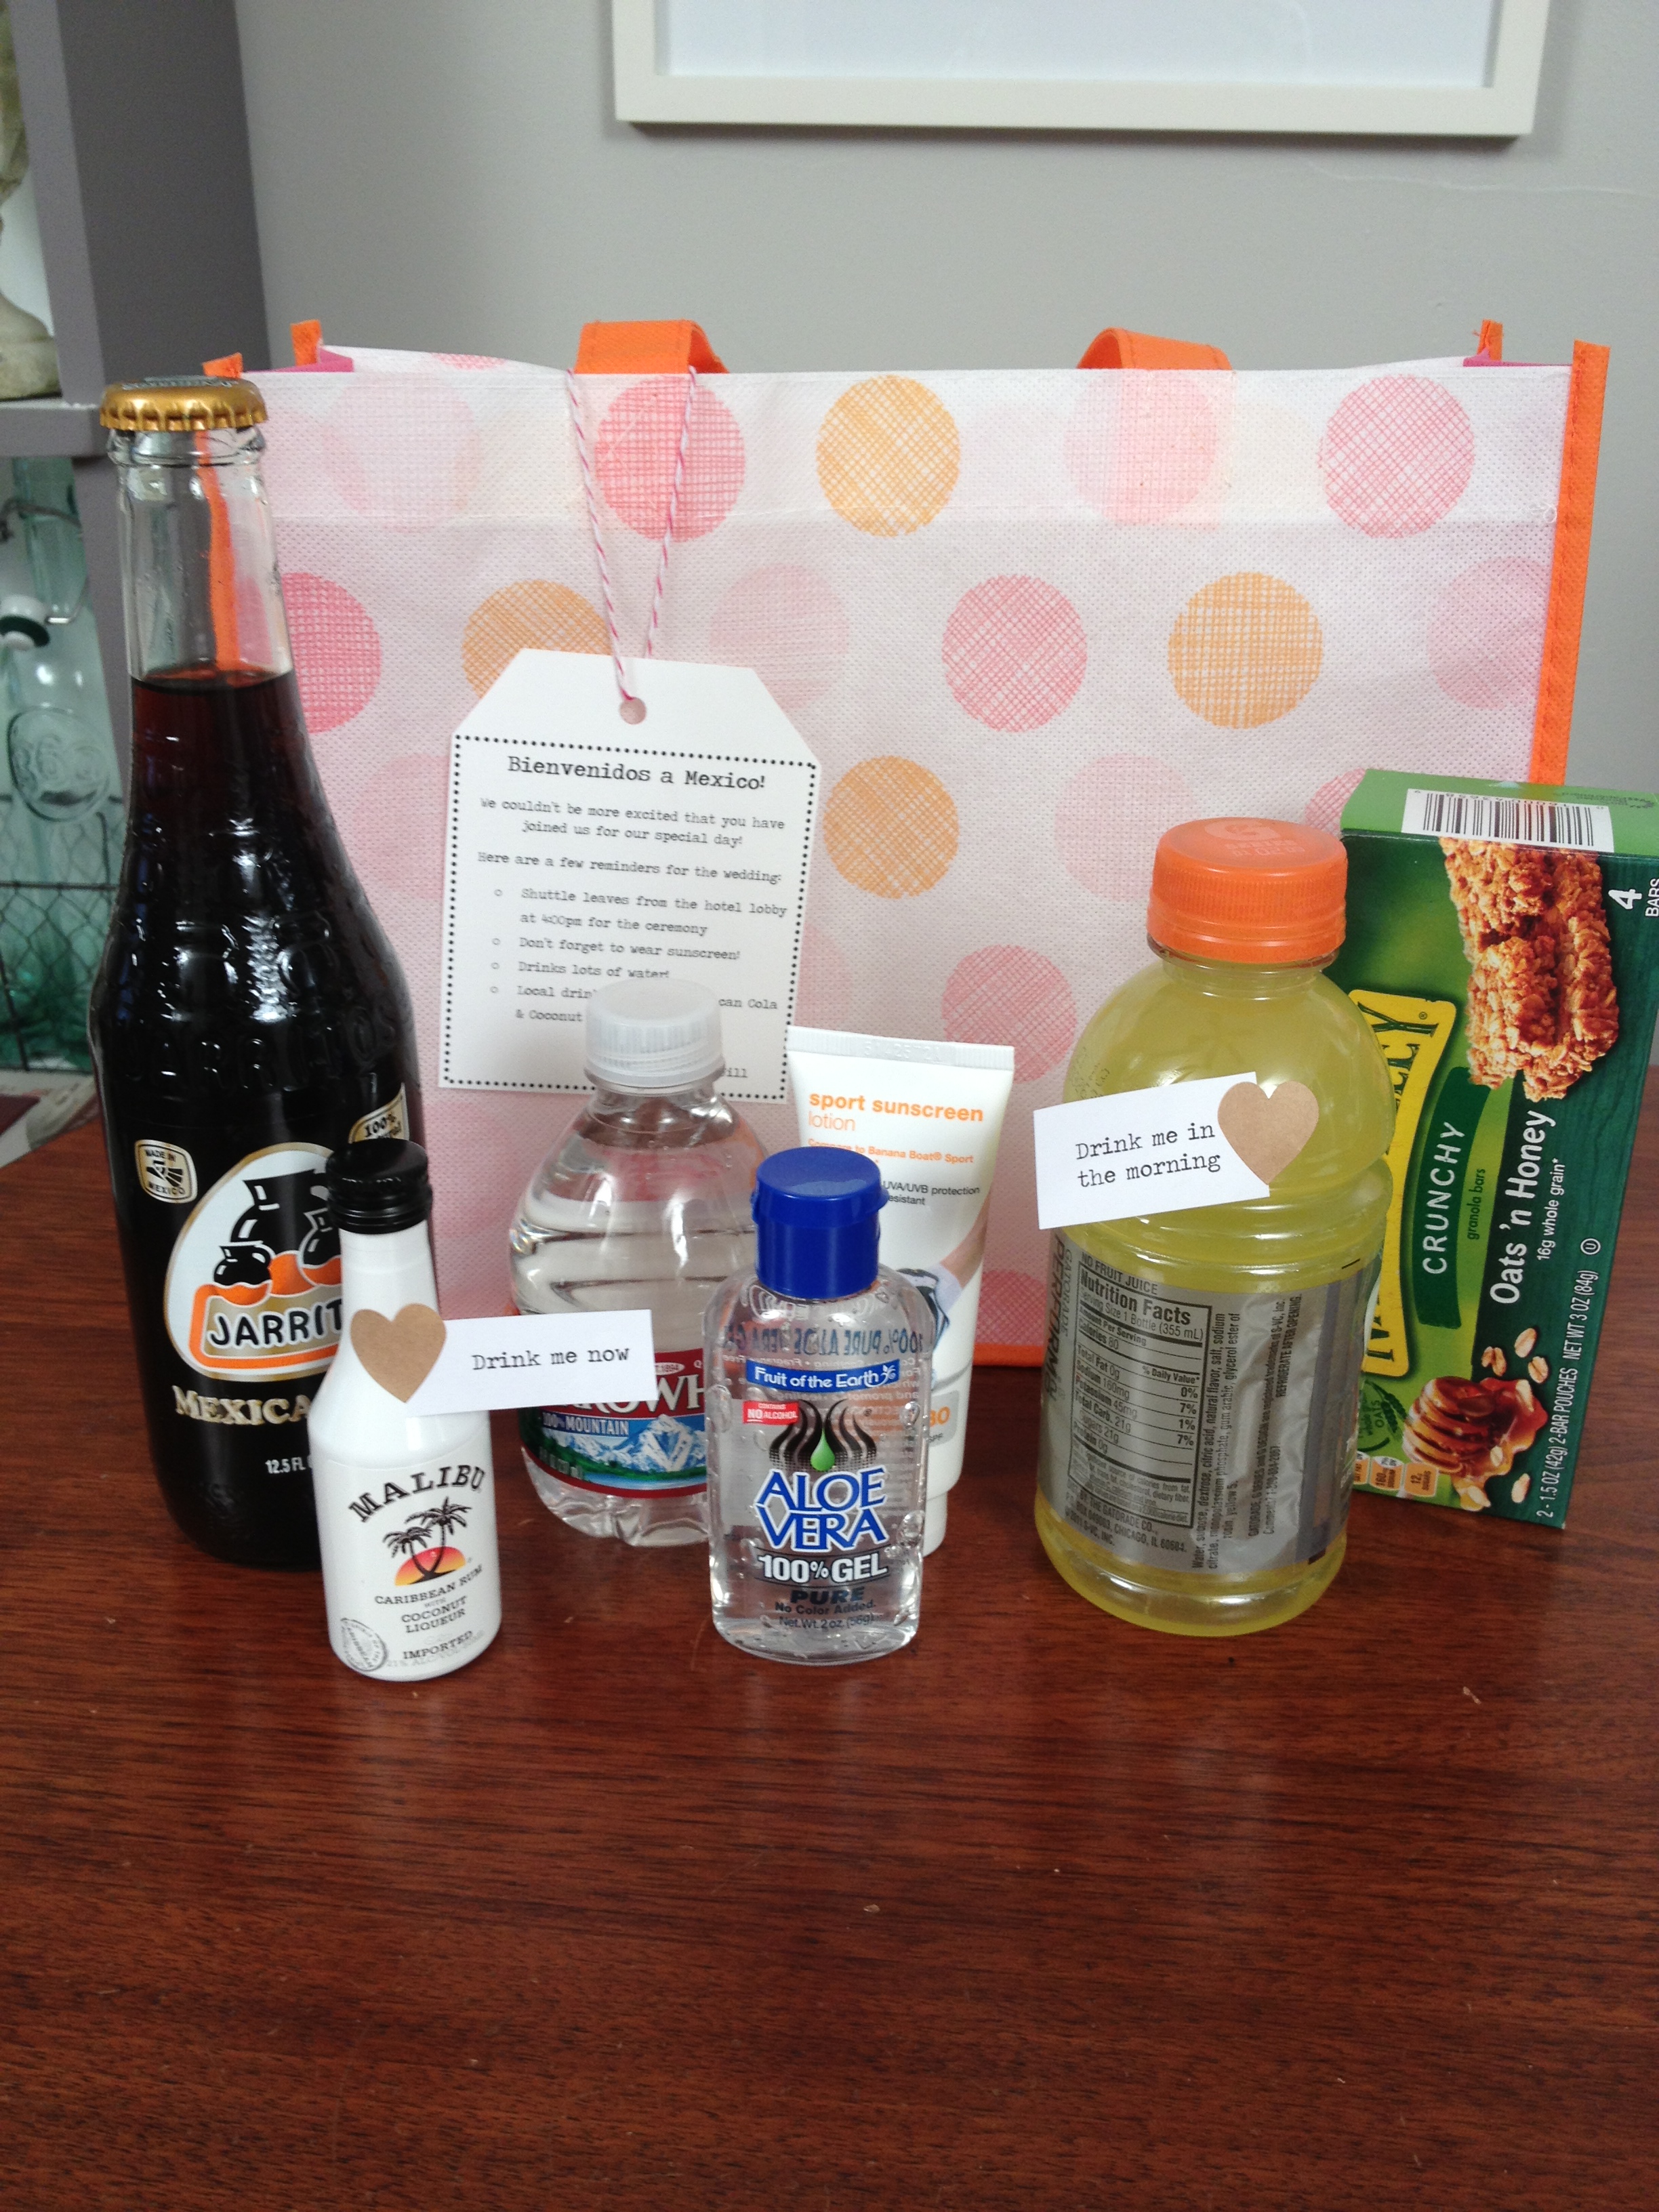
I can’t think of a better way to thank guests for sharing in your big day then to create a welcome bag upon their arrival. This week’s video will show you some easy ways to customize the bags based on your wedding’s theme or destination.
Tip: Include specific notes for your guests such as a weekend itinerary, area attractions, transportation details or other visitor information.
Resources:
Target – $1 section for toiletries
World Market – miniature versions of food and drinks
I got some requests to do more wedding DIY tutorials and I was super happy to comply!
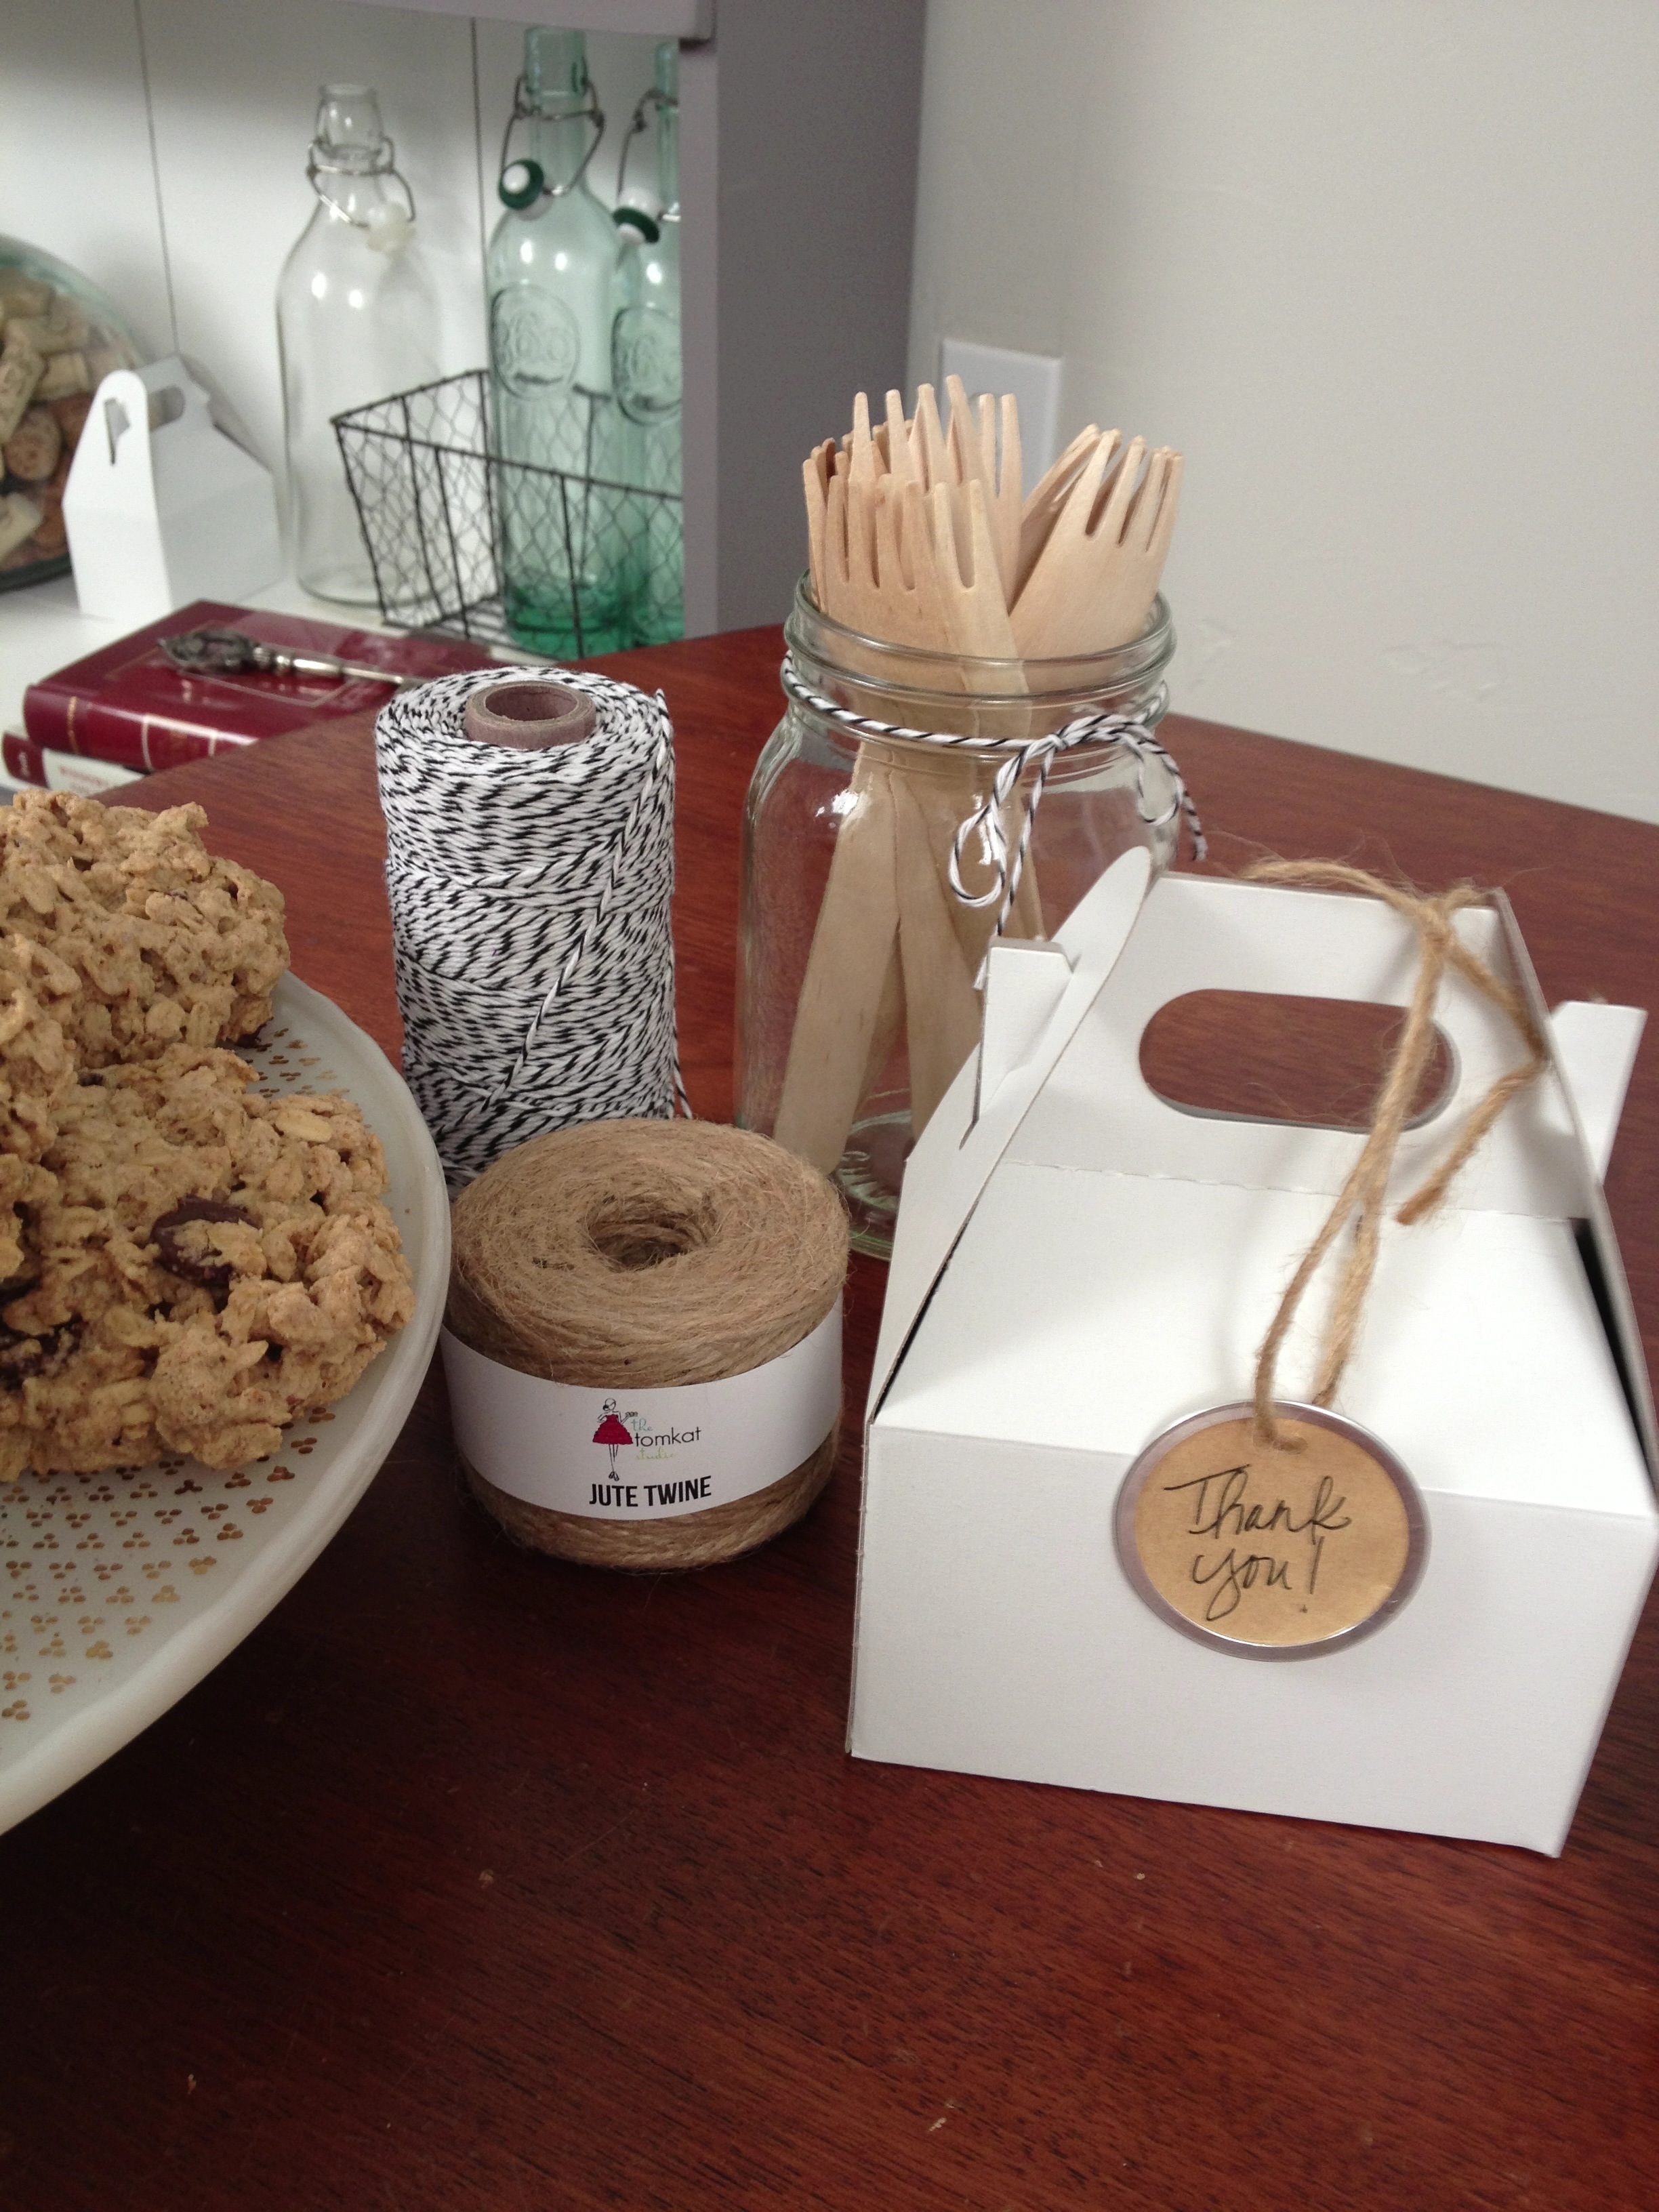
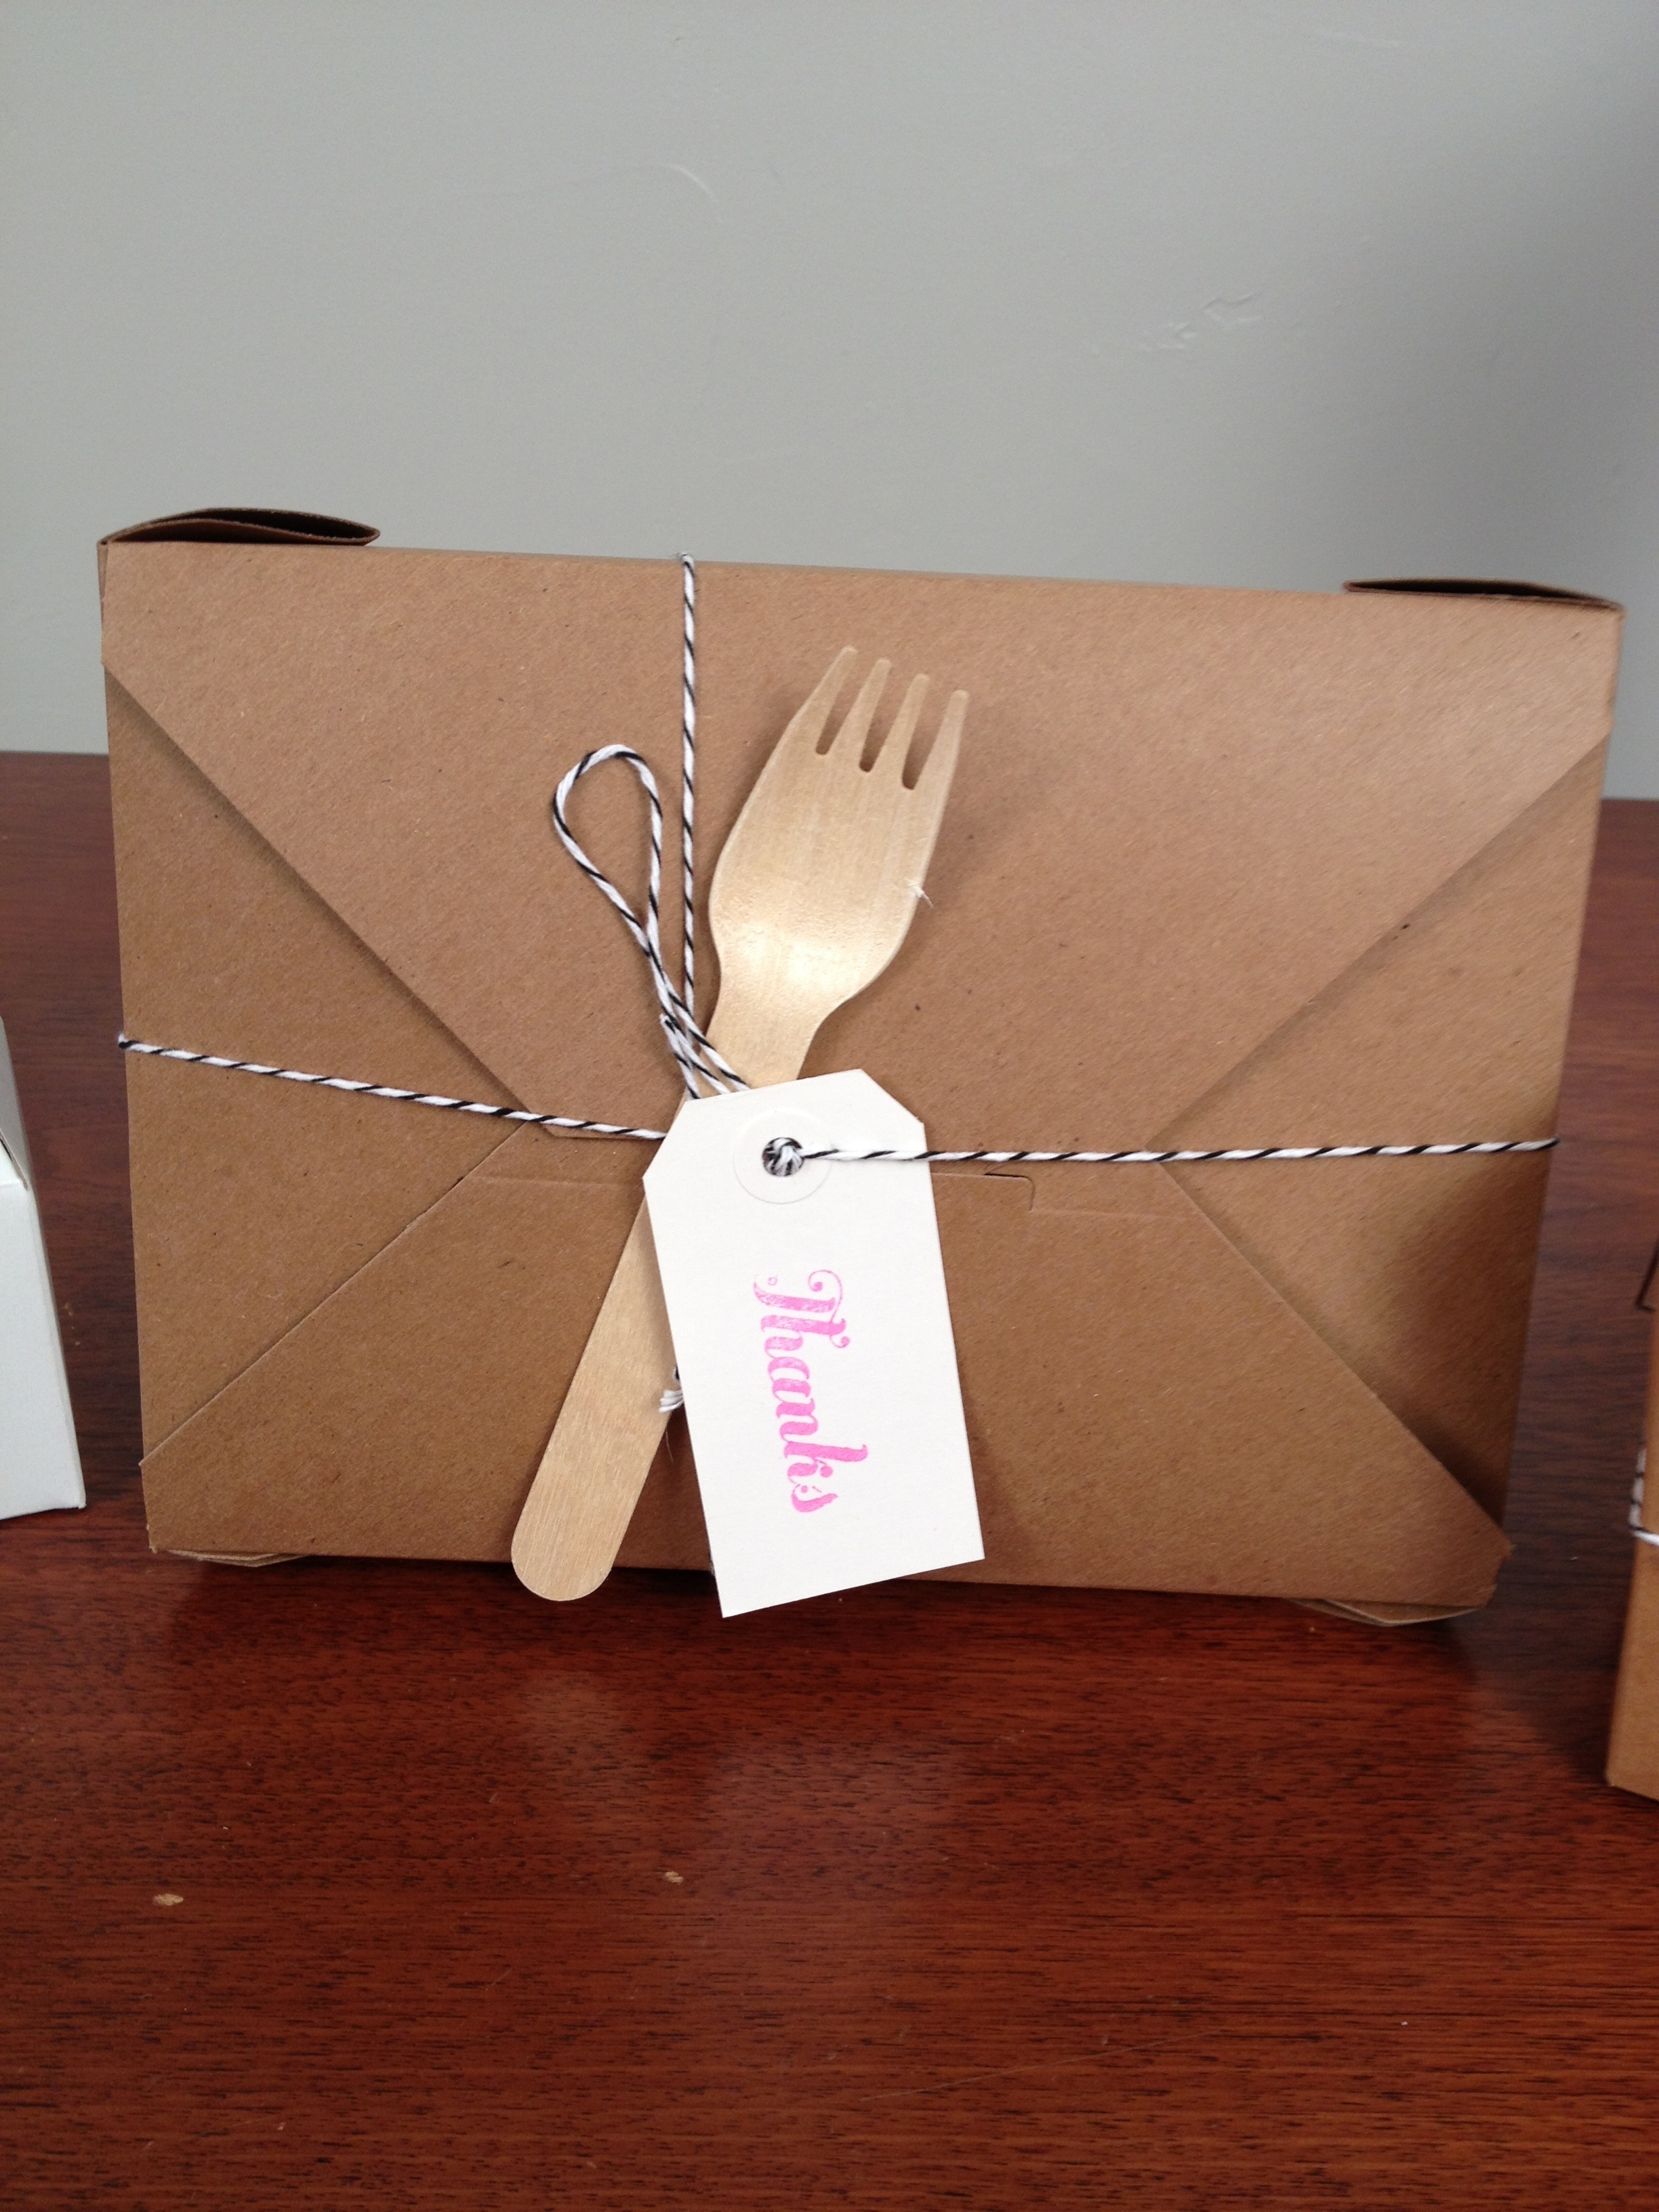
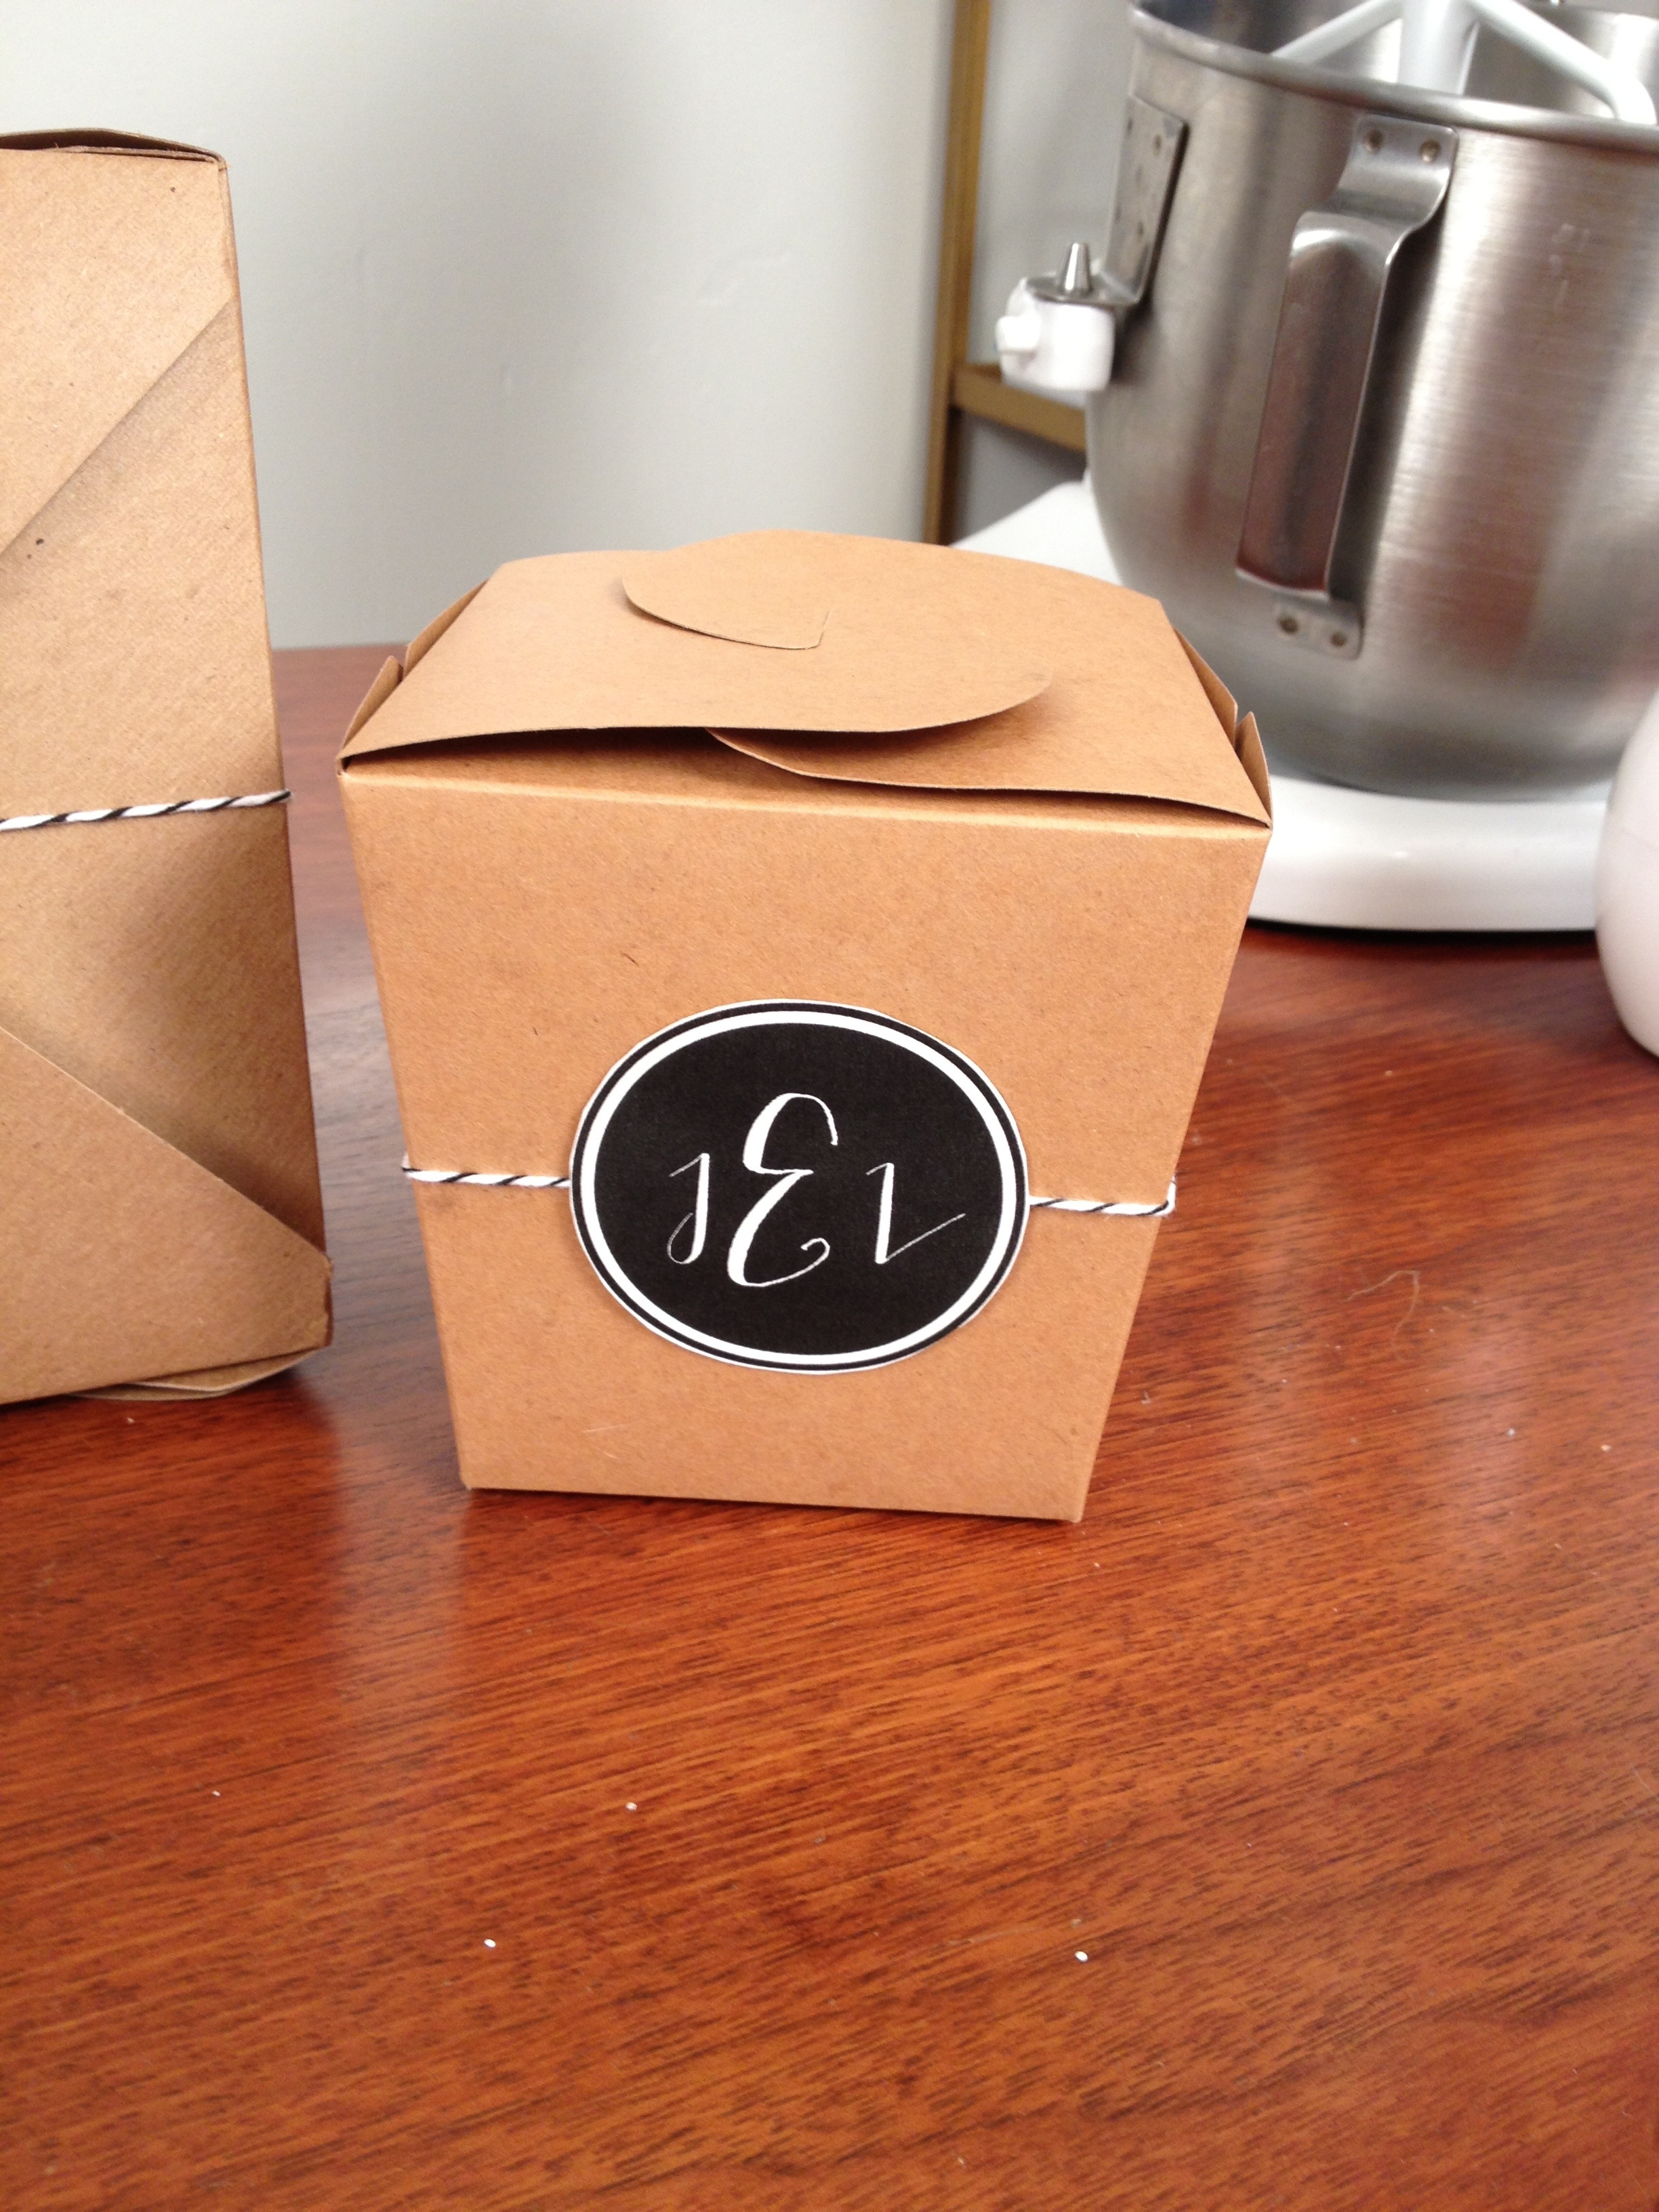
I’m a big advocate on trying to make weddings greener and not have as much waste. For this week’s video, I saw these biodegradable kraft takeout boxes and thought they were a great way to send guests home with leftover wedding cake. How many times have you seen uneaten slices just sitting on the tables!?!
These takeout boxes are not only for weddings, use them at dinner parties to send guests home with leftovers so that you never have to worry about getting your Tupperware returned to you.
I’ve also included a recipe for my signature Gluten Free Oatmeal Cookies that you can use to fill your boxes and turn them into wedding favors.
Don’t forget to SUBSCRIBE to the YouTube channel, so close to the 1,000 goal!
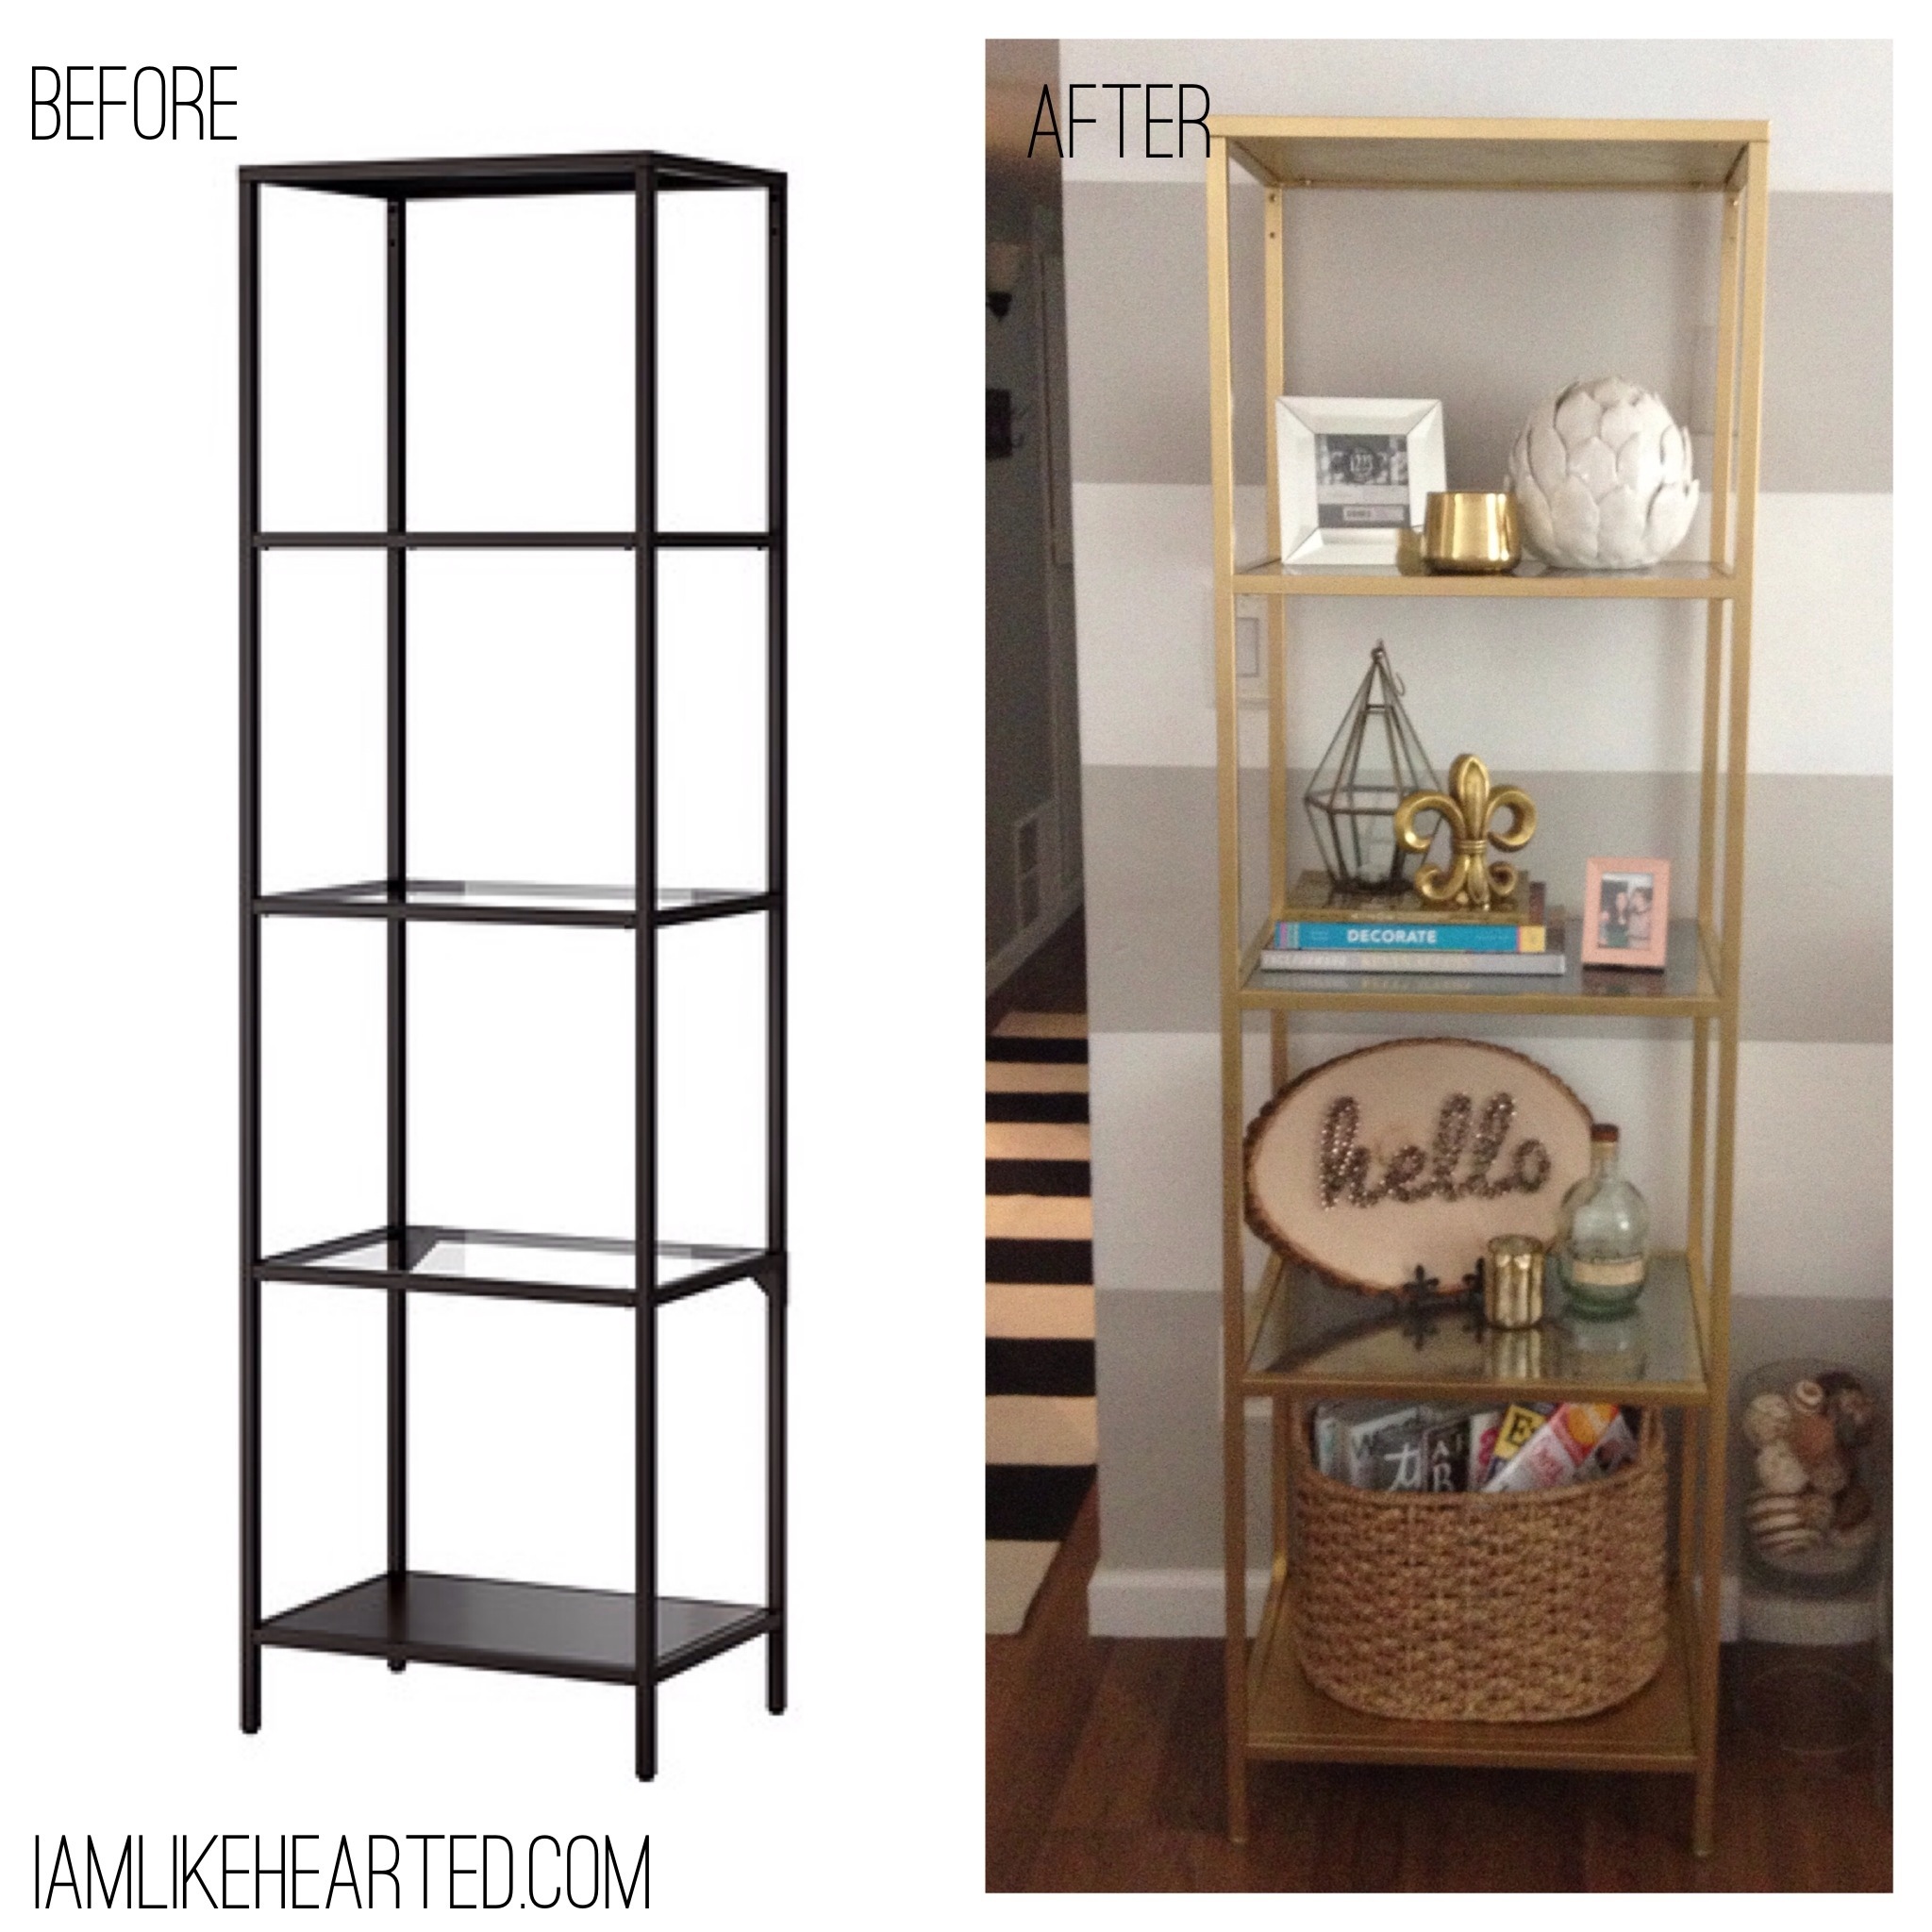
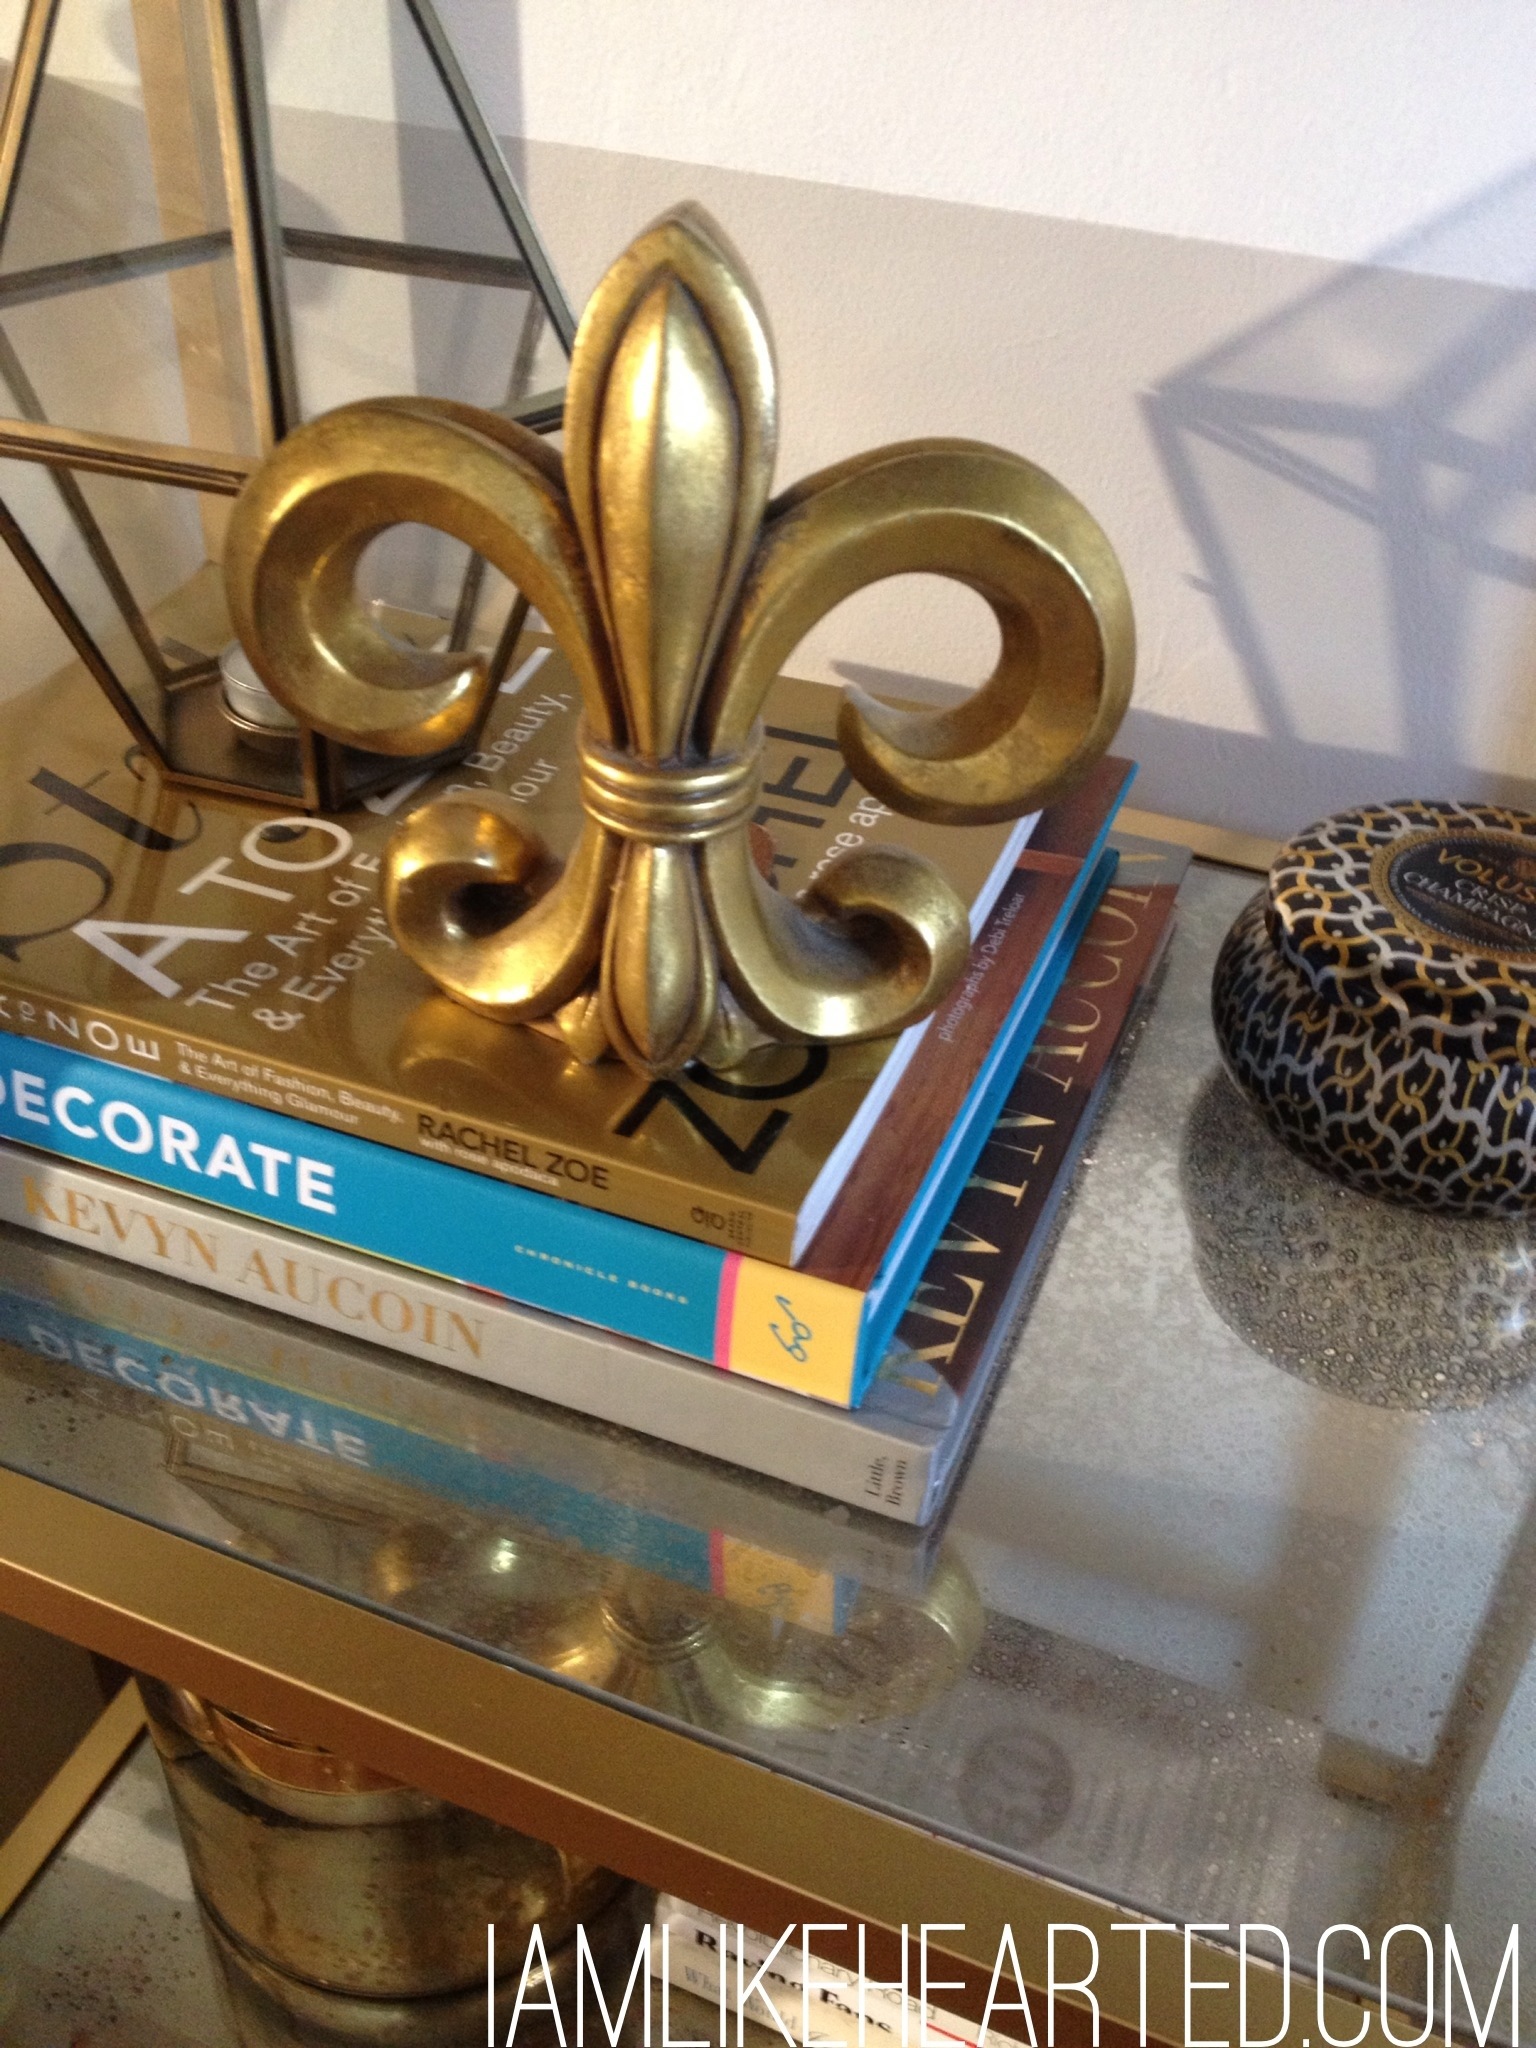
I have a confession…a lot of the tutorials I do are because I need something done around the house. Being a homeowner means the project list never ends. Case in point, I needed a bookcase for my guest room and wanted to recreate the look of a vintage one I already own. In this tutorial learn how to master an Ikea hack and create mercury glass for the shelves. The best part about learning the mercury glass technique is that you can also use it on vases, candlesticks and much more to create additional accents for your home.
Also, I found this post from Brittany Makes extremely helpful when deciding what gold spray paint to use.
Don’t forget to post an Instagram photo of tutorials you have tried and tag me @likehearted. I want to see what you all have been making!
Black Spray Paint (Left over from another project)
Tools:
Damp rag
Spray Bottle filled with water
Mercury Glass Steps:
Make sure you are in a well ventilated area.
Make sure the glass is clean and dry. The paint is going to go on the reserve side of whatever you are painting. In this case, the bottom of the shelf.
Lightly spray the glass with water.
Spray a layer of mirror paint. Let it dry for a few seconds.
Depending on your desired look, you can incorporate other colors, here I add gold and black for a more antiqued look. Spray the colors and dab with a damp cloth top get your desired effect.
Let it dry completely, if it is too transparent add another layer of mirror paint.
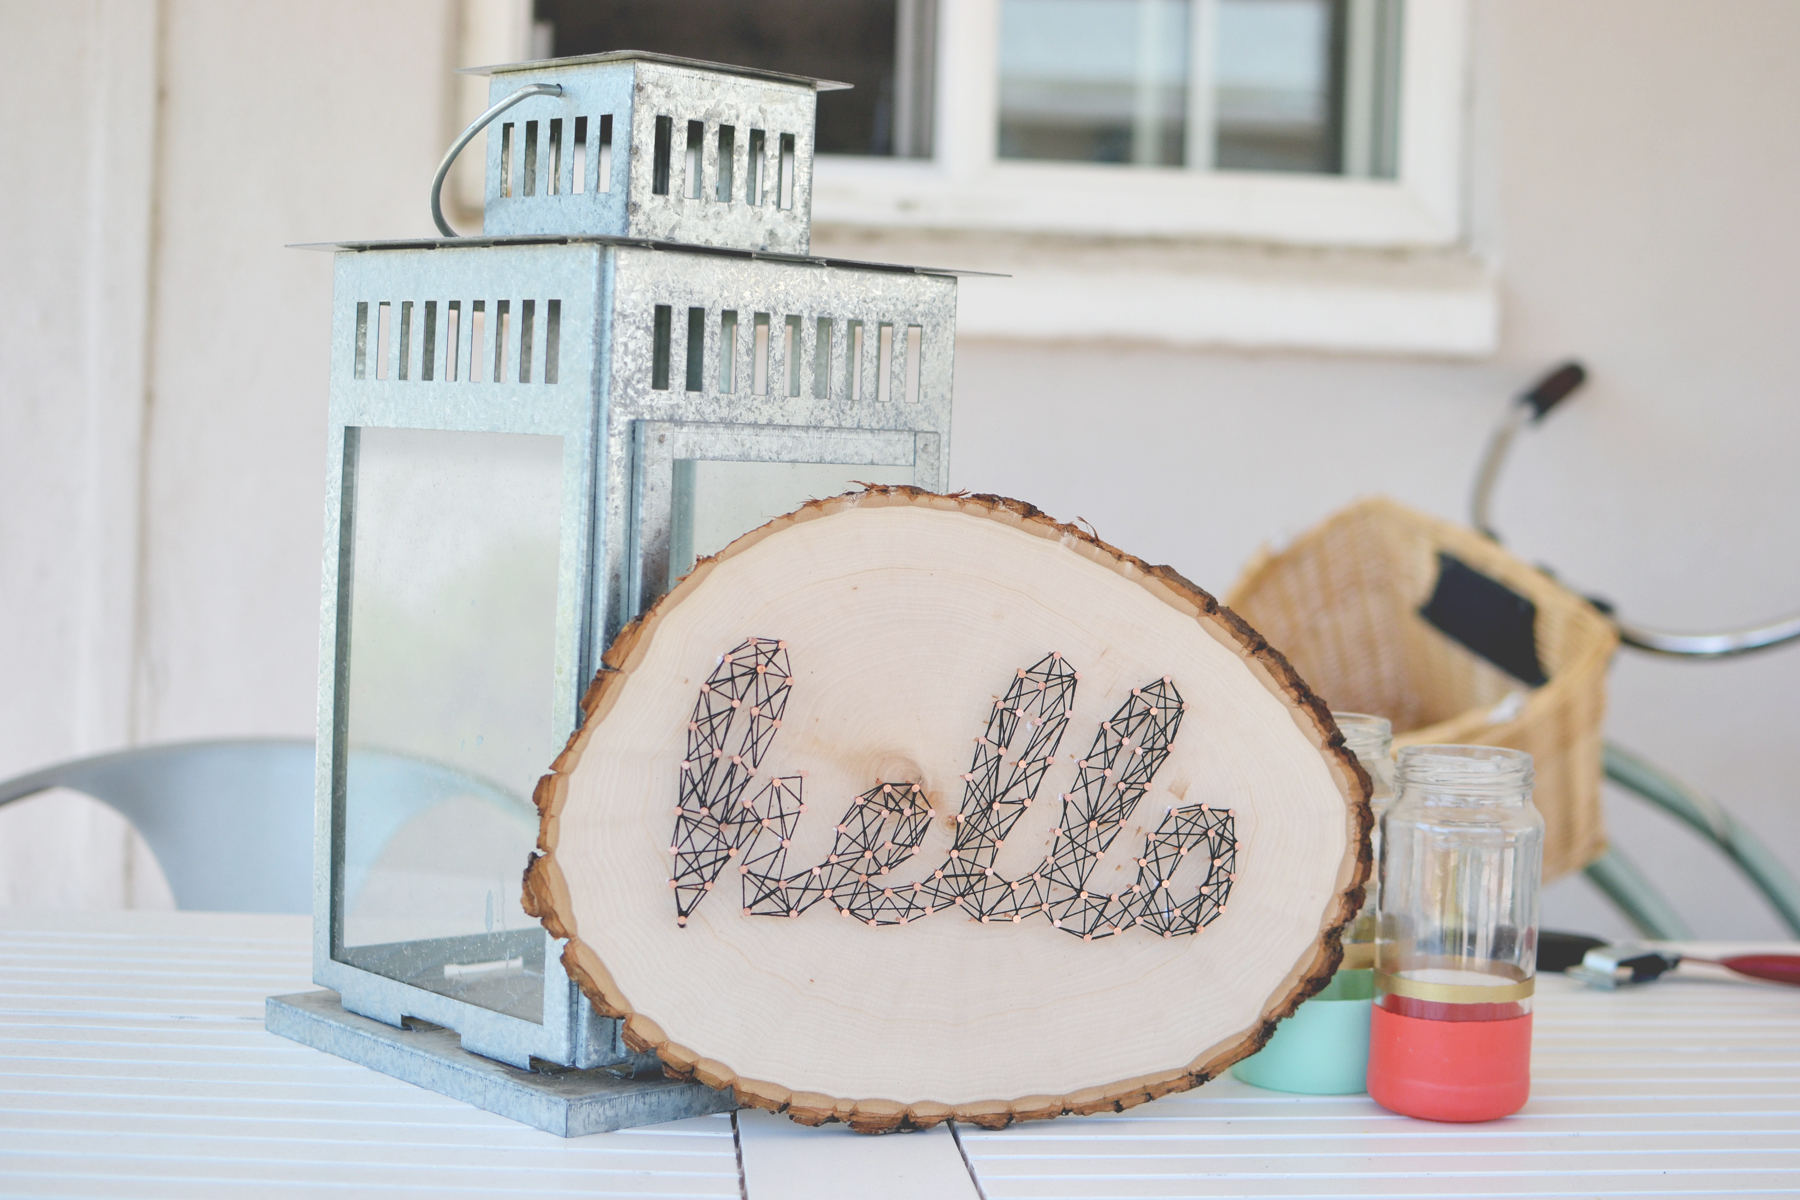
String art is popping up in a lot of different places lately. It first became popular as decorative art in the late 60′s, but I love the modern twists on it these days. This simple craft can easily be customized to make unique art for your home. If for some reason you don’t feel like tackling this project on your own, you can purchase the one I made in the video on my Etsy Store. But I would really love to see what you all create, so instagram a photo and tag @likehearted!
Also, want to send a thank you to The Gentlemen Ether for new music in the video!
Other creative ways to utilize the craft: decorative signage for a wedding, table numbers or even a name sign for a nursery.
Make a template on your computer of the word or shape you plan on using. I downloaded Pacifico and made the template in a word doc using a font size of 375.
Cut out the template and align on wood board, use scotch tape to keep it in place.
Begin to outline the word/shape with nails, placing them about 1/2” apart.
To start threading tie one end of the string to a nail, then outline the word/shape. Wrapping around the nail head as you go.
Tear away the paper template.
Start wrapping the string around the nails creating a zigzag pattern. Continue to do this until you have filled in the entire word/shape.
Anyone else watch the Academy Country Music awards last night? Carrie Underwood’s makeup that she wore during her performance was perfection, classic red lips with big full lashes. As part of my Beauty Series, I’m excited to show you how you can get the perfect false eyelashes in just 3 minutes, pair this with the red lips and winged eyeliner tutorial to recreate Carrie’s look.
I love using the individual lashes, especially if you are a beginner they are easier to apply. For my look I used the Eylure Individual Lashes Combo Pack – 3 medium length lashes in the outer corners and 2 small length lashes in the middle (like the Jessica Alba picture).
Tip:If you have rounder eyes like me, focus the lashes on the outer corners to create length. If you have more almond shape eyes, place in the center, to create openness.
Mad Men has a new season premiering this Sunday and I couldn’t be more excited! It inspired me to do a series on beauty classics – red lips and winged eye liner. Red lips never go out of style but this season it’s all about a matte finish (just like how Christina Hendricks and Adele are wearing it). Also, try complementing the lip color with a red nail color that is 1 or 2 shades darker. Watch the video tutorial to learn how to keep those red lips lasting all night long.
Please SUBSCRIBE to the channel to see new videos every Friday- sign in with your gmail account and hit the “subscribe” button in the header. Share your comments below on other beauty, lifestyle or DIY tips you’d like to see!
Steps for Winged Eye Liner:
Start in the middle of the lid and draw your line to your outer corner. I did more of a subtle look, but you can extend the line out further for a more dramatic winged eyeliner.
Re-apply product to brush, starting the middle again and working your way to the inner corner.
Curl lashes and finish with coat of mascara.
Tips:
Make sure your elbow is on a steady surface.
Use a dashing method to draw the line and fill in the spots as you go.
Don’t start on the inner corner, you don’t know how much product is on the brush.
Steps for Long-Lasting Red Lips:
Fill in entire lips with liner.
Apply lipstick, pressing it into the lip, blend with a brush.
Blot with tissue.
Apply another layer of lipstick, pressing it into the lip.
Lightly dust on transparent powder (I used MAC’s translucent powder)
Apply another layer of lipstick and use liner to sharpen edges.
Tips:
Prep lips with a scrub, apply lip balm and let it set, do your normal foundation rountine, then wipe away excess lip balm before doing the steps above.
Skip steps 5-8 if using a long lasting lipstick like Covergirl lipperfection.
Add blush after you have applied the red lipstick.