DIY: Glitter Pumpkins

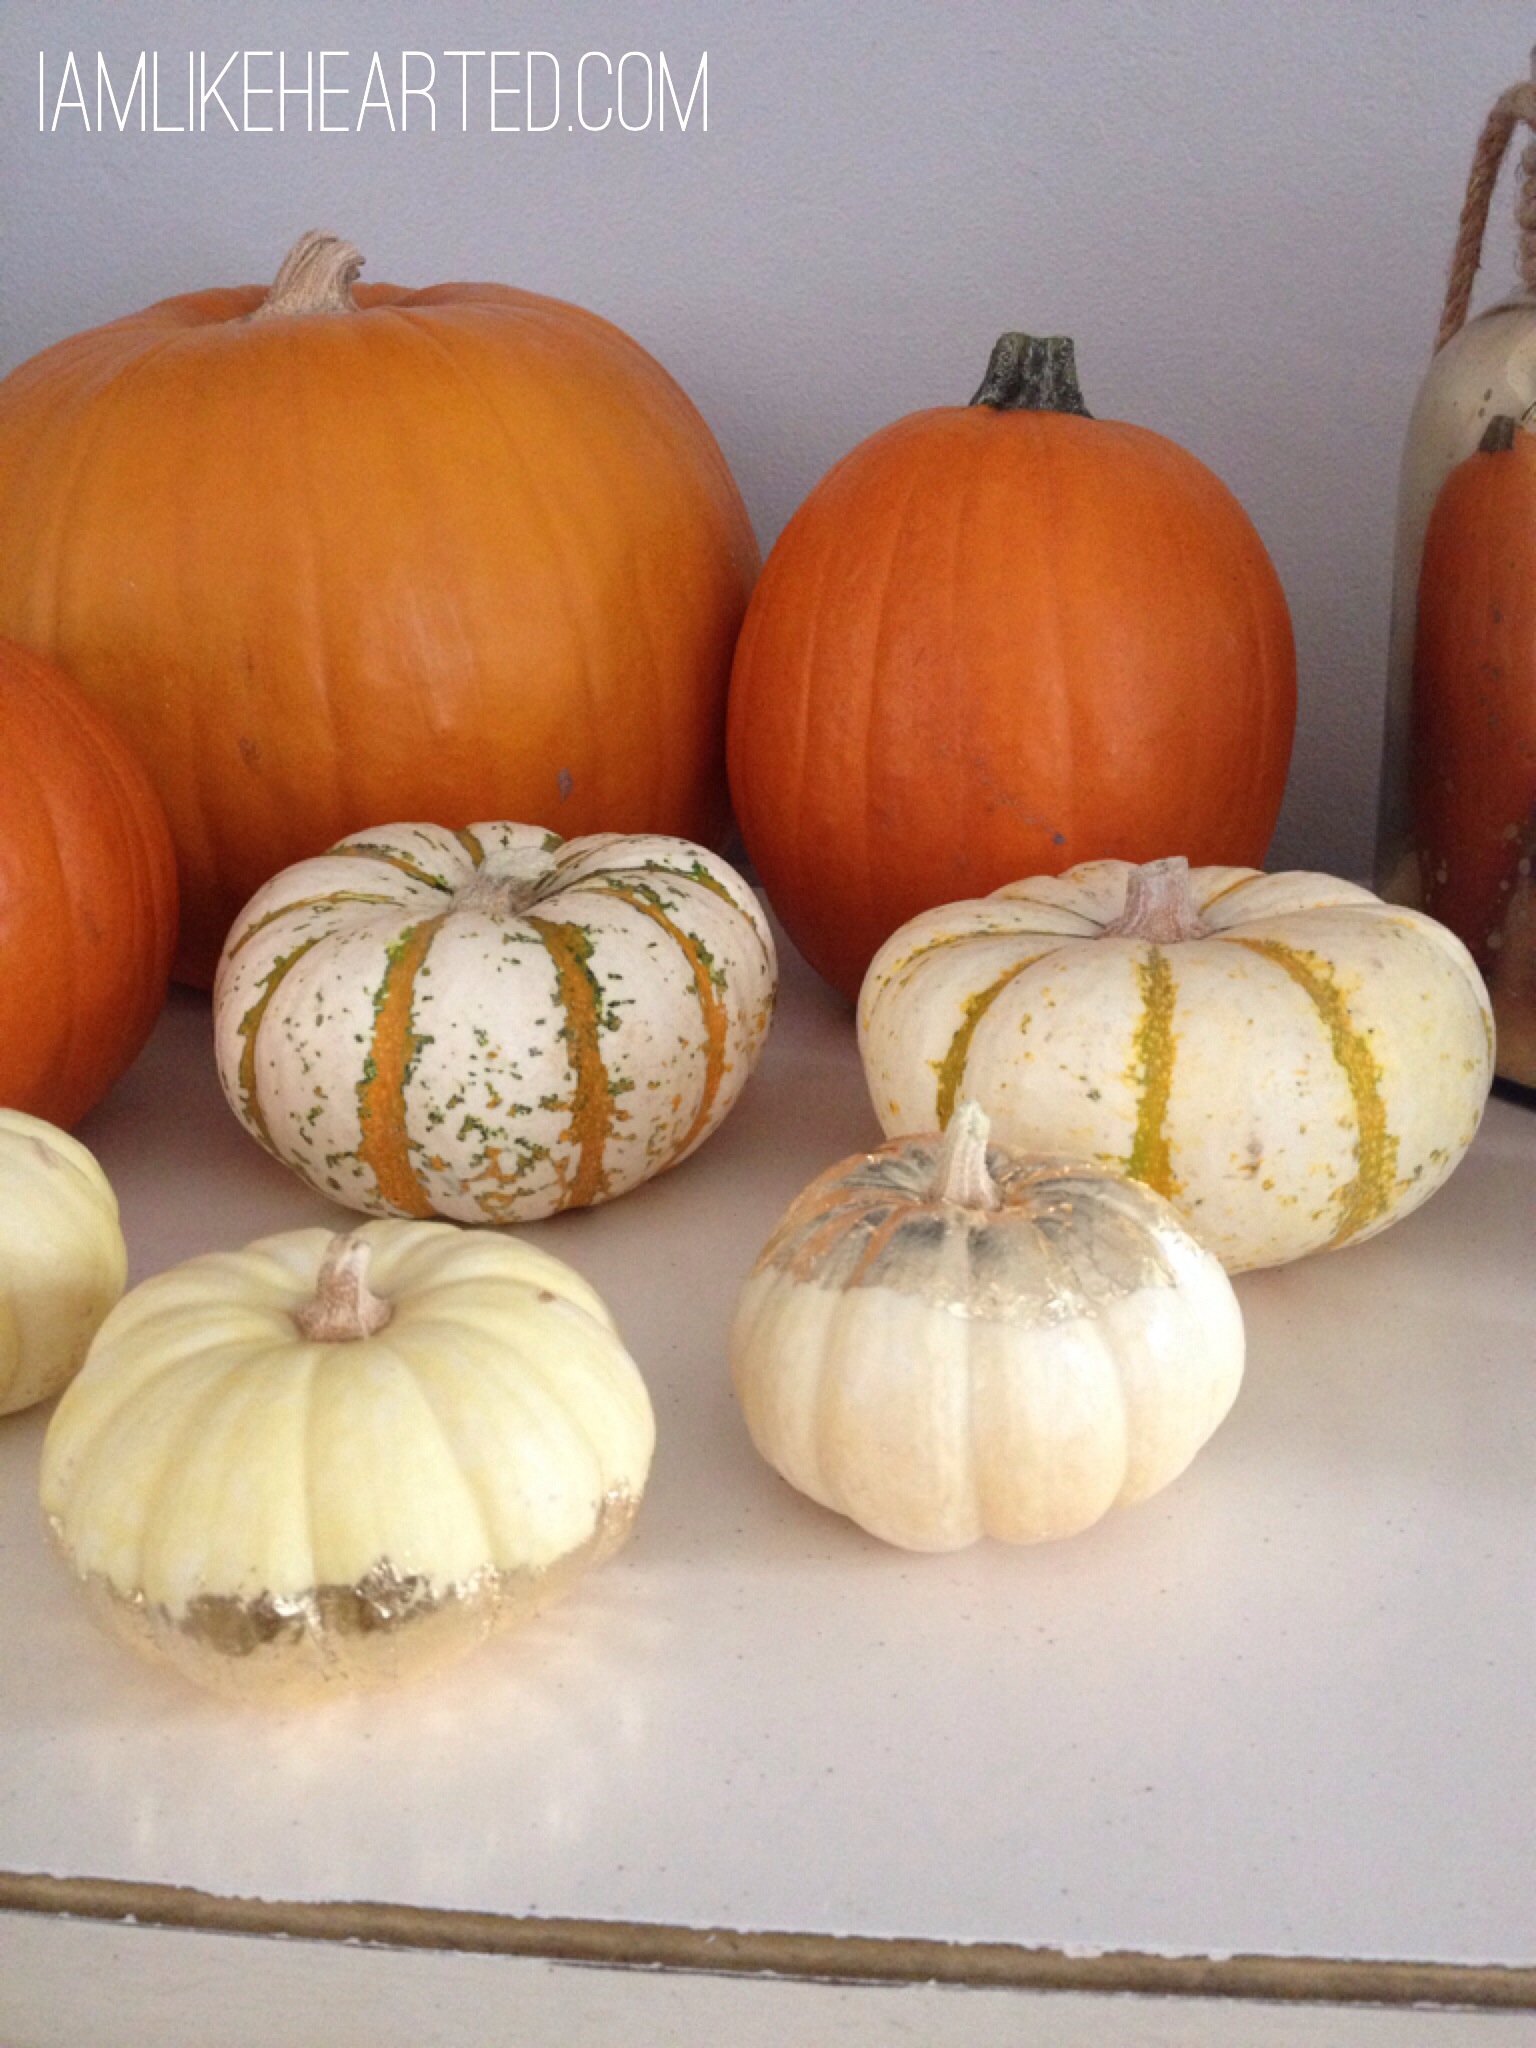
I’ve been on a bit of a hiatus but the holidays are making me jump right back into things! These glitter pumpkins are one of my favorite crafts to do for Fall. It’s a quick and easy craft for anyone who wants to add a little extra sparkle to their holiday decor. They also make for great last minute hostess gifts.

Check out the video for the tutorial!
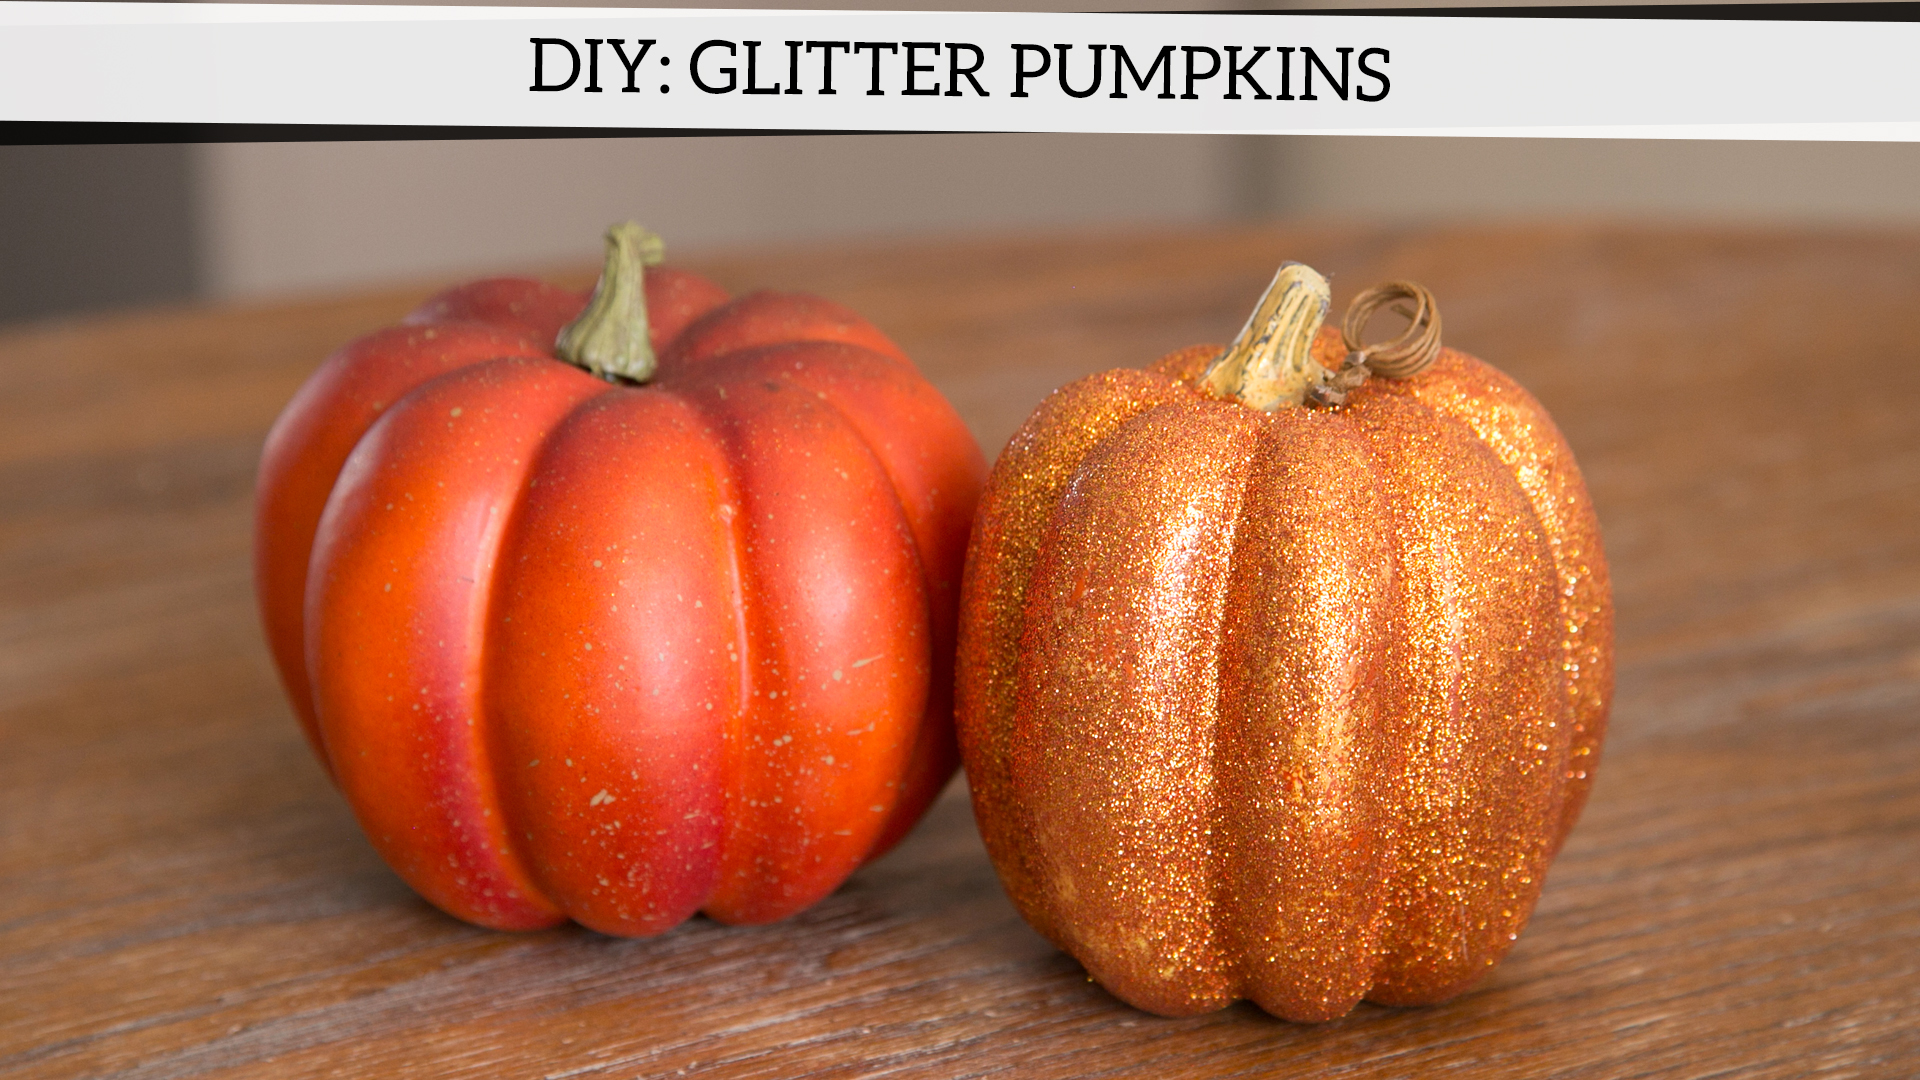
diy glitter pumpkins

Materials:

  • Mod Podge Glue
  • Glitter (use a fine texture one)
  • Mod Podge High-Gloss Sealer Spray
  • Paint Brush
  • Butcher paper or Newspaper to use for prepping the table

Have a wonderful Thanksgiving!

Advertisement

DIY: 3D Punch Out Artwork

What do you do with all those cards you receive throughout the year? Mine just get stored in a box. Do you store them or trash them? I decided to repurpose those cards and create some really special artwork. Learn all the details on how to make your own with this video. P.S. Sorry the music is a little loud!

20140121-210612.jpg

Martha Stewart Gilding Product Tutorial

I saw Martha Stewart Living post on their Instagram about this new gilding product and knew instantly I wanted to try it out. In the video, I added the gilding to a white bowl which I thought was a cute little piece to place jewelry in. I actually have the bowl by my kitchen sink so I can put my rings in it while I wash dishes. It’s a simple process and is perfect for adding the metallic look to home accessories or holiday decor. I couldn’t resist adding a little glam to my white pumkpins.

20131024-221708.jpg

DIY: “I Love You to the Moon & Back” Nursery Artwork

There is some major baby fever right now! I have eight friends due by the end of the year, that means tons of baby showers in my future. I always like to get something off of the registry and also include something personalized. This week I’ll show you how to create simple artwork for the saying “I Love You to the Moon & Back.”

The best part is I have curated a kit so that you can easily replicate this craft at home, purchase it here. You can use the kit to create the artwork yourself, or give it to the mom-to-be as a gift.

Tips:

  • Use stickers if you don’t want to hand write the saying.
  • Use a coffee can or bowl if you don’t have a compass.

Don’t forget to share your photos of the crafts you have done on Instagram and tag @likehearted!!

20130719-122943.jpg

DIY: Chevron Tray

I’m constantly looking for home decor accessories and believe this is the biggest challenge when it comes to styling any space. I saw this tray in its raw wood form and decided to transform it to fit the decor at my house. The tray serves a great piece to display jewelry and/or perfume. I’ve put together a kit of all the supplies I used so you can make this exact one at home, purchase it here. If you get the kit send me a pic of the finished product on instagram and tag @likehearted!

BUY THIS KIT:

DSC_0028

PaintedTrayDIY 

How to give cork board a face lift

Thank you to my cousin Courtney for requesting this DIY tutorial! Courtney is finishing up her freshman year of college in North Carolina and her friends are moving out of the dorms in May. She wanted to know some easy and inexpensive ways to decorate her new apartment. I think a lot of college students already own a cork board, so in this video I’ll show you a few ideas on how to give it a face lift with paint, fabric and rope.

Leave a comment below or post a photo on instagram and tag @likehearted to show other ways you have re-purposed your cork board.

PIN IT!

How to Graywash Furniture

I have a ranch style house and the decor can be described as modern rustic, with the primary colors being gray and white. I love Restoration Hardware, but it is totally out of my budget, so I mostly refer to the store for just inspiration. A lot of their living and dining pieces come in a Grey Acacia Finish (pictured below) and since I enjoy refinishing furniture I tried to take a stab at recreating the RH look. I think it is a handy painting technique to know how to do if you like rustic, shabby chic, vintage styles.

Restoration Hardware Inspiration

The best part about the graywash technique is that it can be used on any type of wood furniture. In the video I did it on a frame to create accessory displays. I’ll do another post of how to create the accessory displays with chicken wire or twine.

Materials:

Tools:

Steps:

  1. If needed sand the frame to take away any varnish.

  2. To create the graywash – mix together 1 part gray paint and 1 part glaze.

  3. Use a bristle (chip) brush apply the gray paint to the frame. Use a different dry bristle (chip) brush to remove excess paint. Keeping with the rustic look the paint doesn’t need to fully cover the frame, just depends on how much of the oak wood you want to show through. Personally, I didn’t want much of the light wood to show through. Let is dry and apply second layer if needed.

  4. To really create the weathered look add a white glaze mixture: mix 1 part white paint to 1/4 part glaze. Using your regular paint brush paint on the white glaze mixture then remove excess with a damp rag. Continue this process until you achieve your desired look.

Graywash Steps

A new favorite…

Whenever I see the Martha Stewart’s name on anything, I’m drawn in like a moth to the flame…so while shopping at Home Depot I spotted Martha’s new line of special finish paints and immediately had to figure out what to use the paint on. Good thing I’m knees deep in DIY projects since buying the house.  The paint comes in a variety of finishes  including metallic glaze, glitter, textured metallic, terra cotta, crackle, etc. Available at The Home Depot, $5.48-8.98 for a 10oz. I used the Metallic Paint in Vintage Gold.

20120314-225955.jpg

20120314-230004.jpg

Weekend Warrior Project # 2 – Mirror

I’m working on decorating my guest bedroom and decided to make a vanity out of my current desk (making a new desk for my office will be another weekend project). I needed a mirror and scored another great find at my favorite antique store. Purchased this mirror for only $40!

BEFORE: Sorry I didn’t take a better before shot!


AFTER: I wasn’t in love with the oak finish so I decided it needed a face lift.

20120314-225817.jpg


Here is how I did it:

  • I used painter’s tape (the blue colored kind) and kraft paper to cover the mirror edges.
  • I primed the entire mirror with Rust-Oleum Painter’s Touch Ultra Cover 2x Coverage Primer. Again let me stress, if you haven’t been using this paint to refinish things then I highly suggest you start using it. It’s a spray can, paint and primer in one so it cuts your project time in half!
  • The color is Martha Stewart Specialty Paint in Vintage Gold, which I painted on using a regular paint brush. This needed about 3 coats of paint.
  • Total cost of the project: $46