Nothing can go wrong with a drink that has both bubbles and whiskey, right? If you are hosting New Year’s Eve your guests will not be disappointed. If you are attending as a guest bring the mixings (shopping list below) and be the life of the party. Check out the video for steps on how to create the perfect New Year’s Eve Cocktail!
Wishing you all a healthy and happy new year!!
Ingredients:
3-4 Blackberries (Raspberries or blueberries can be used as alternatives)
Drop of Agave Nectar
1 oz Whiskey
Prosecco (I know I ended up using Proscecco instead of Champagne but really any bubbles will do!)
These delicious cake pops are much easier to make than they look. I promise you no one will have just one. I figured about 4 cake pops equal 1 cupcake, so don’t feel so bad when you go for seconds, or thirds….right!?!
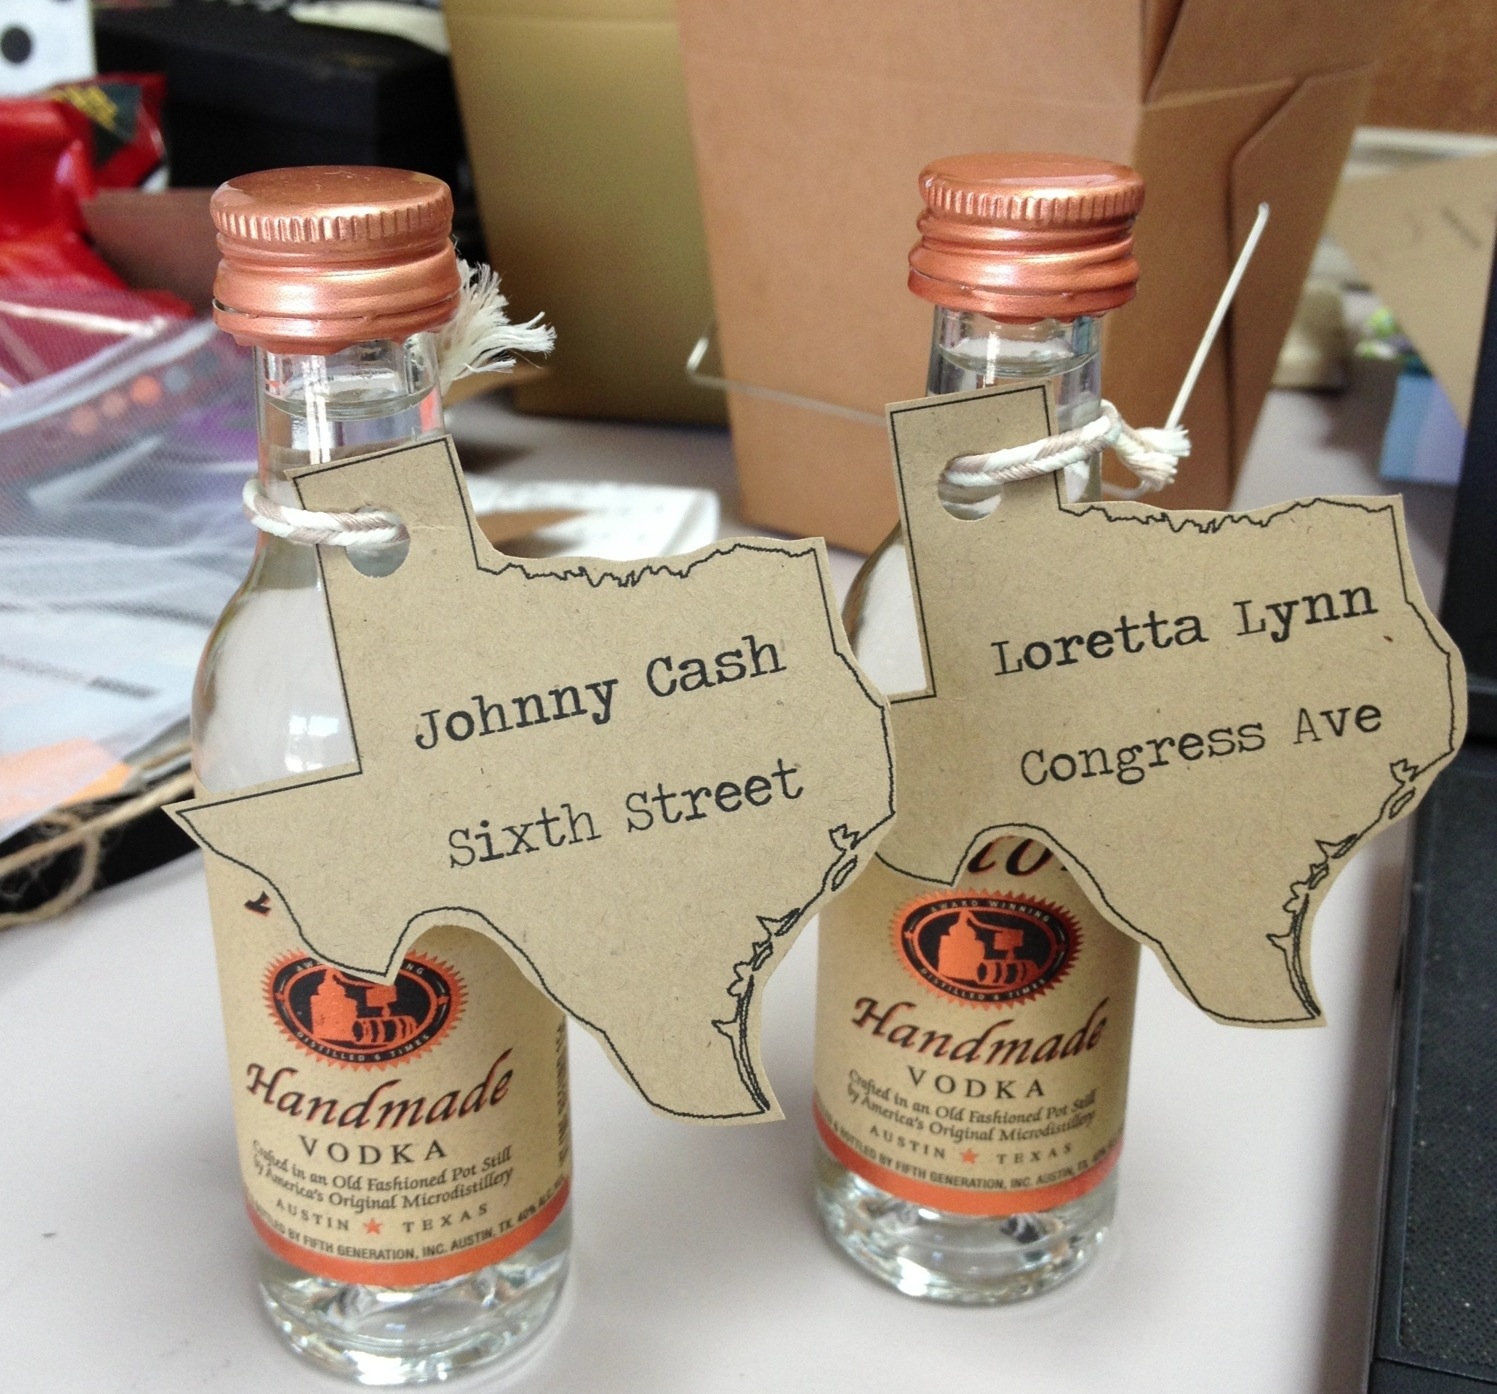
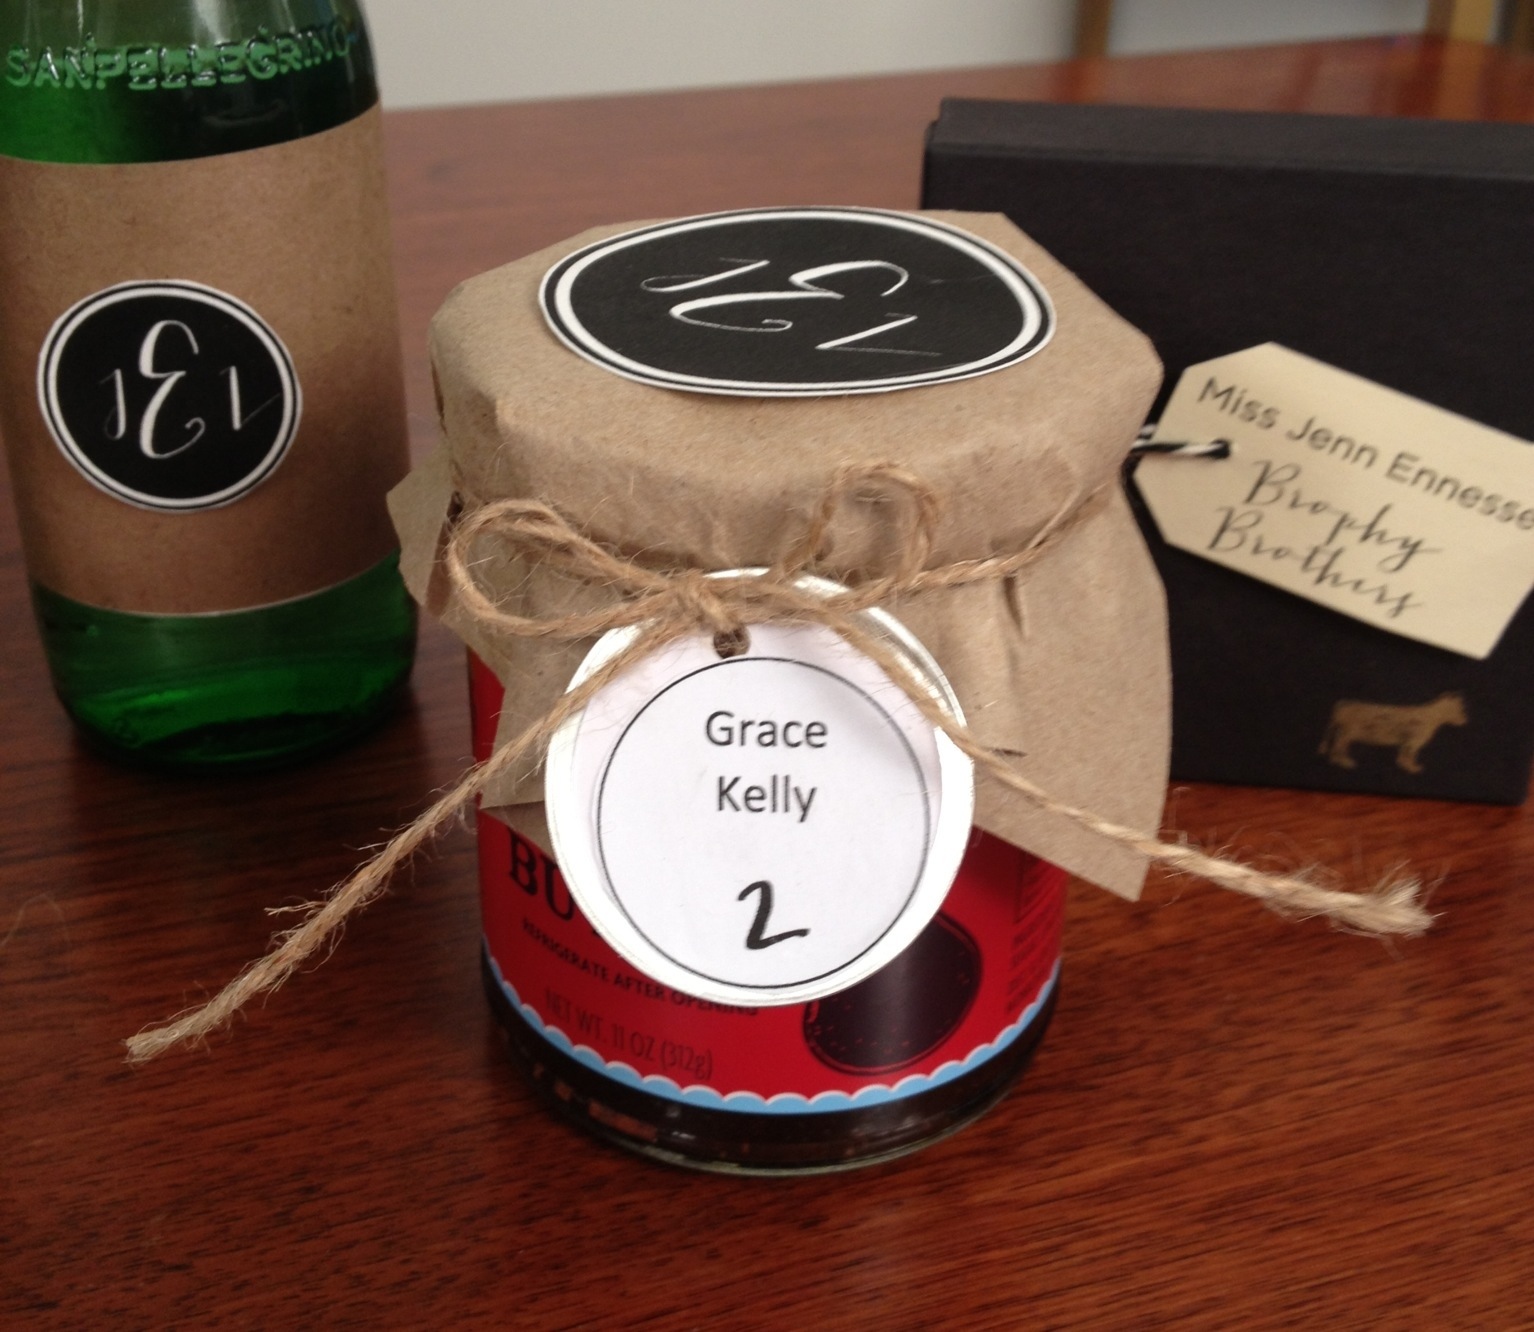
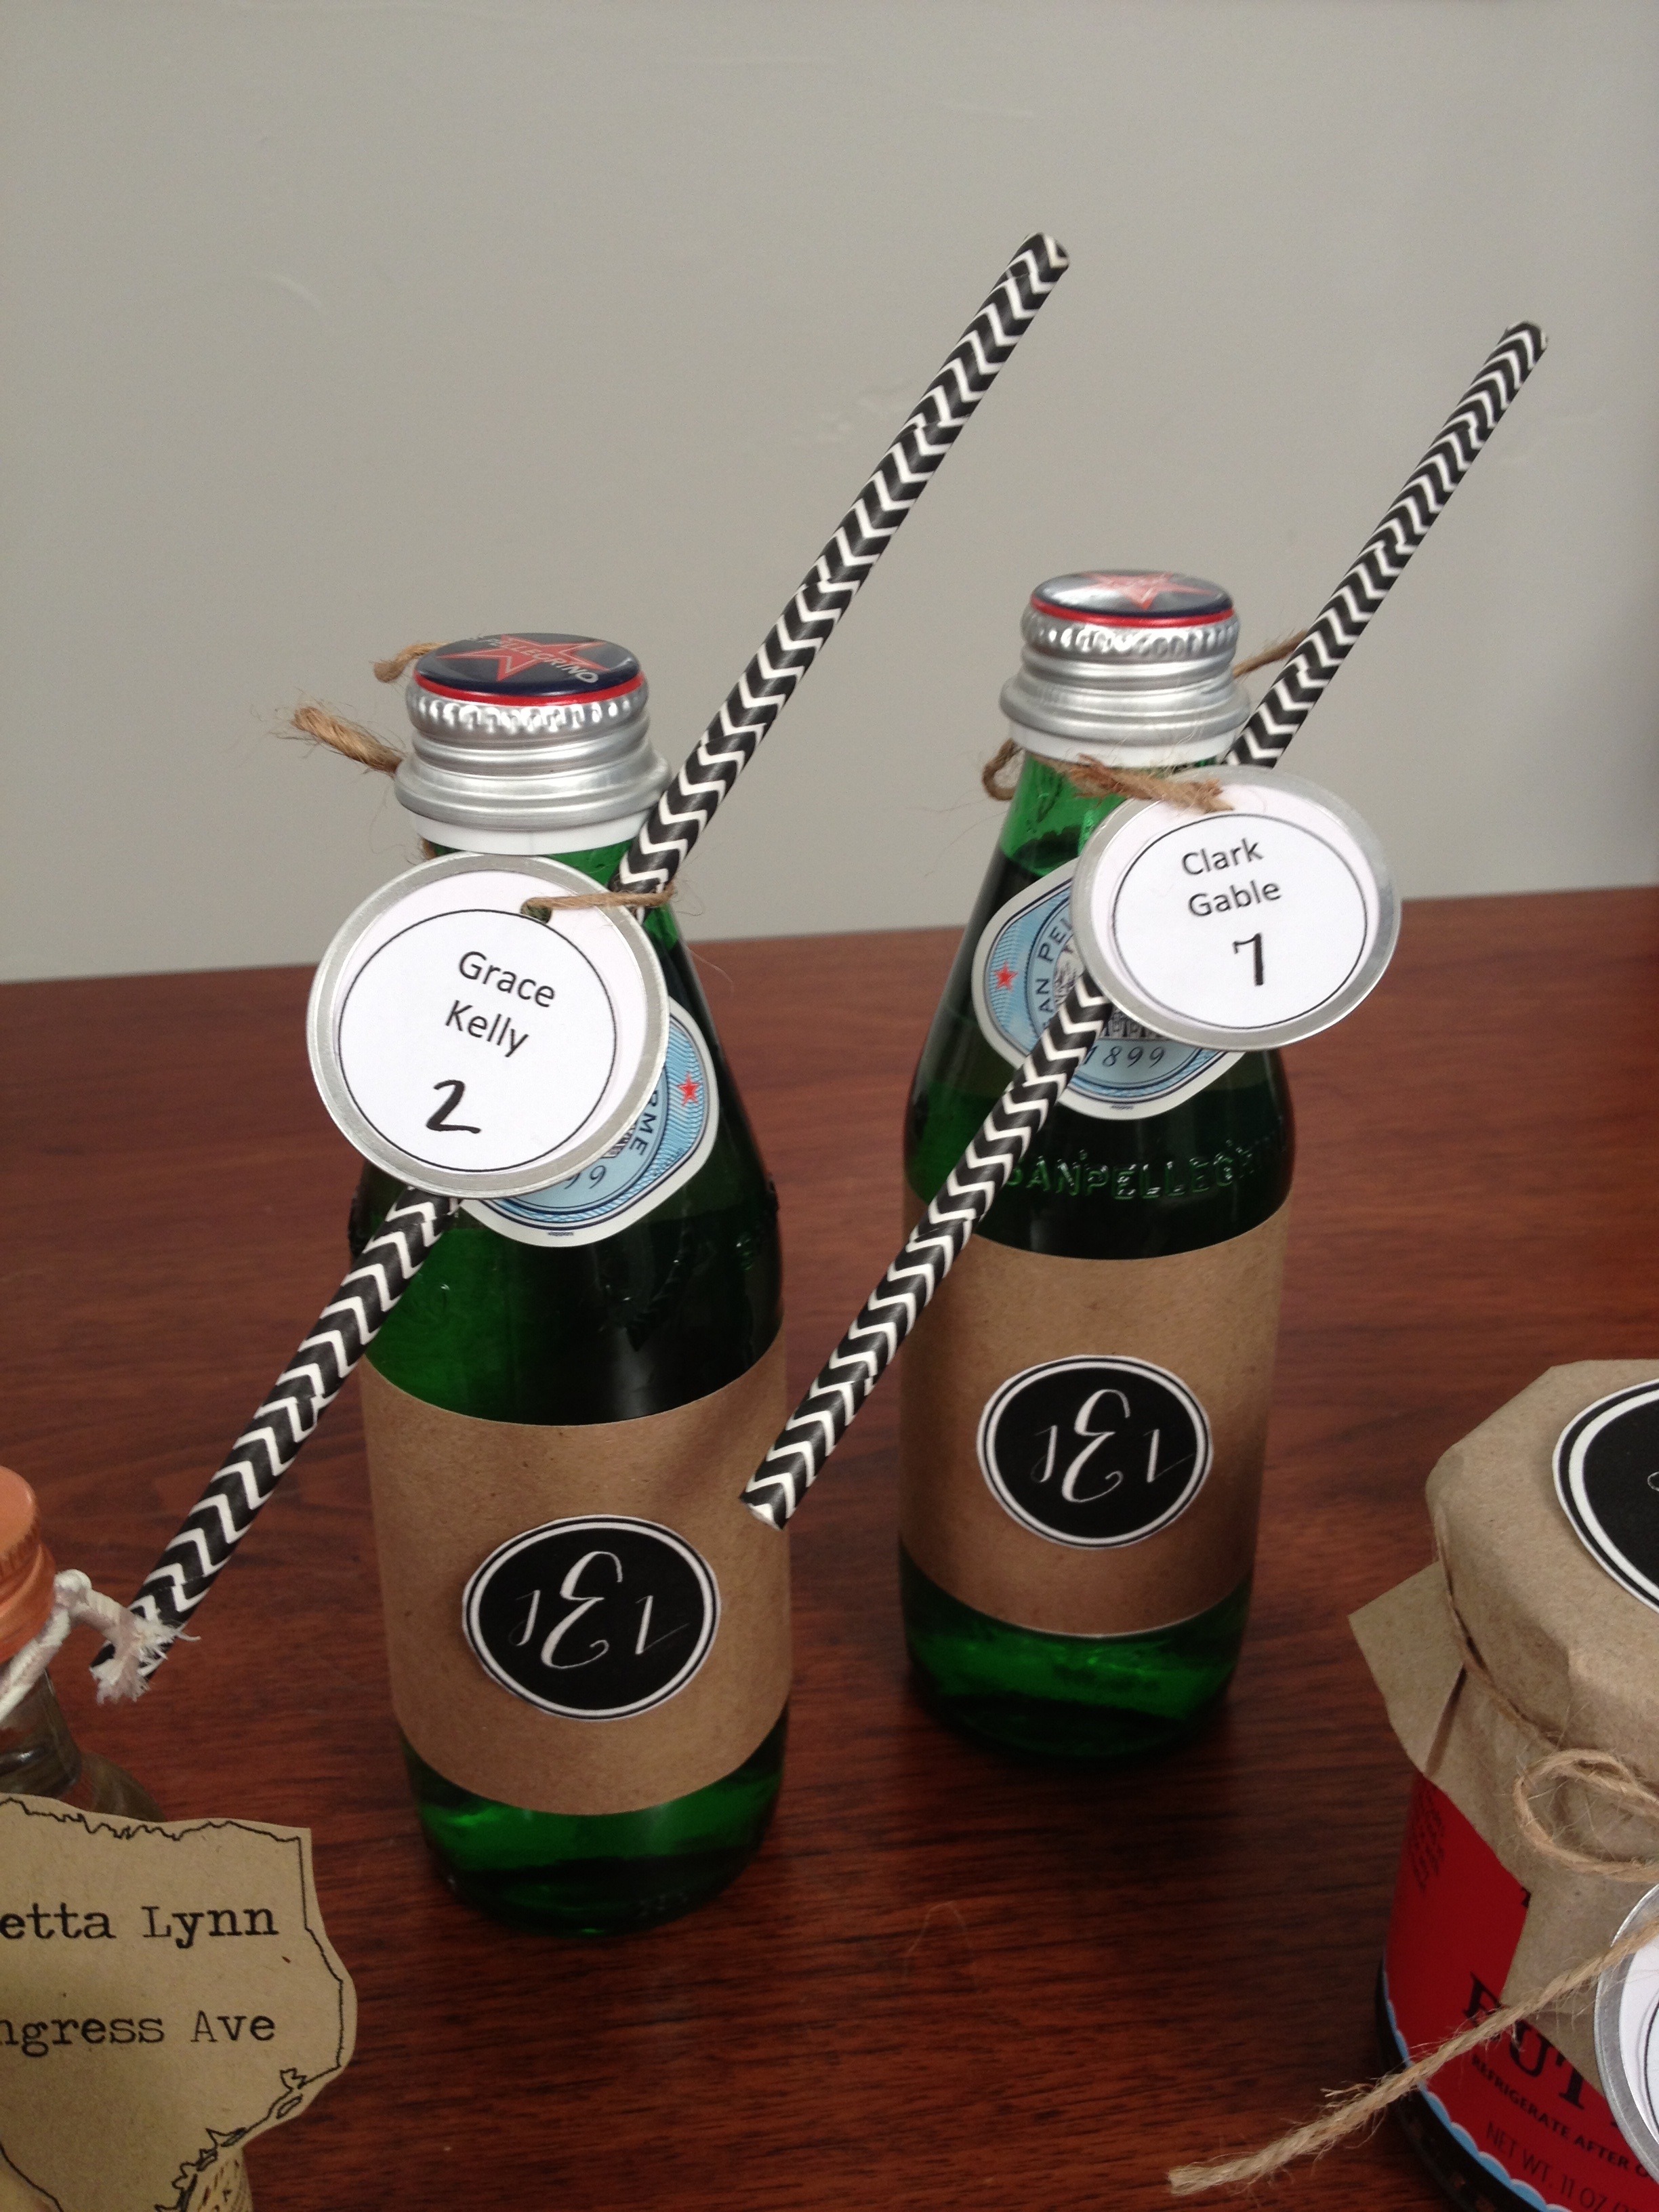
Keeping with the theme on trying to make weddings greener and not having a lot of paper waste, I really like the idea of doing “double duty” escort cards. The concept is to combine your escort cards and favors into one takeaway. These also work well for groomsmen or bridesmaids gifts, favors at bridal showers or name cards at dinner parties. Check out the video for additional ideas and have you subscribe to the YouTube channel yet? A new video posts every Friday!
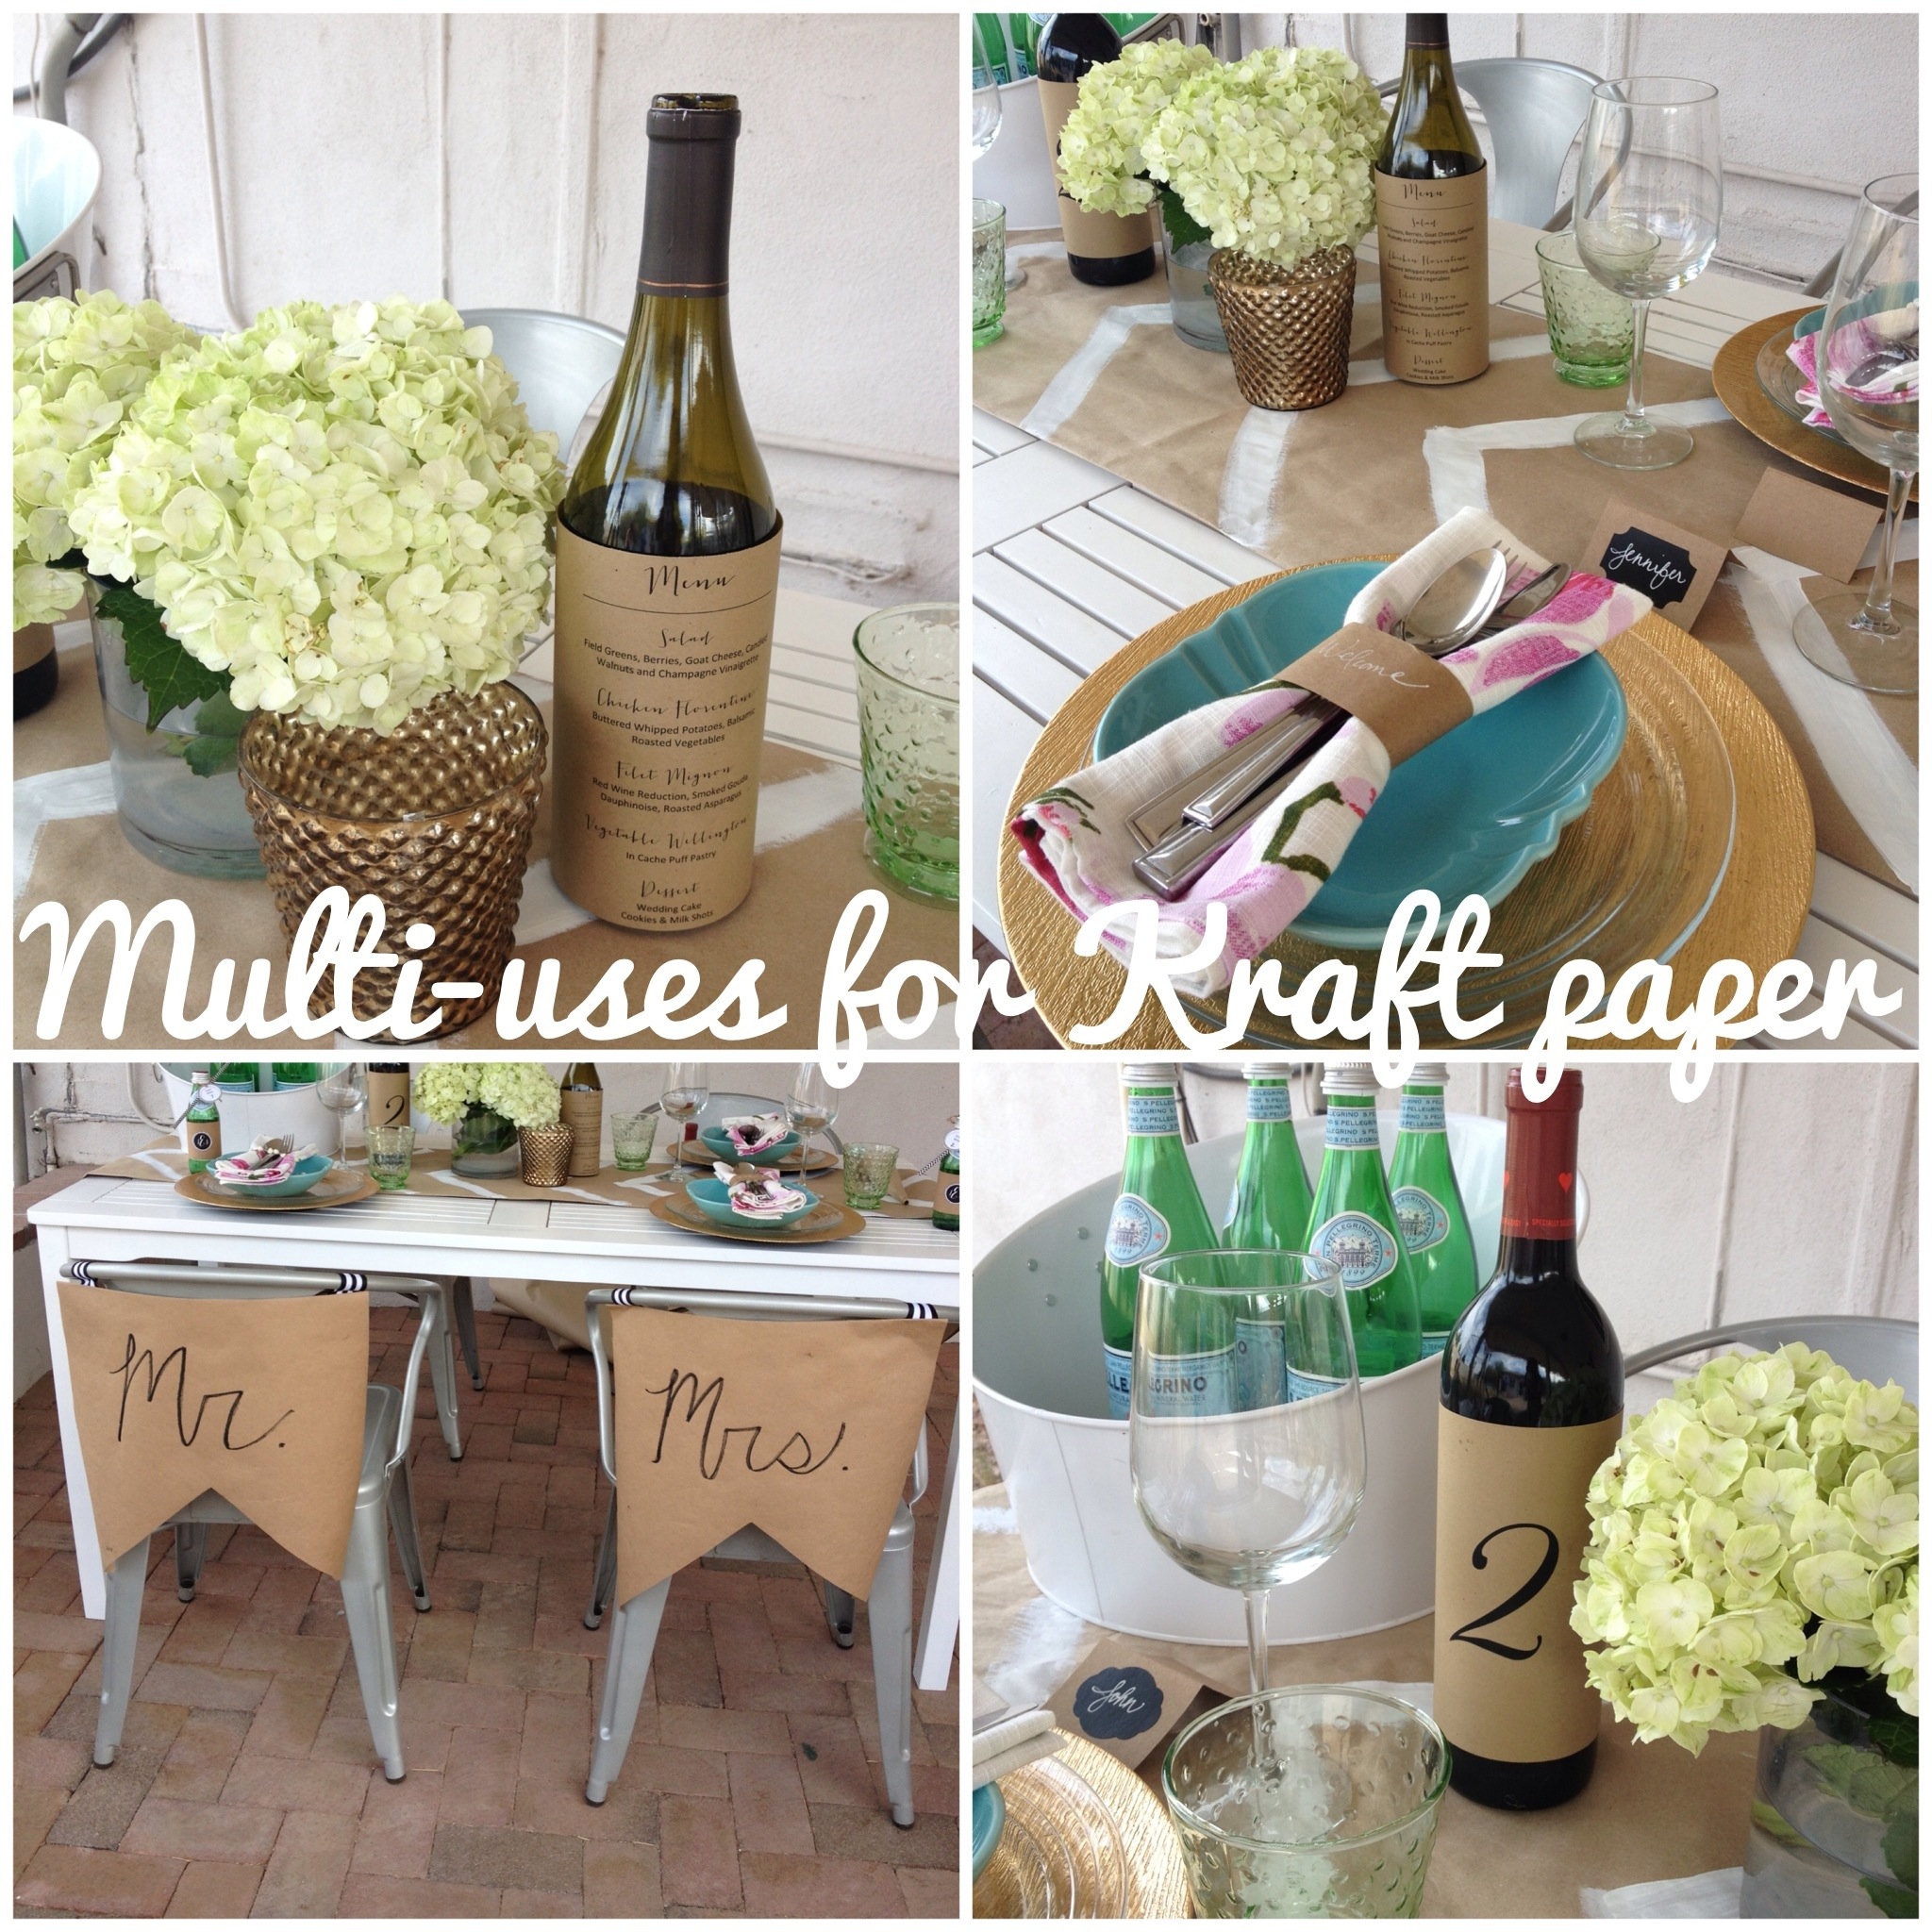
Can you believe it’s June 1st already? I know I say this every year but I really mean it, time is flying by! Summer is rolling in and outdoor entertaining is ramping up. To keep things simple, I wanted to share some ideas on easy ways to style your summer event with Kraft paper. The best thing about Kraft paper is that it has multiple uses, is inexpensive (I picked up my roll at the Dollar Store), easy to clean-up and recyclable. Check out the video for different uses which include wrapping wine bottles with your menus, creating custom napkin ring holders or a painted table runner.
Get more inspiration and places to purchase kraft items by checking out my Pinterest board.
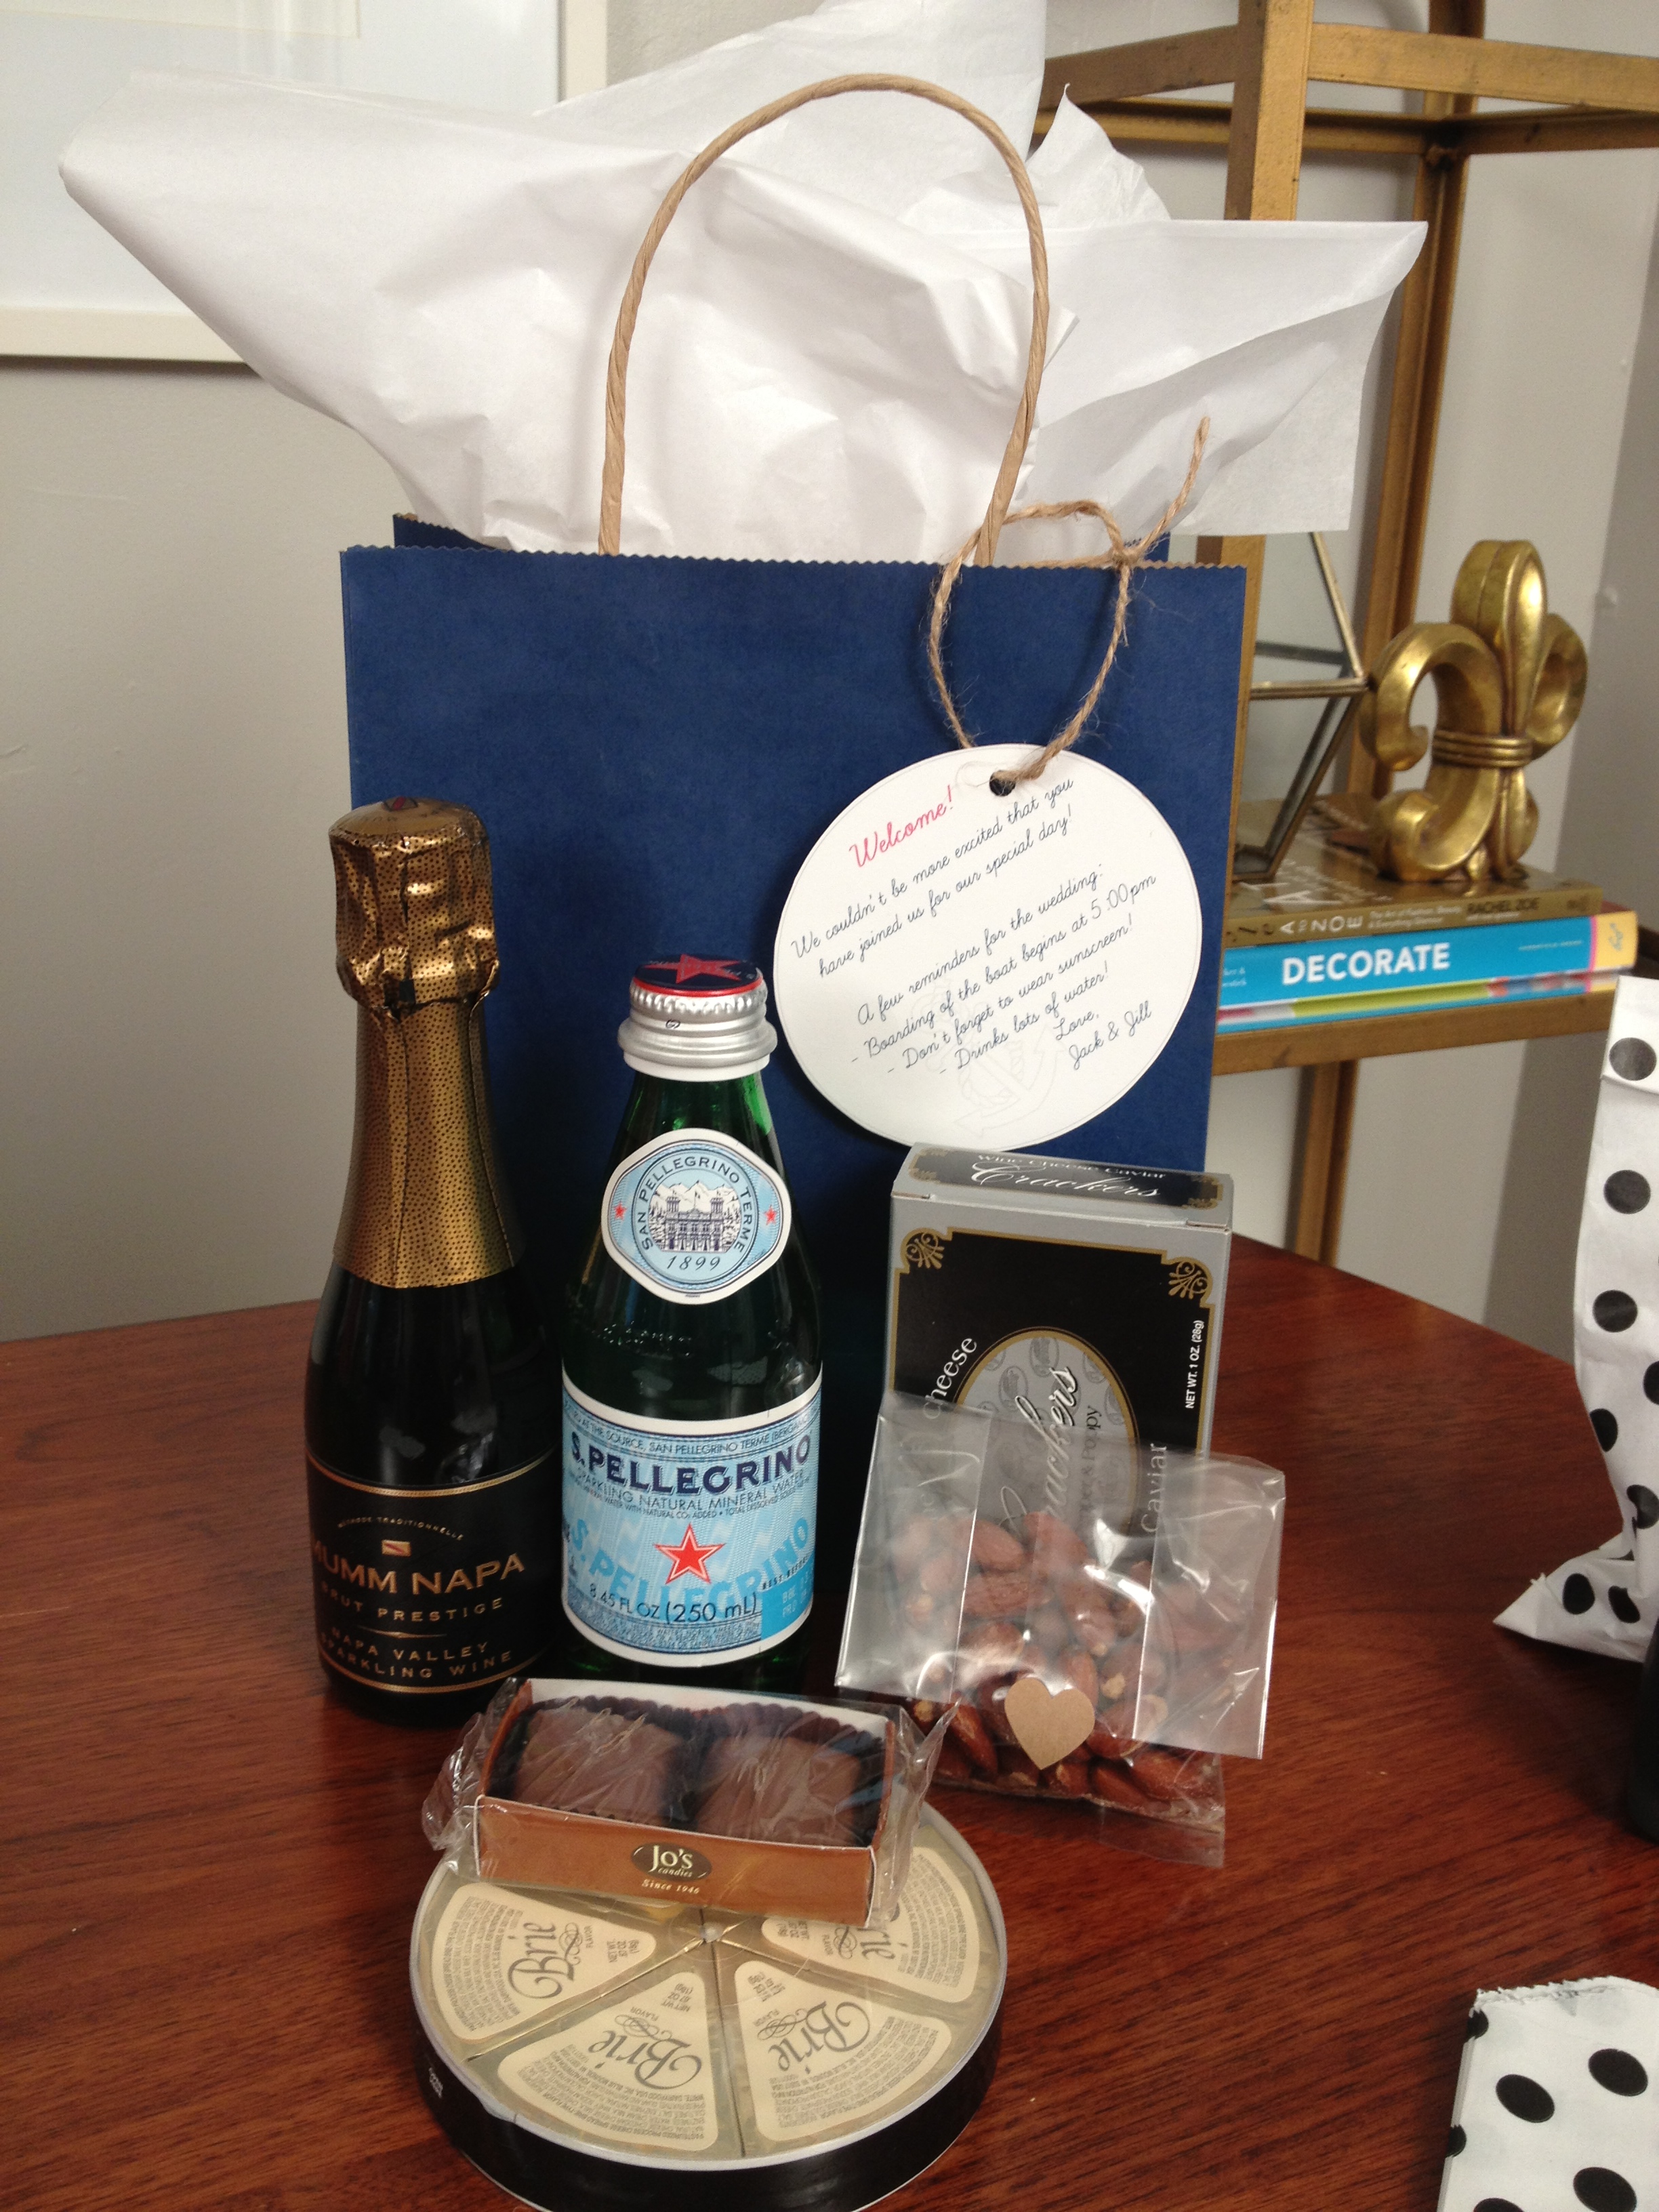
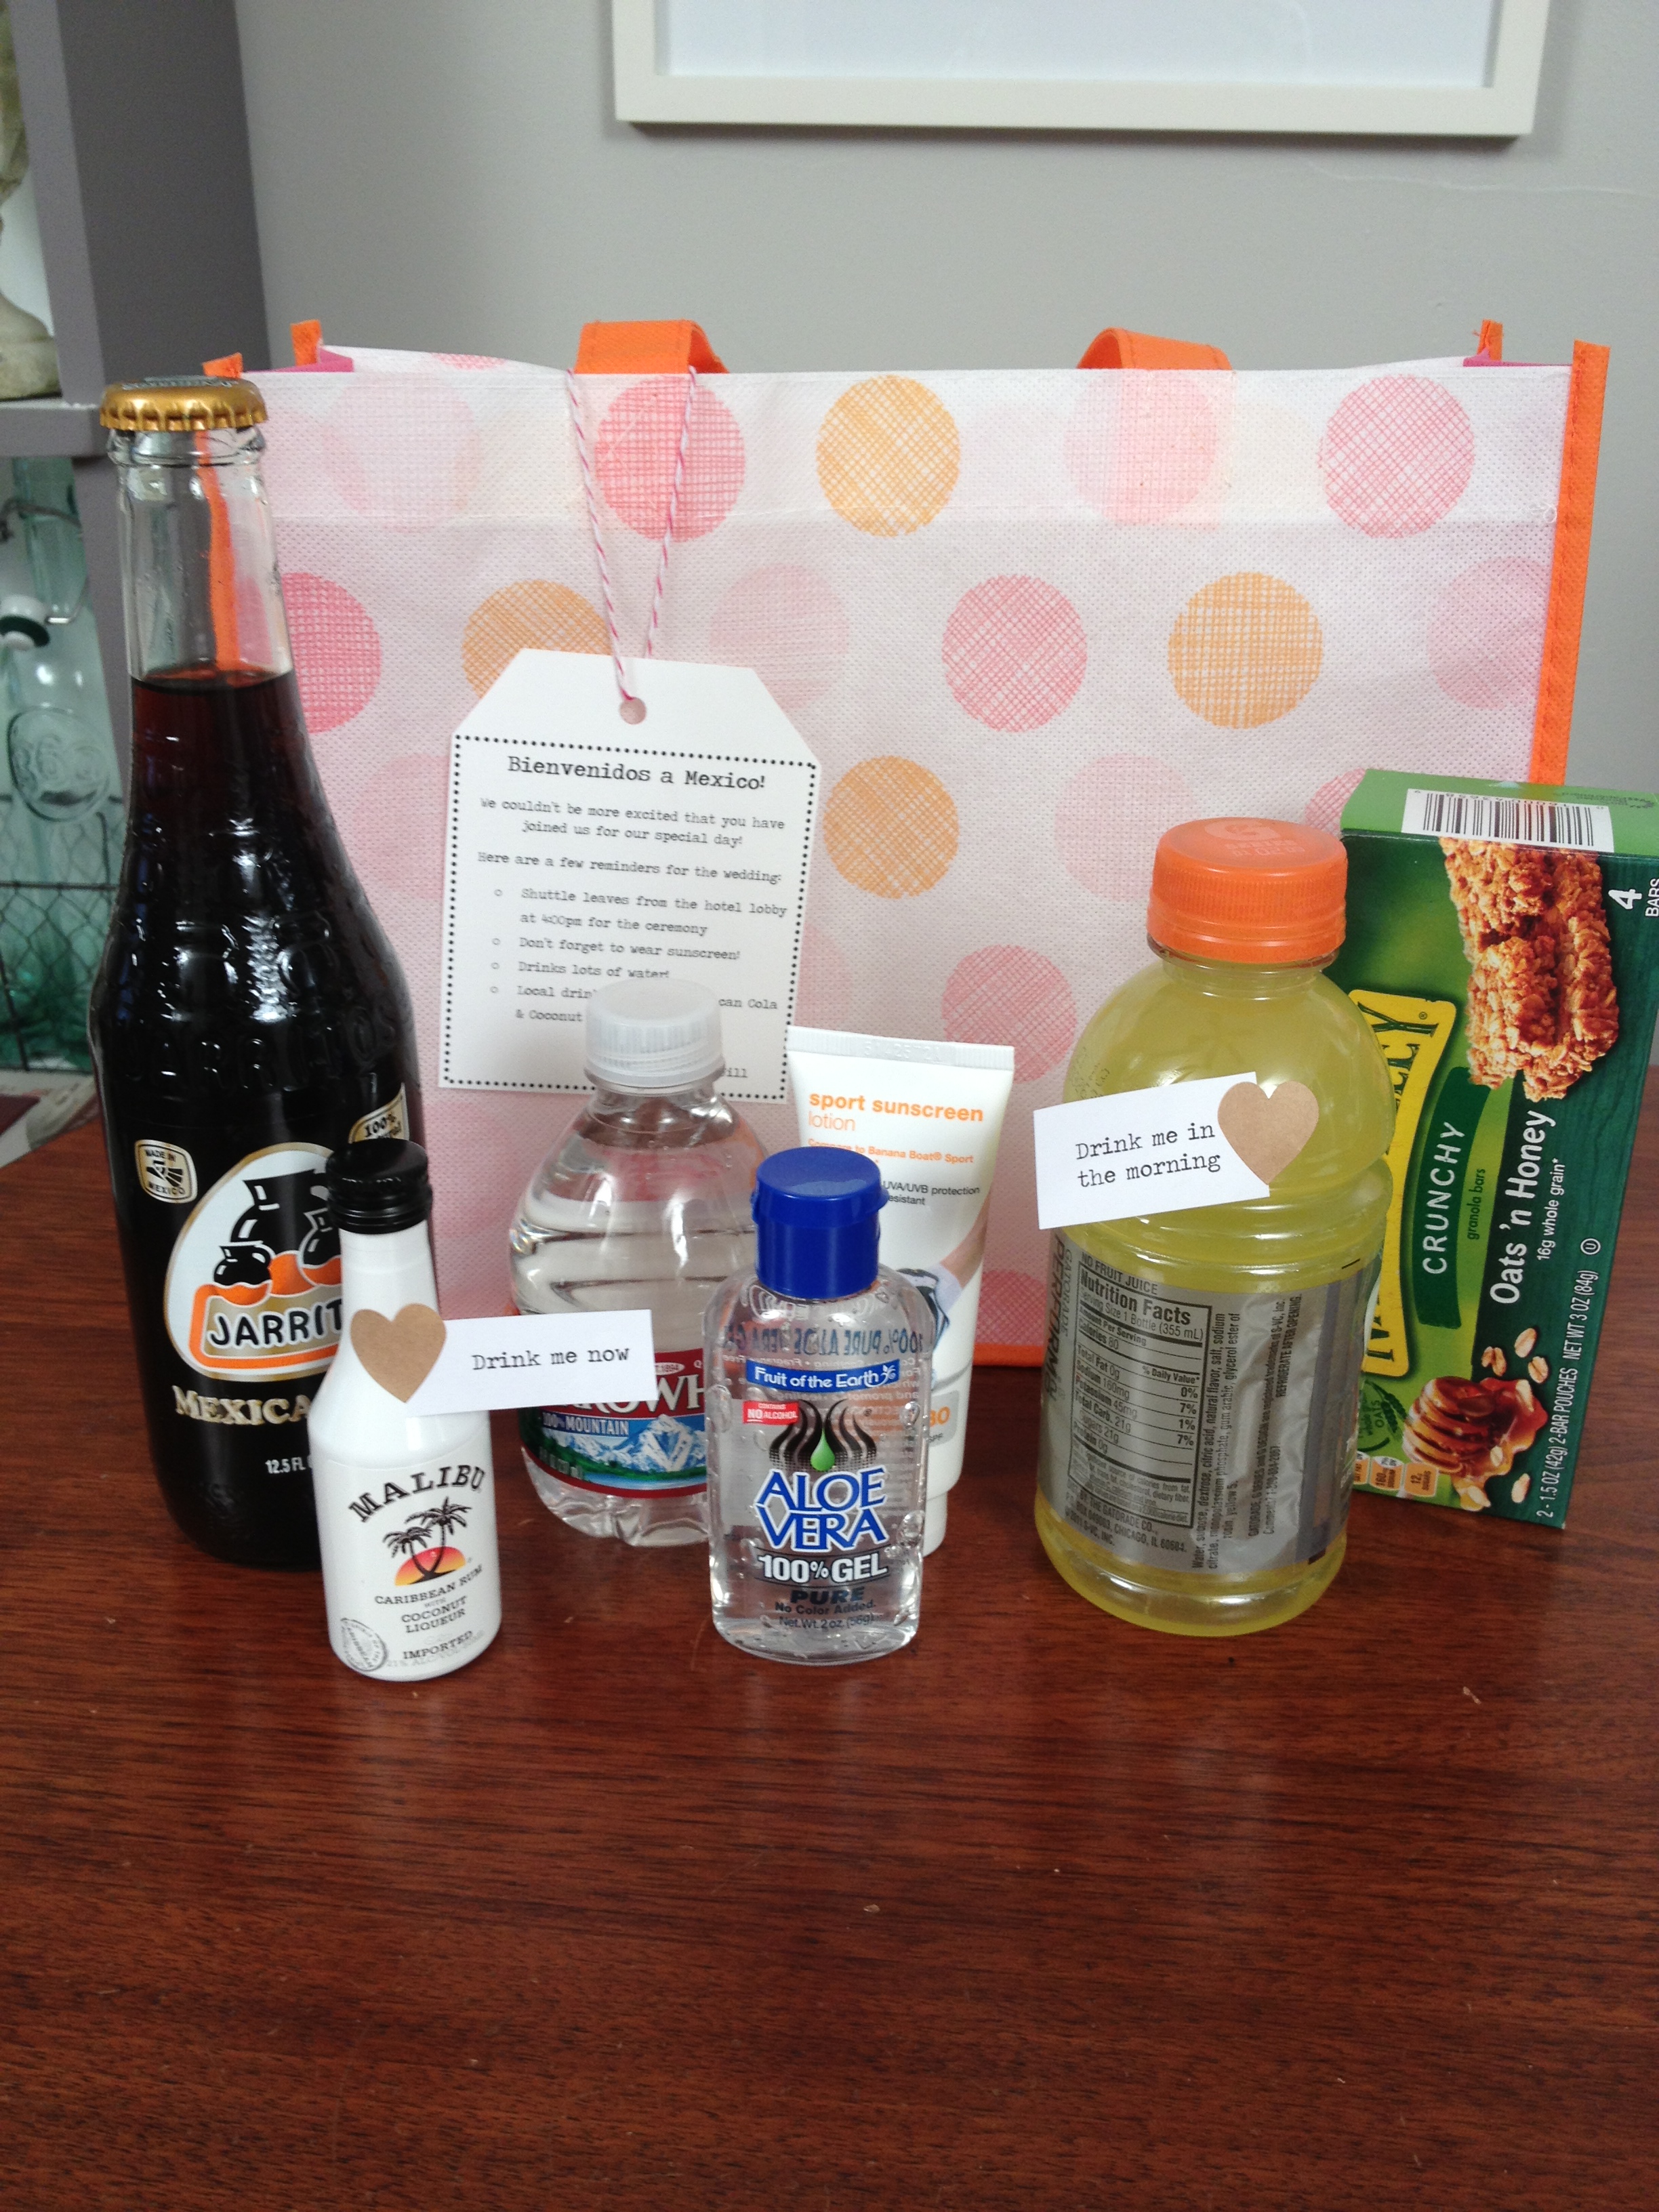
I can’t think of a better way to thank guests for sharing in your big day then to create a welcome bag upon their arrival. This week’s video will show you some easy ways to customize the bags based on your wedding’s theme or destination.
Tip: Include specific notes for your guests such as a weekend itinerary, area attractions, transportation details or other visitor information.
Resources:
Target – $1 section for toiletries
World Market – miniature versions of food and drinks
I got some requests to do more wedding DIY tutorials and I was super happy to comply!
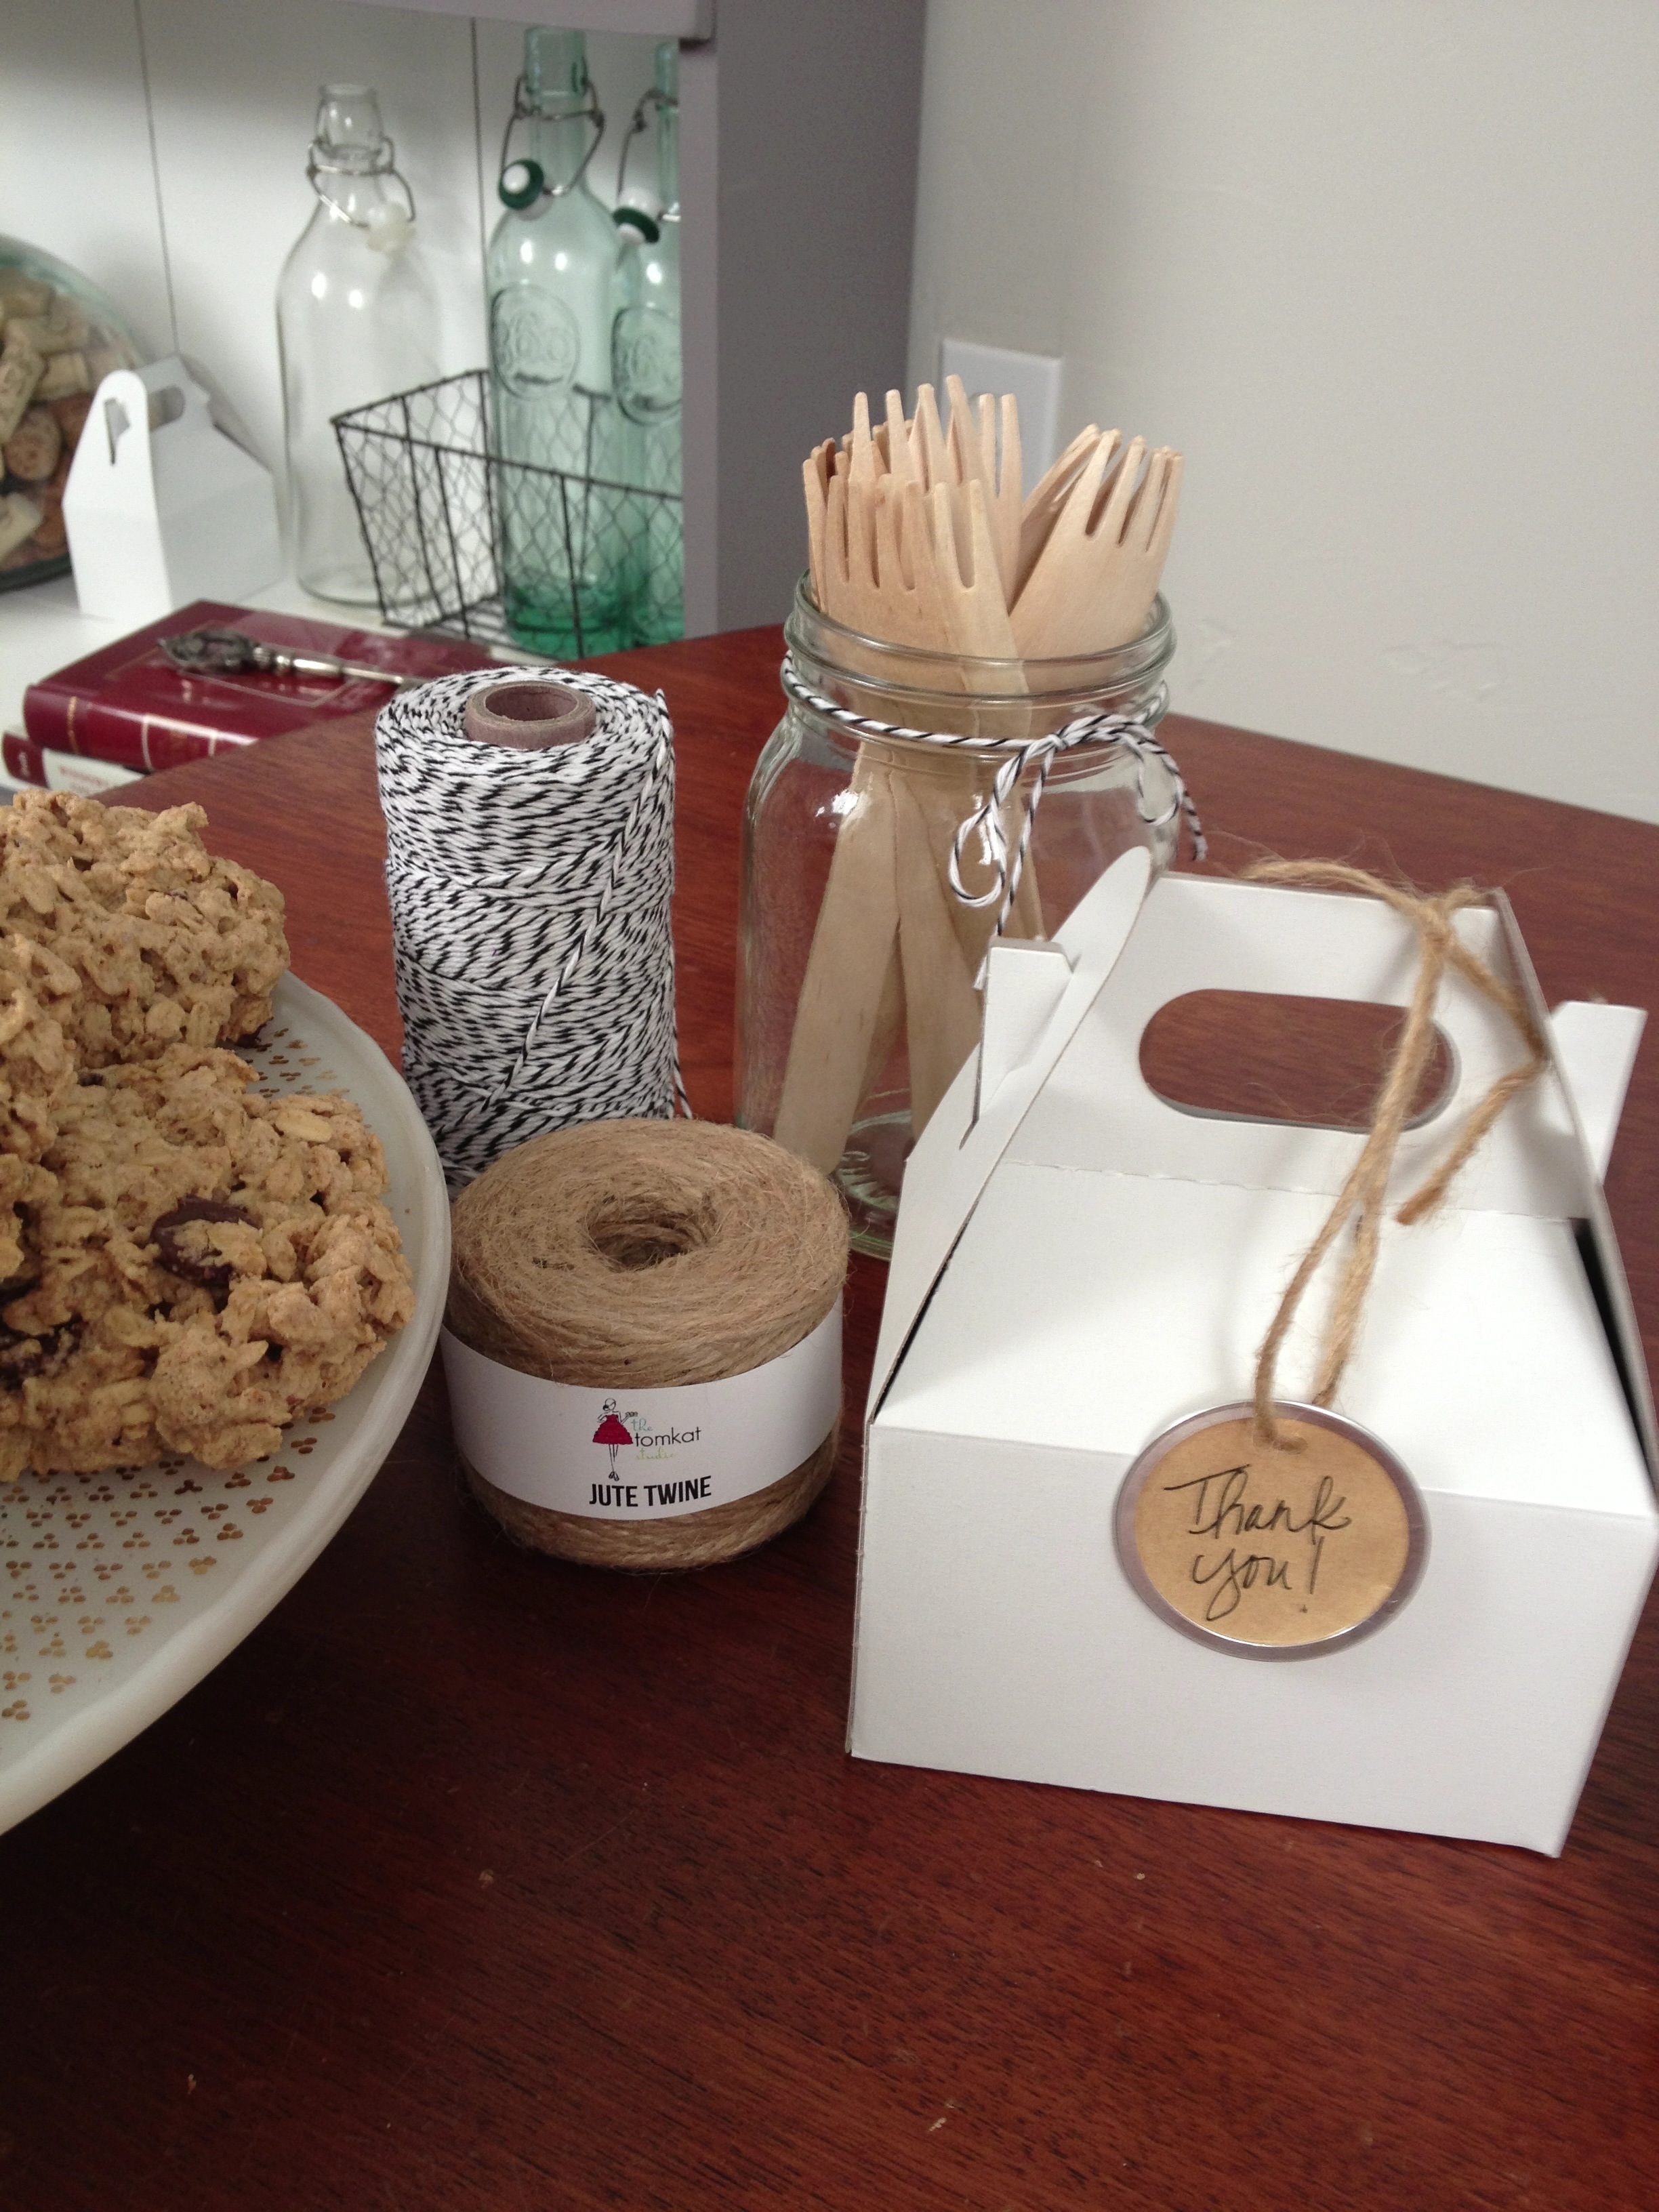
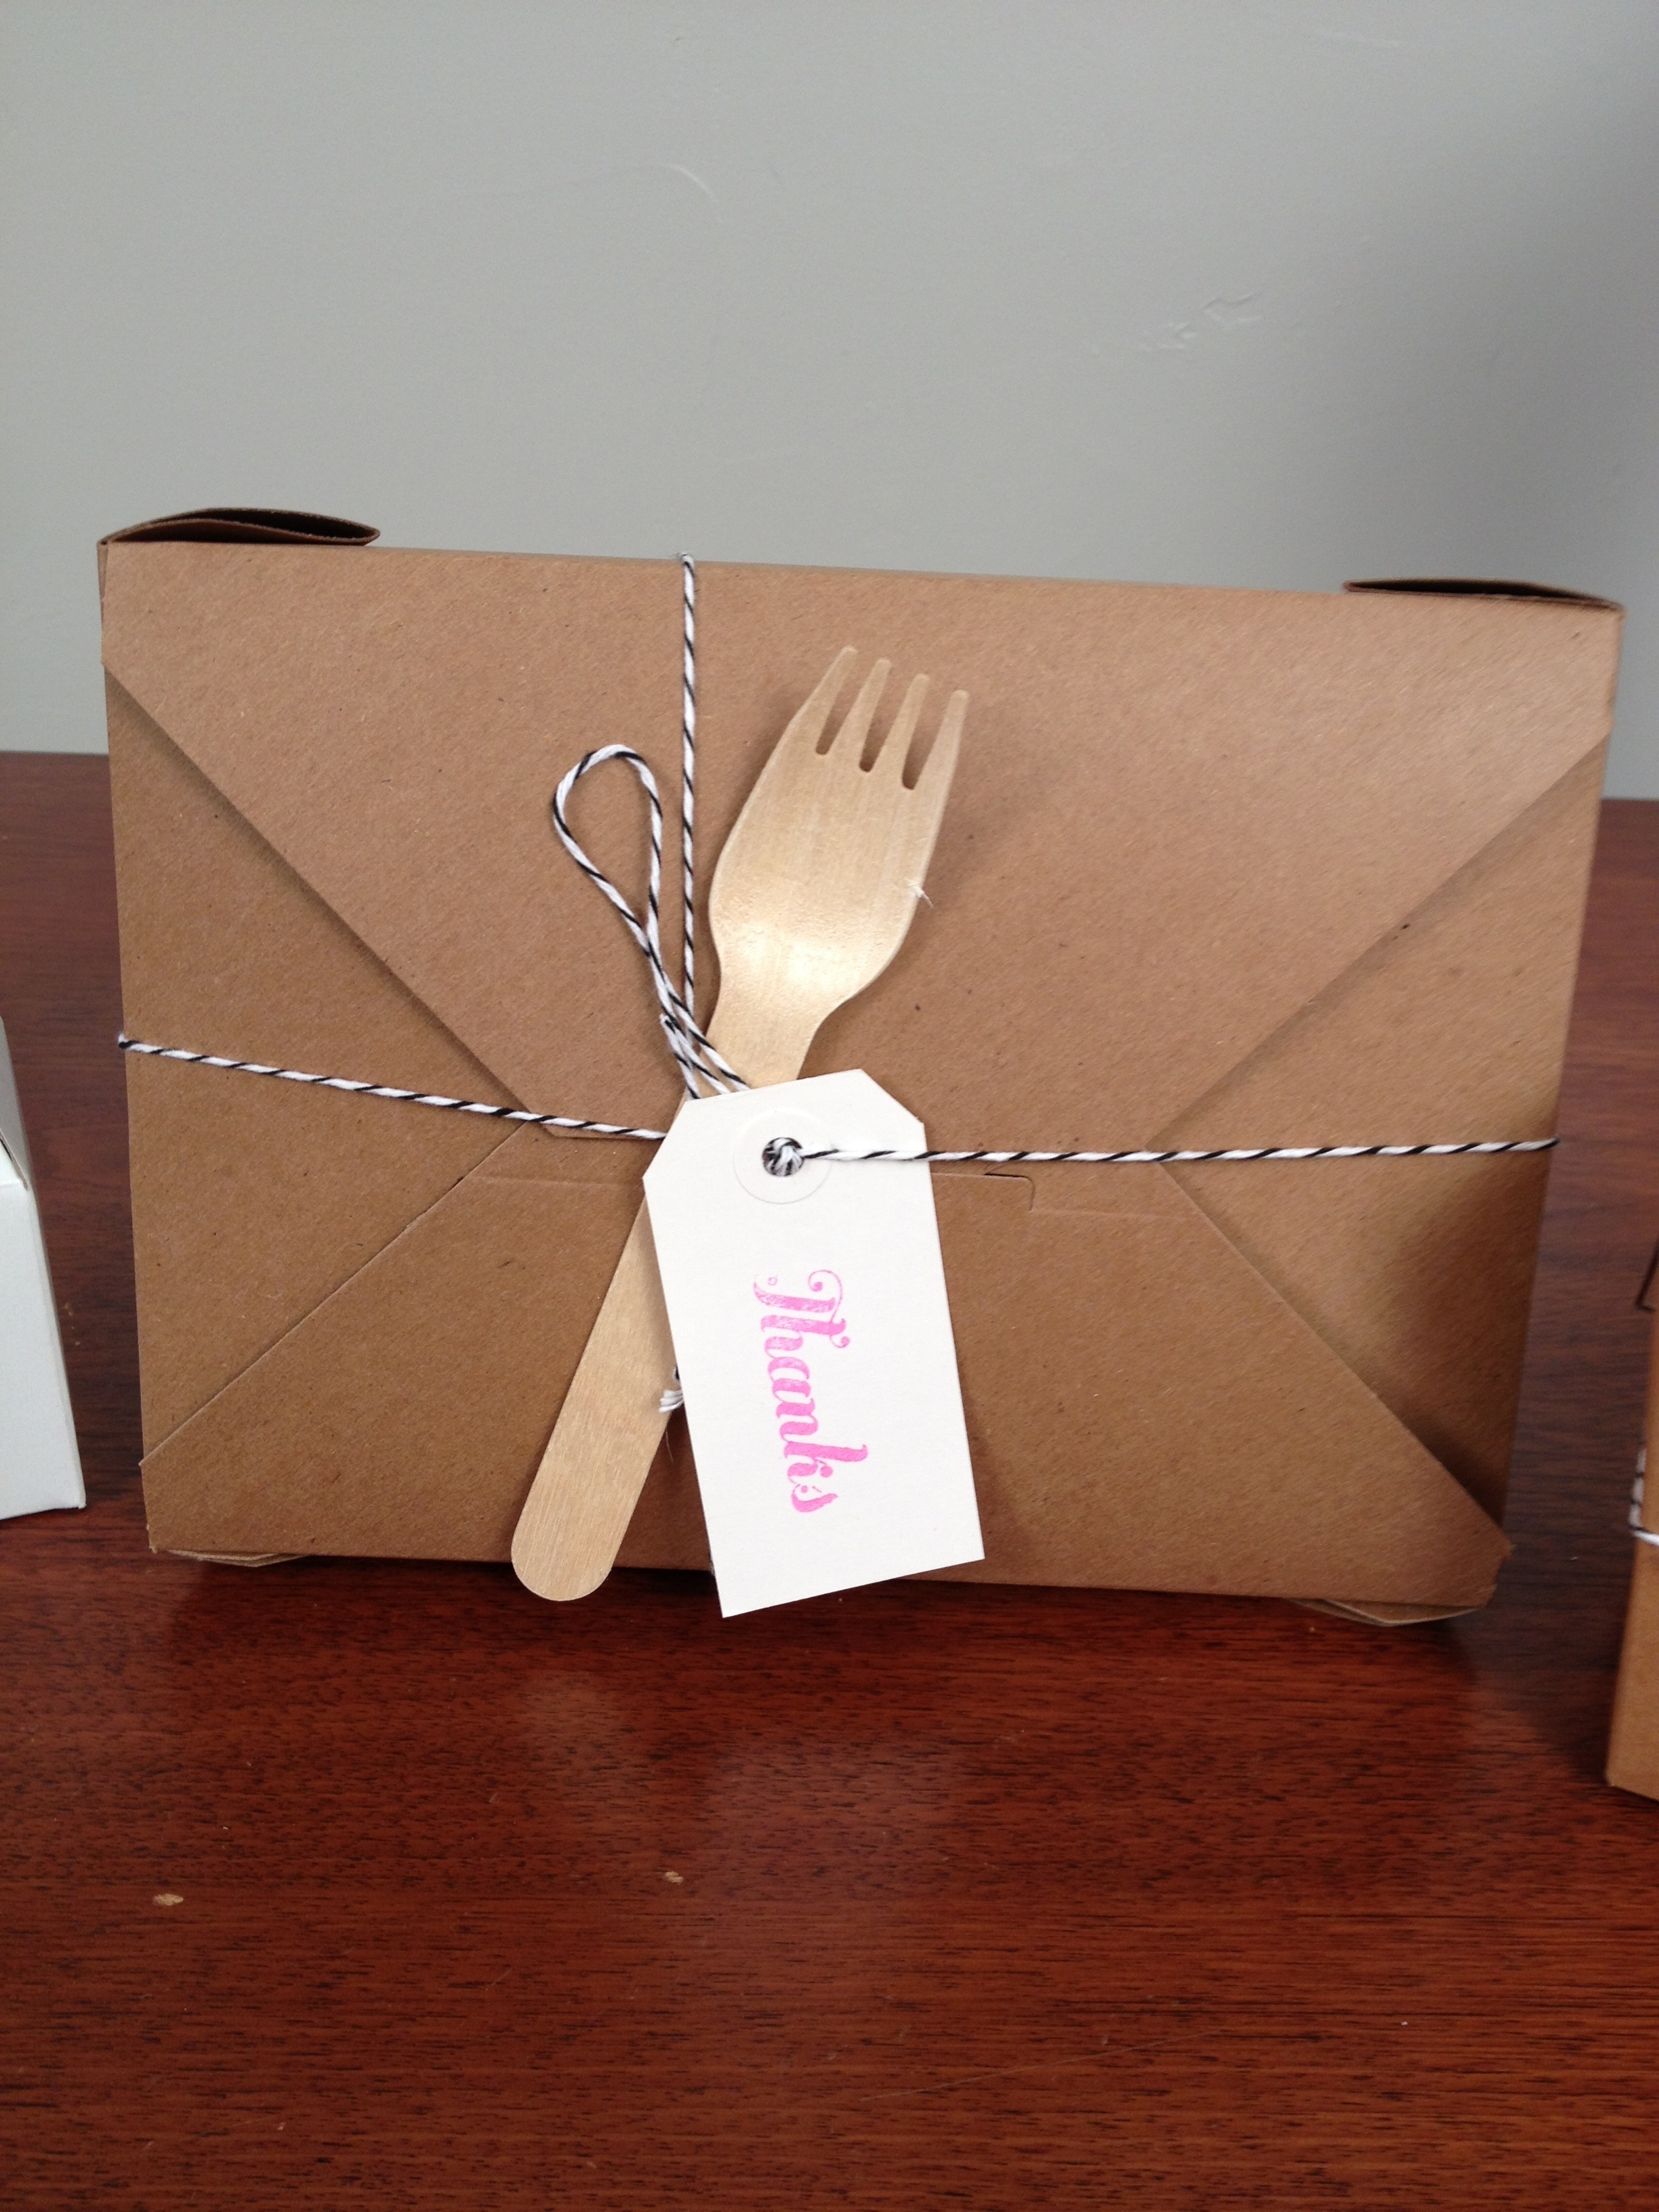
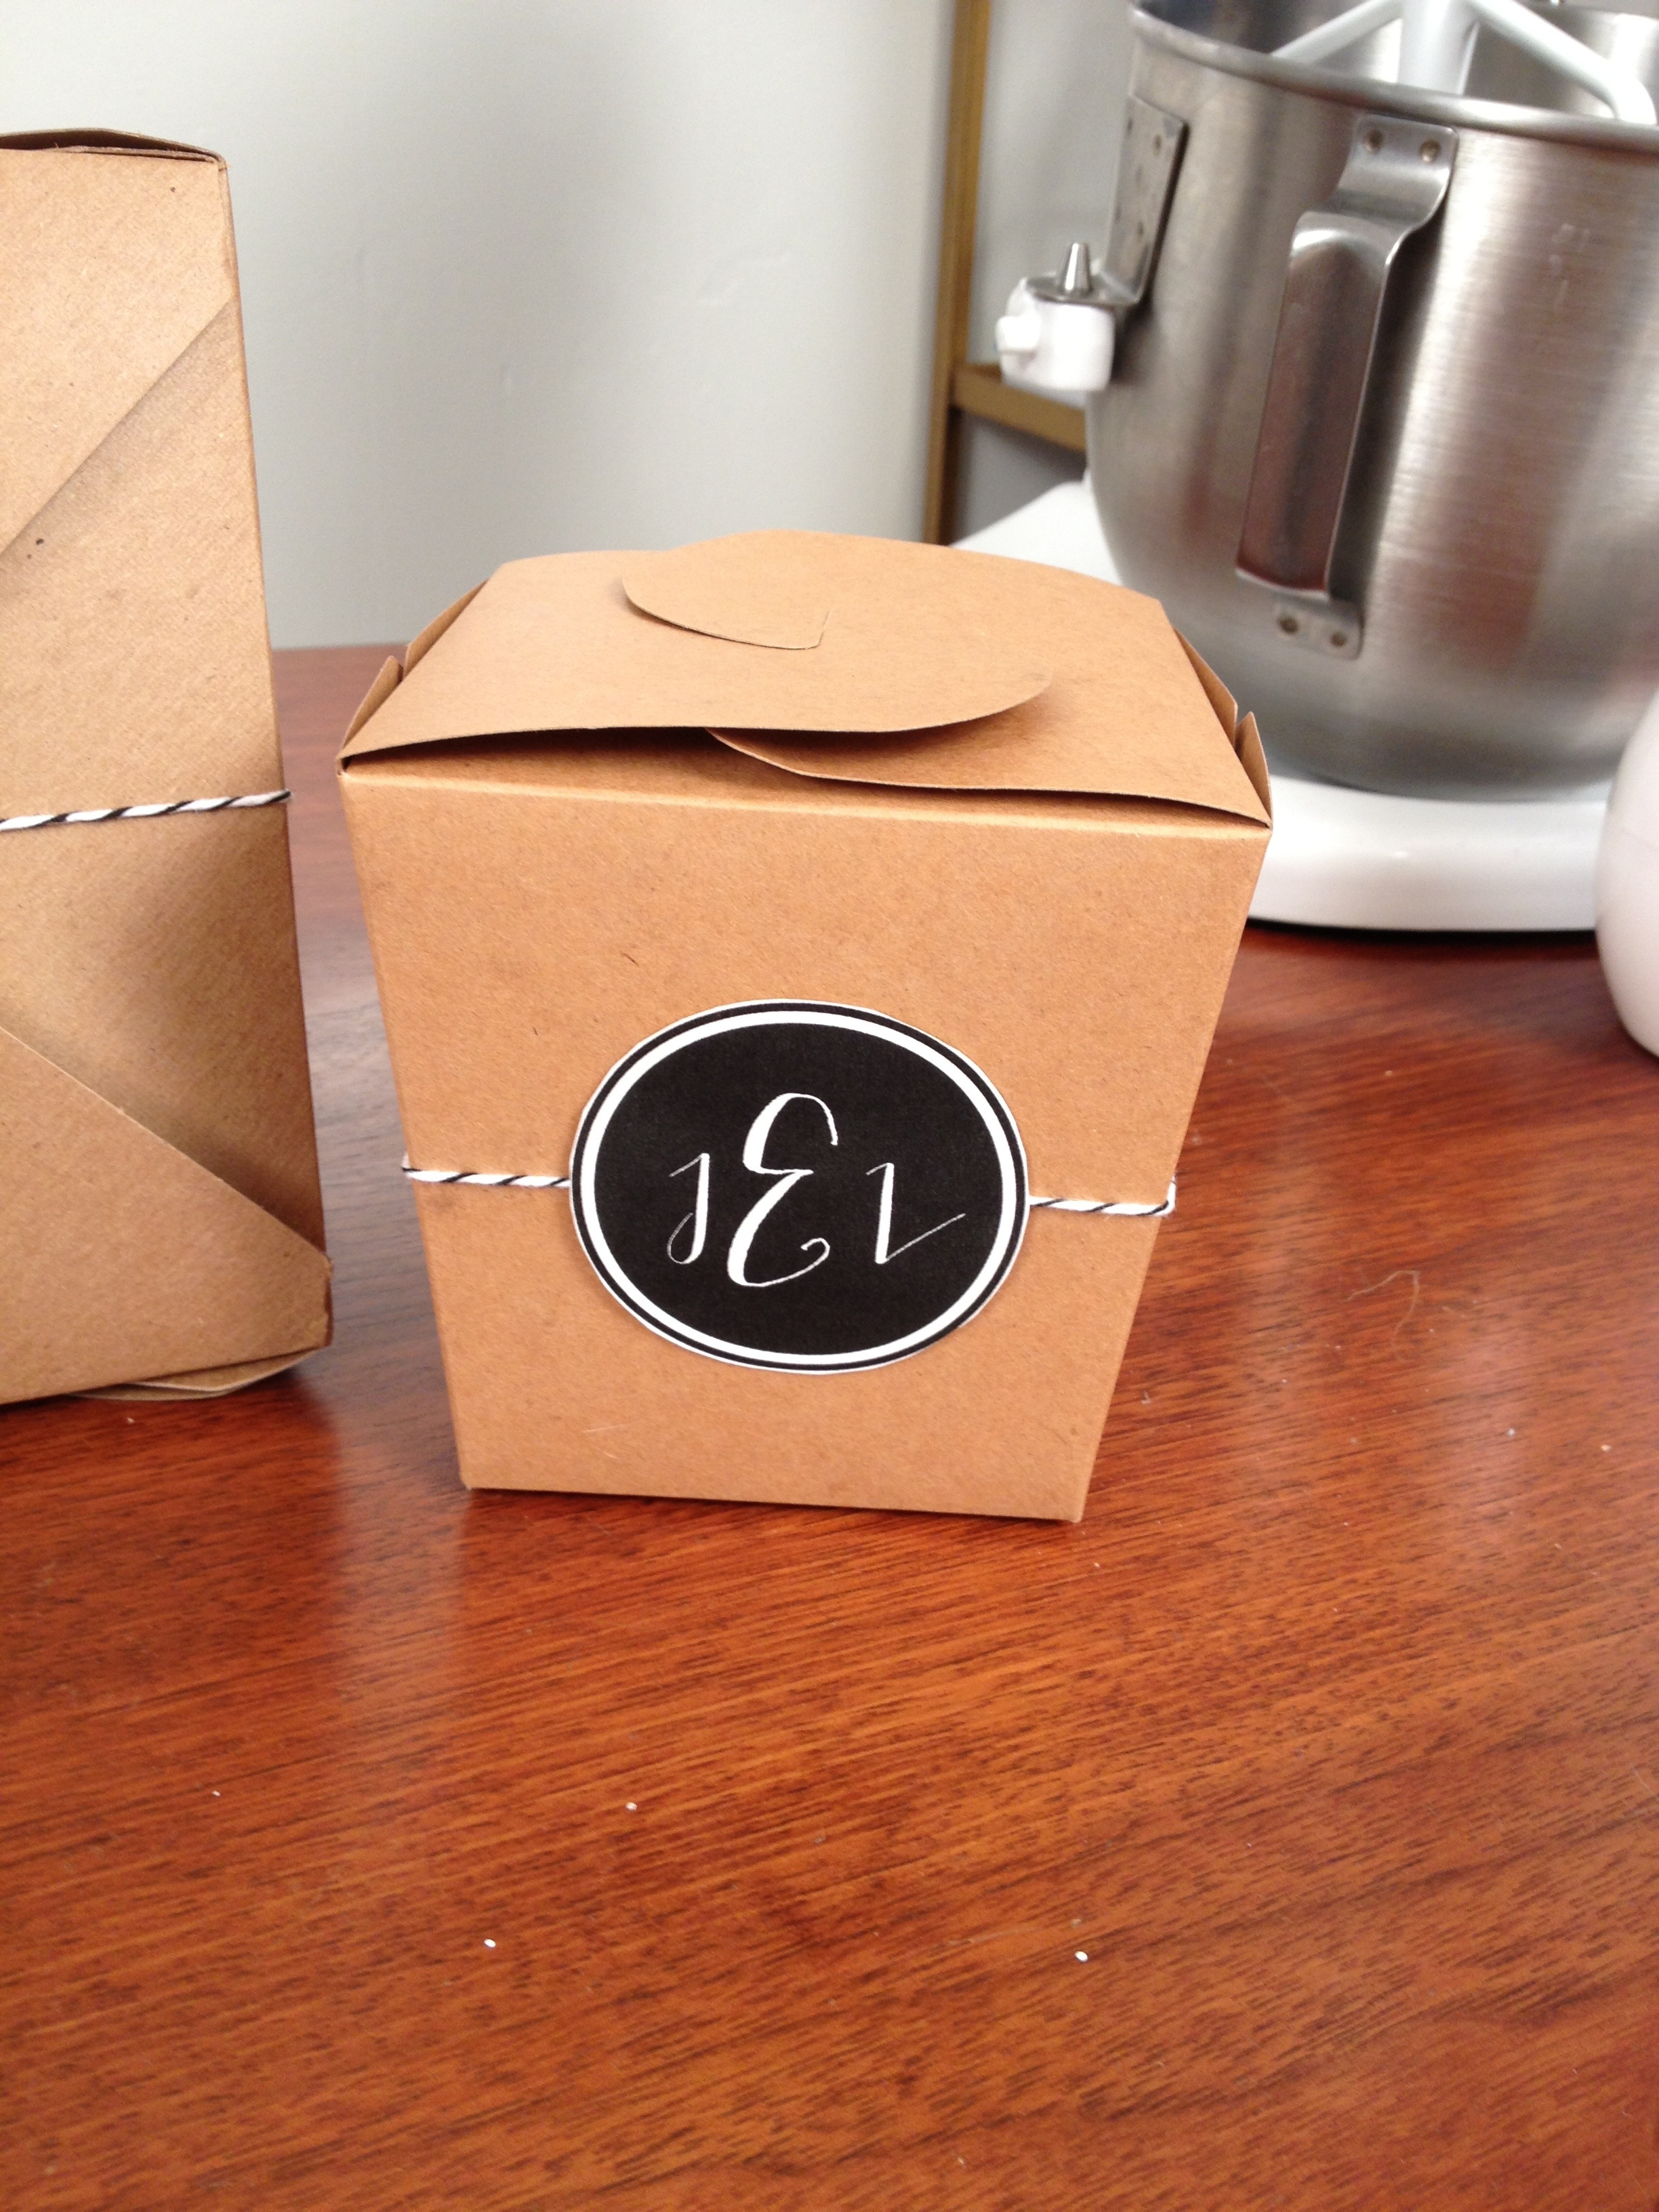
I’m a big advocate on trying to make weddings greener and not have as much waste. For this week’s video, I saw these biodegradable kraft takeout boxes and thought they were a great way to send guests home with leftover wedding cake. How many times have you seen uneaten slices just sitting on the tables!?!
These takeout boxes are not only for weddings, use them at dinner parties to send guests home with leftovers so that you never have to worry about getting your Tupperware returned to you.
I’ve also included a recipe for my signature Gluten Free Oatmeal Cookies that you can use to fill your boxes and turn them into wedding favors.
Don’t forget to SUBSCRIBE to the YouTube channel, so close to the 1,000 goal!
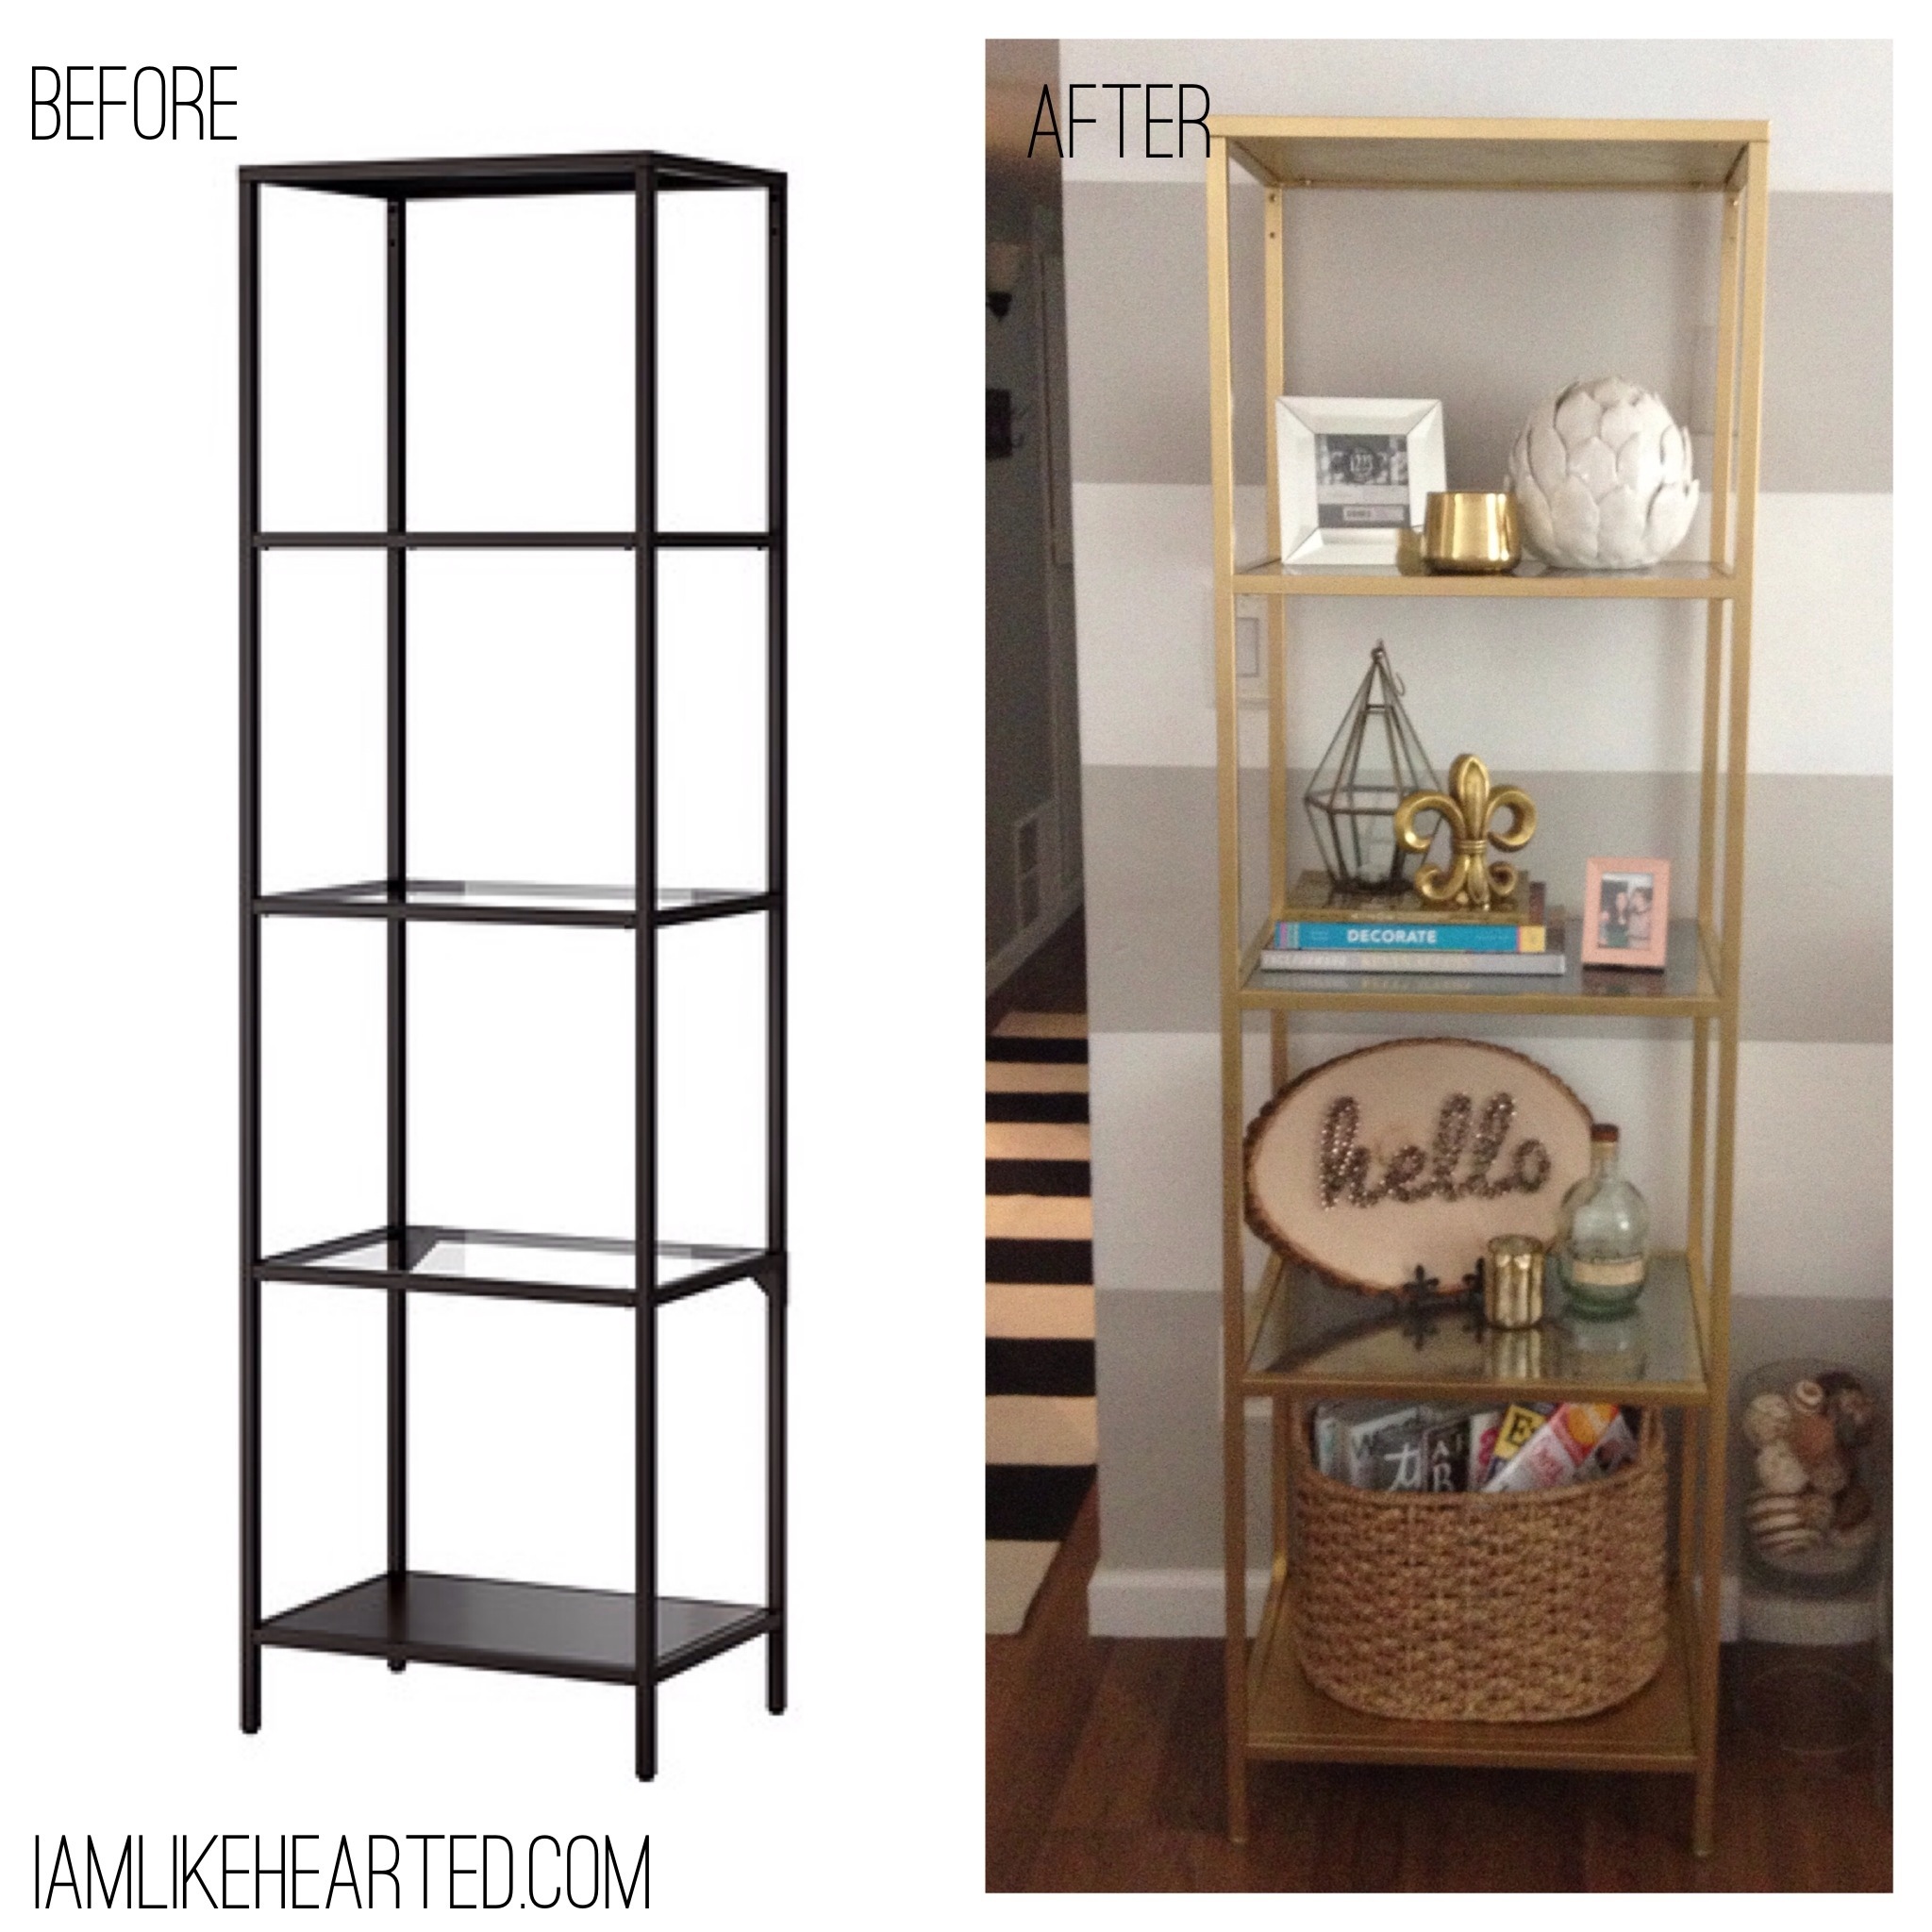
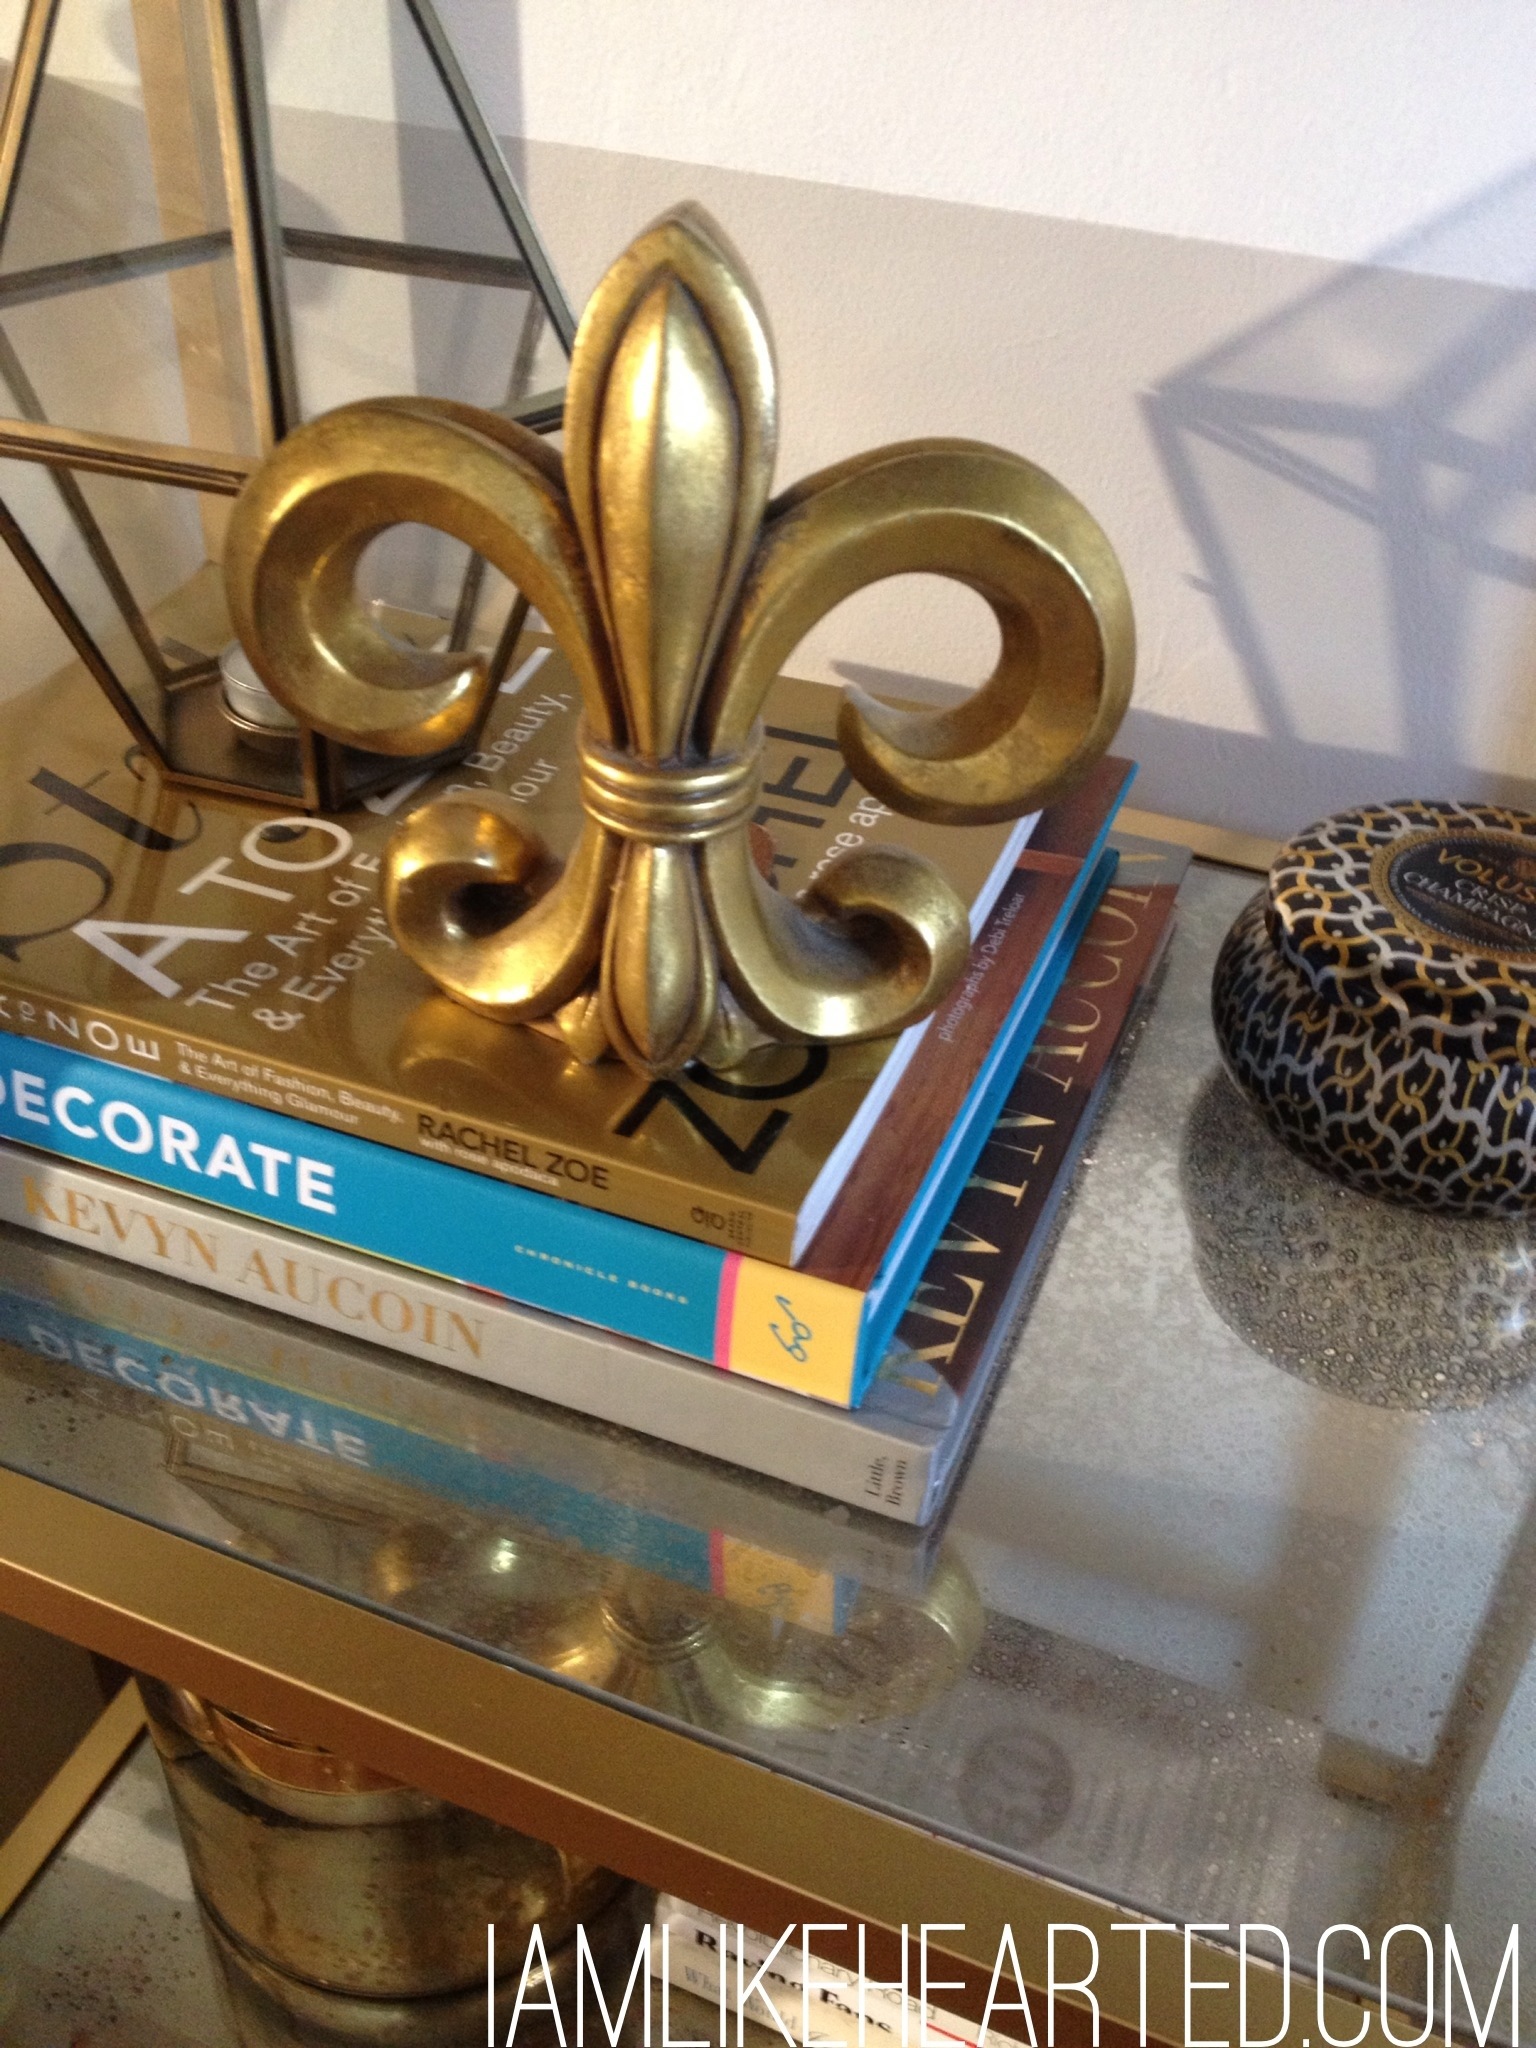
I have a confession…a lot of the tutorials I do are because I need something done around the house. Being a homeowner means the project list never ends. Case in point, I needed a bookcase for my guest room and wanted to recreate the look of a vintage one I already own. In this tutorial learn how to master an Ikea hack and create mercury glass for the shelves. The best part about learning the mercury glass technique is that you can also use it on vases, candlesticks and much more to create additional accents for your home.
Also, I found this post from Brittany Makes extremely helpful when deciding what gold spray paint to use.
Don’t forget to post an Instagram photo of tutorials you have tried and tag me @likehearted. I want to see what you all have been making!
Black Spray Paint (Left over from another project)
Tools:
Damp rag
Spray Bottle filled with water
Mercury Glass Steps:
Make sure you are in a well ventilated area.
Make sure the glass is clean and dry. The paint is going to go on the reserve side of whatever you are painting. In this case, the bottom of the shelf.
Lightly spray the glass with water.
Spray a layer of mirror paint. Let it dry for a few seconds.
Depending on your desired look, you can incorporate other colors, here I add gold and black for a more antiqued look. Spray the colors and dab with a damp cloth top get your desired effect.
Let it dry completely, if it is too transparent add another layer of mirror paint.
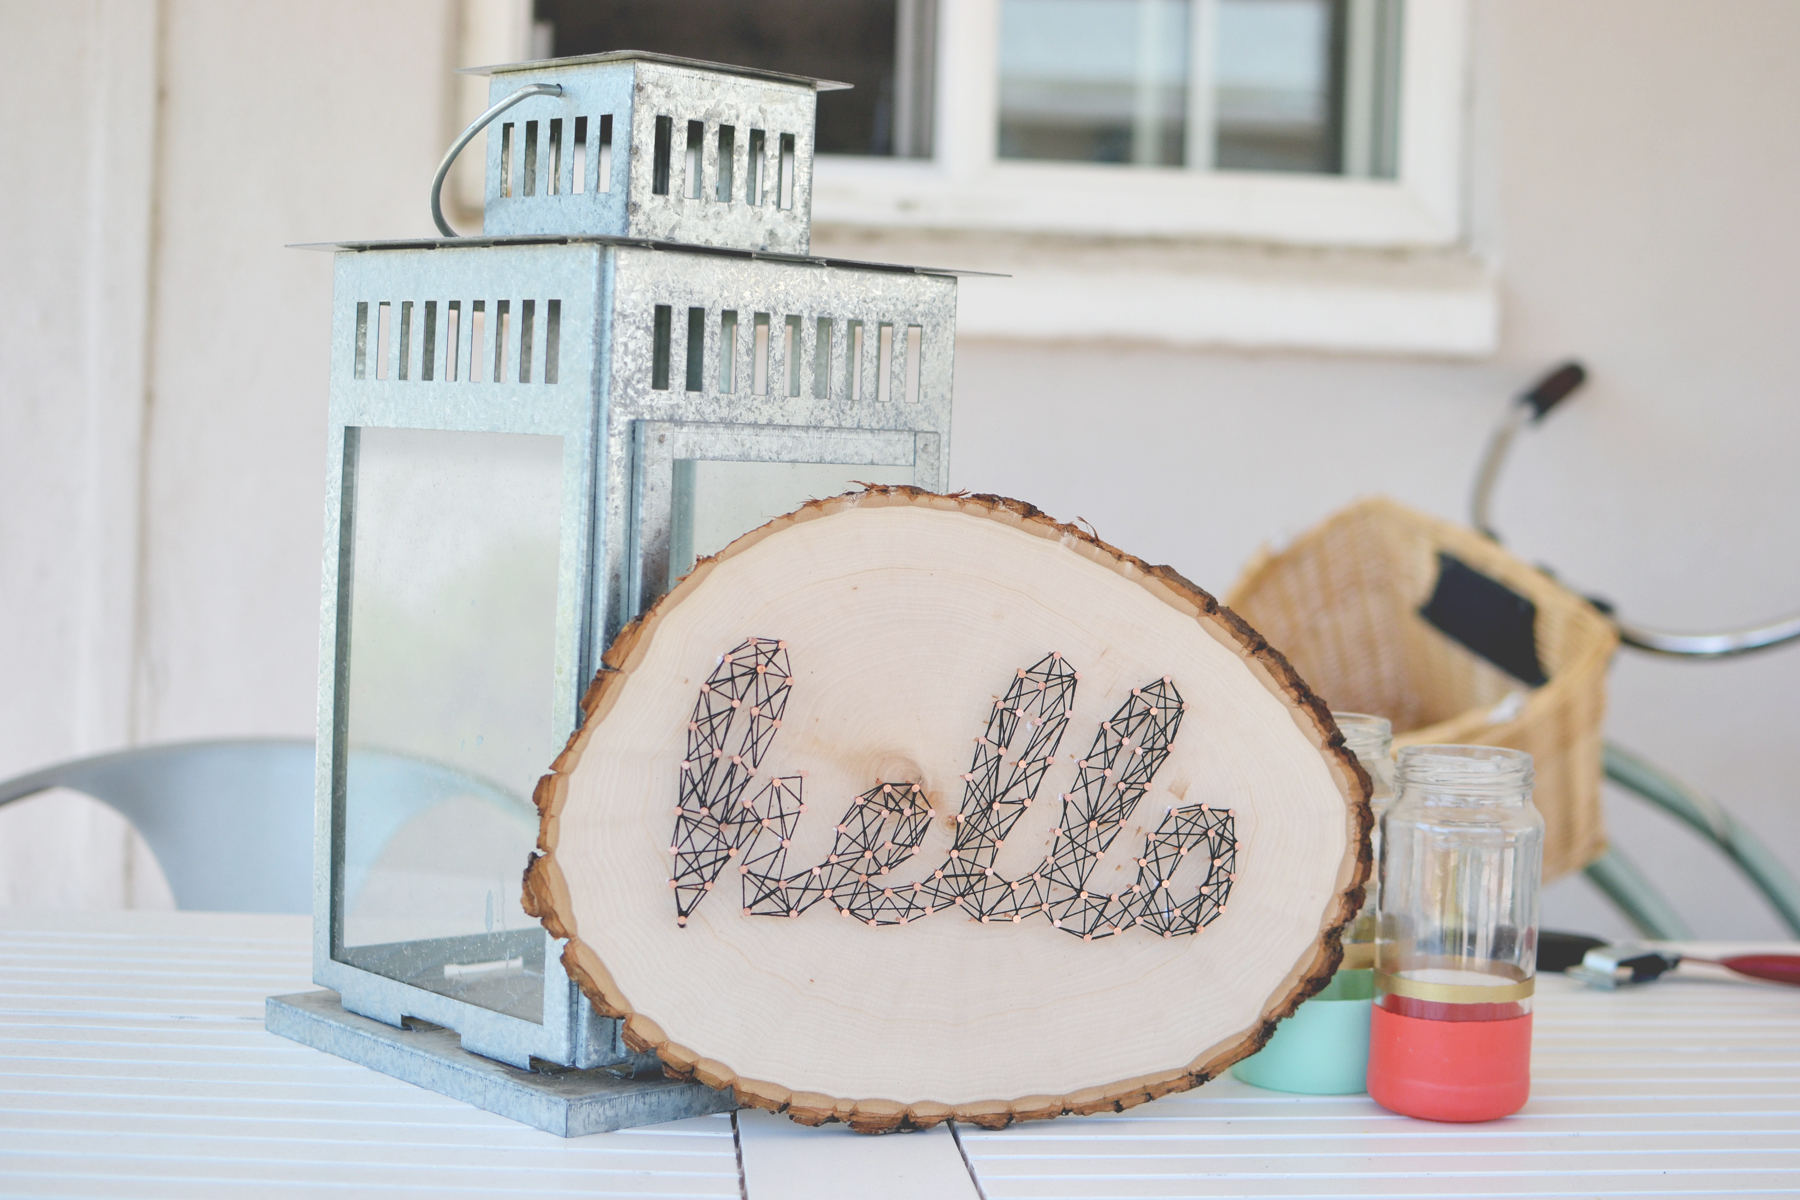
String art is popping up in a lot of different places lately. It first became popular as decorative art in the late 60′s, but I love the modern twists on it these days. This simple craft can easily be customized to make unique art for your home. If for some reason you don’t feel like tackling this project on your own, you can purchase the one I made in the video on my Etsy Store. But I would really love to see what you all create, so instagram a photo and tag @likehearted!
Also, want to send a thank you to The Gentlemen Ether for new music in the video!
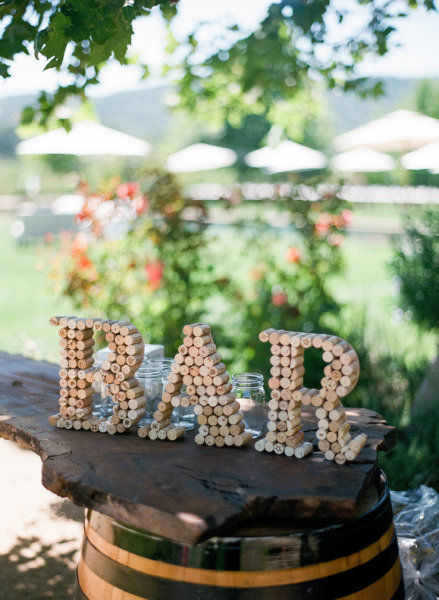
Other creative ways to utilize the craft: decorative signage for a wedding, table numbers or even a name sign for a nursery.
Make a template on your computer of the word or shape you plan on using. I downloaded Pacifico and made the template in a word doc using a font size of 375.
Cut out the template and align on wood board, use scotch tape to keep it in place.
Begin to outline the word/shape with nails, placing them about 1/2” apart.
To start threading tie one end of the string to a nail, then outline the word/shape. Wrapping around the nail head as you go.
Tear away the paper template.
Start wrapping the string around the nails creating a zigzag pattern. Continue to do this until you have filled in the entire word/shape.
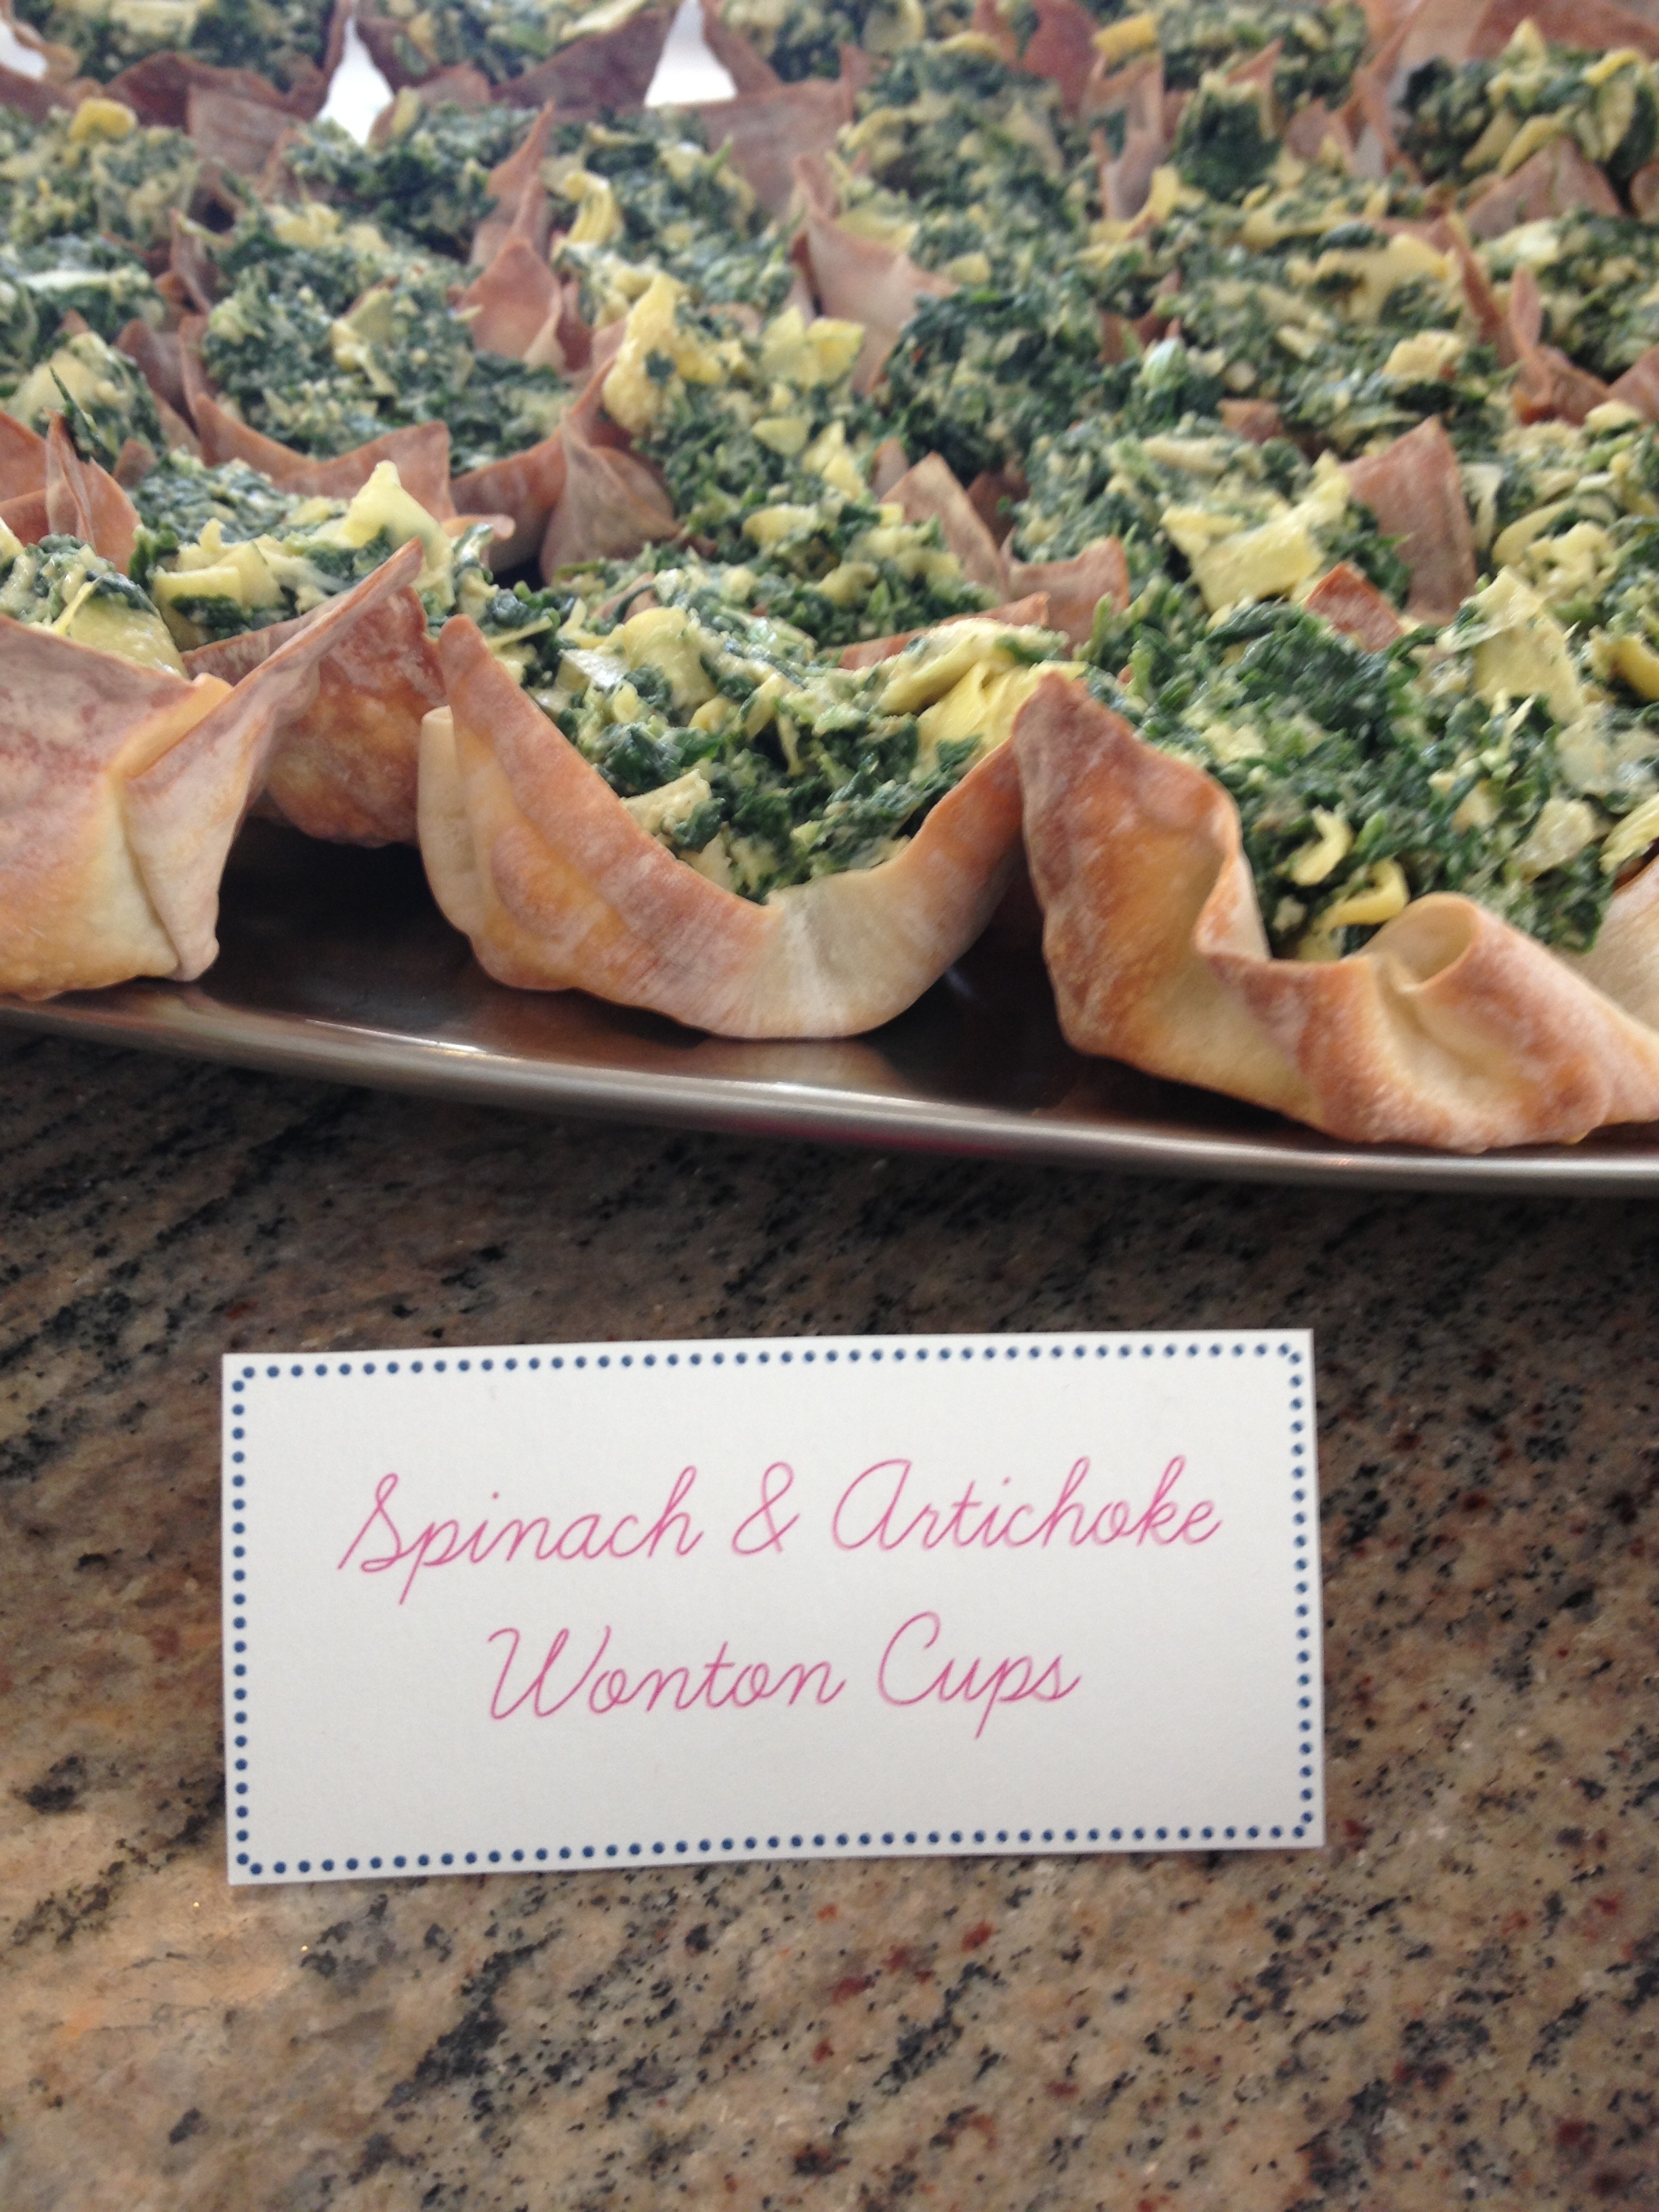
I love this recipe because it takes the messiness out of eating a dip since you have the spinach and artichoke filling in individual cups. I haven’t found gluten free wontons yet, so if you want to make this gluten free, forget the wonton cups and just serve the filling with tortilla chips. If you do this I suggest making it a bit more creamier by adding additional greek yogurt. Plus, it’s a much lighter version of a traditional spinach & artichoke dip.
Ingredients:
1 Package of frozen chopped spinach, defrosted and drained
1 Can of artichokes in water, drained and chopped
1/4 cup Vegan Mayo
1/3 cup Greek Yogurt
1 Tablespoon Frank’s hot sauce
1 clove of garlic, minced
1 lemon, zest only
1/2 Grated Parmesan Cheese
Salt & Pepper to taste
Wonton Wrappers (these are not gluten free)
Directions:
Preheat oven to 350 degrees. Using a muffin pan, place a wonton into each tin and press down to form the cup shape (they don’t have to be perfect). Bake for 12-15 minutes or until the wonton tips are a light brown. You can make these wonton cups a few days in advance, just store in a zip lock bag.
Make sure the chopped spinach and artichokes are drained well. Use a paper towel to press out any excess water.
Mix all filling ingredients together in large bowl.
Fill wonton cups with mixture. Don’t fill the cups more than 30 minutes in advance otherwise the wontons will get soggy.
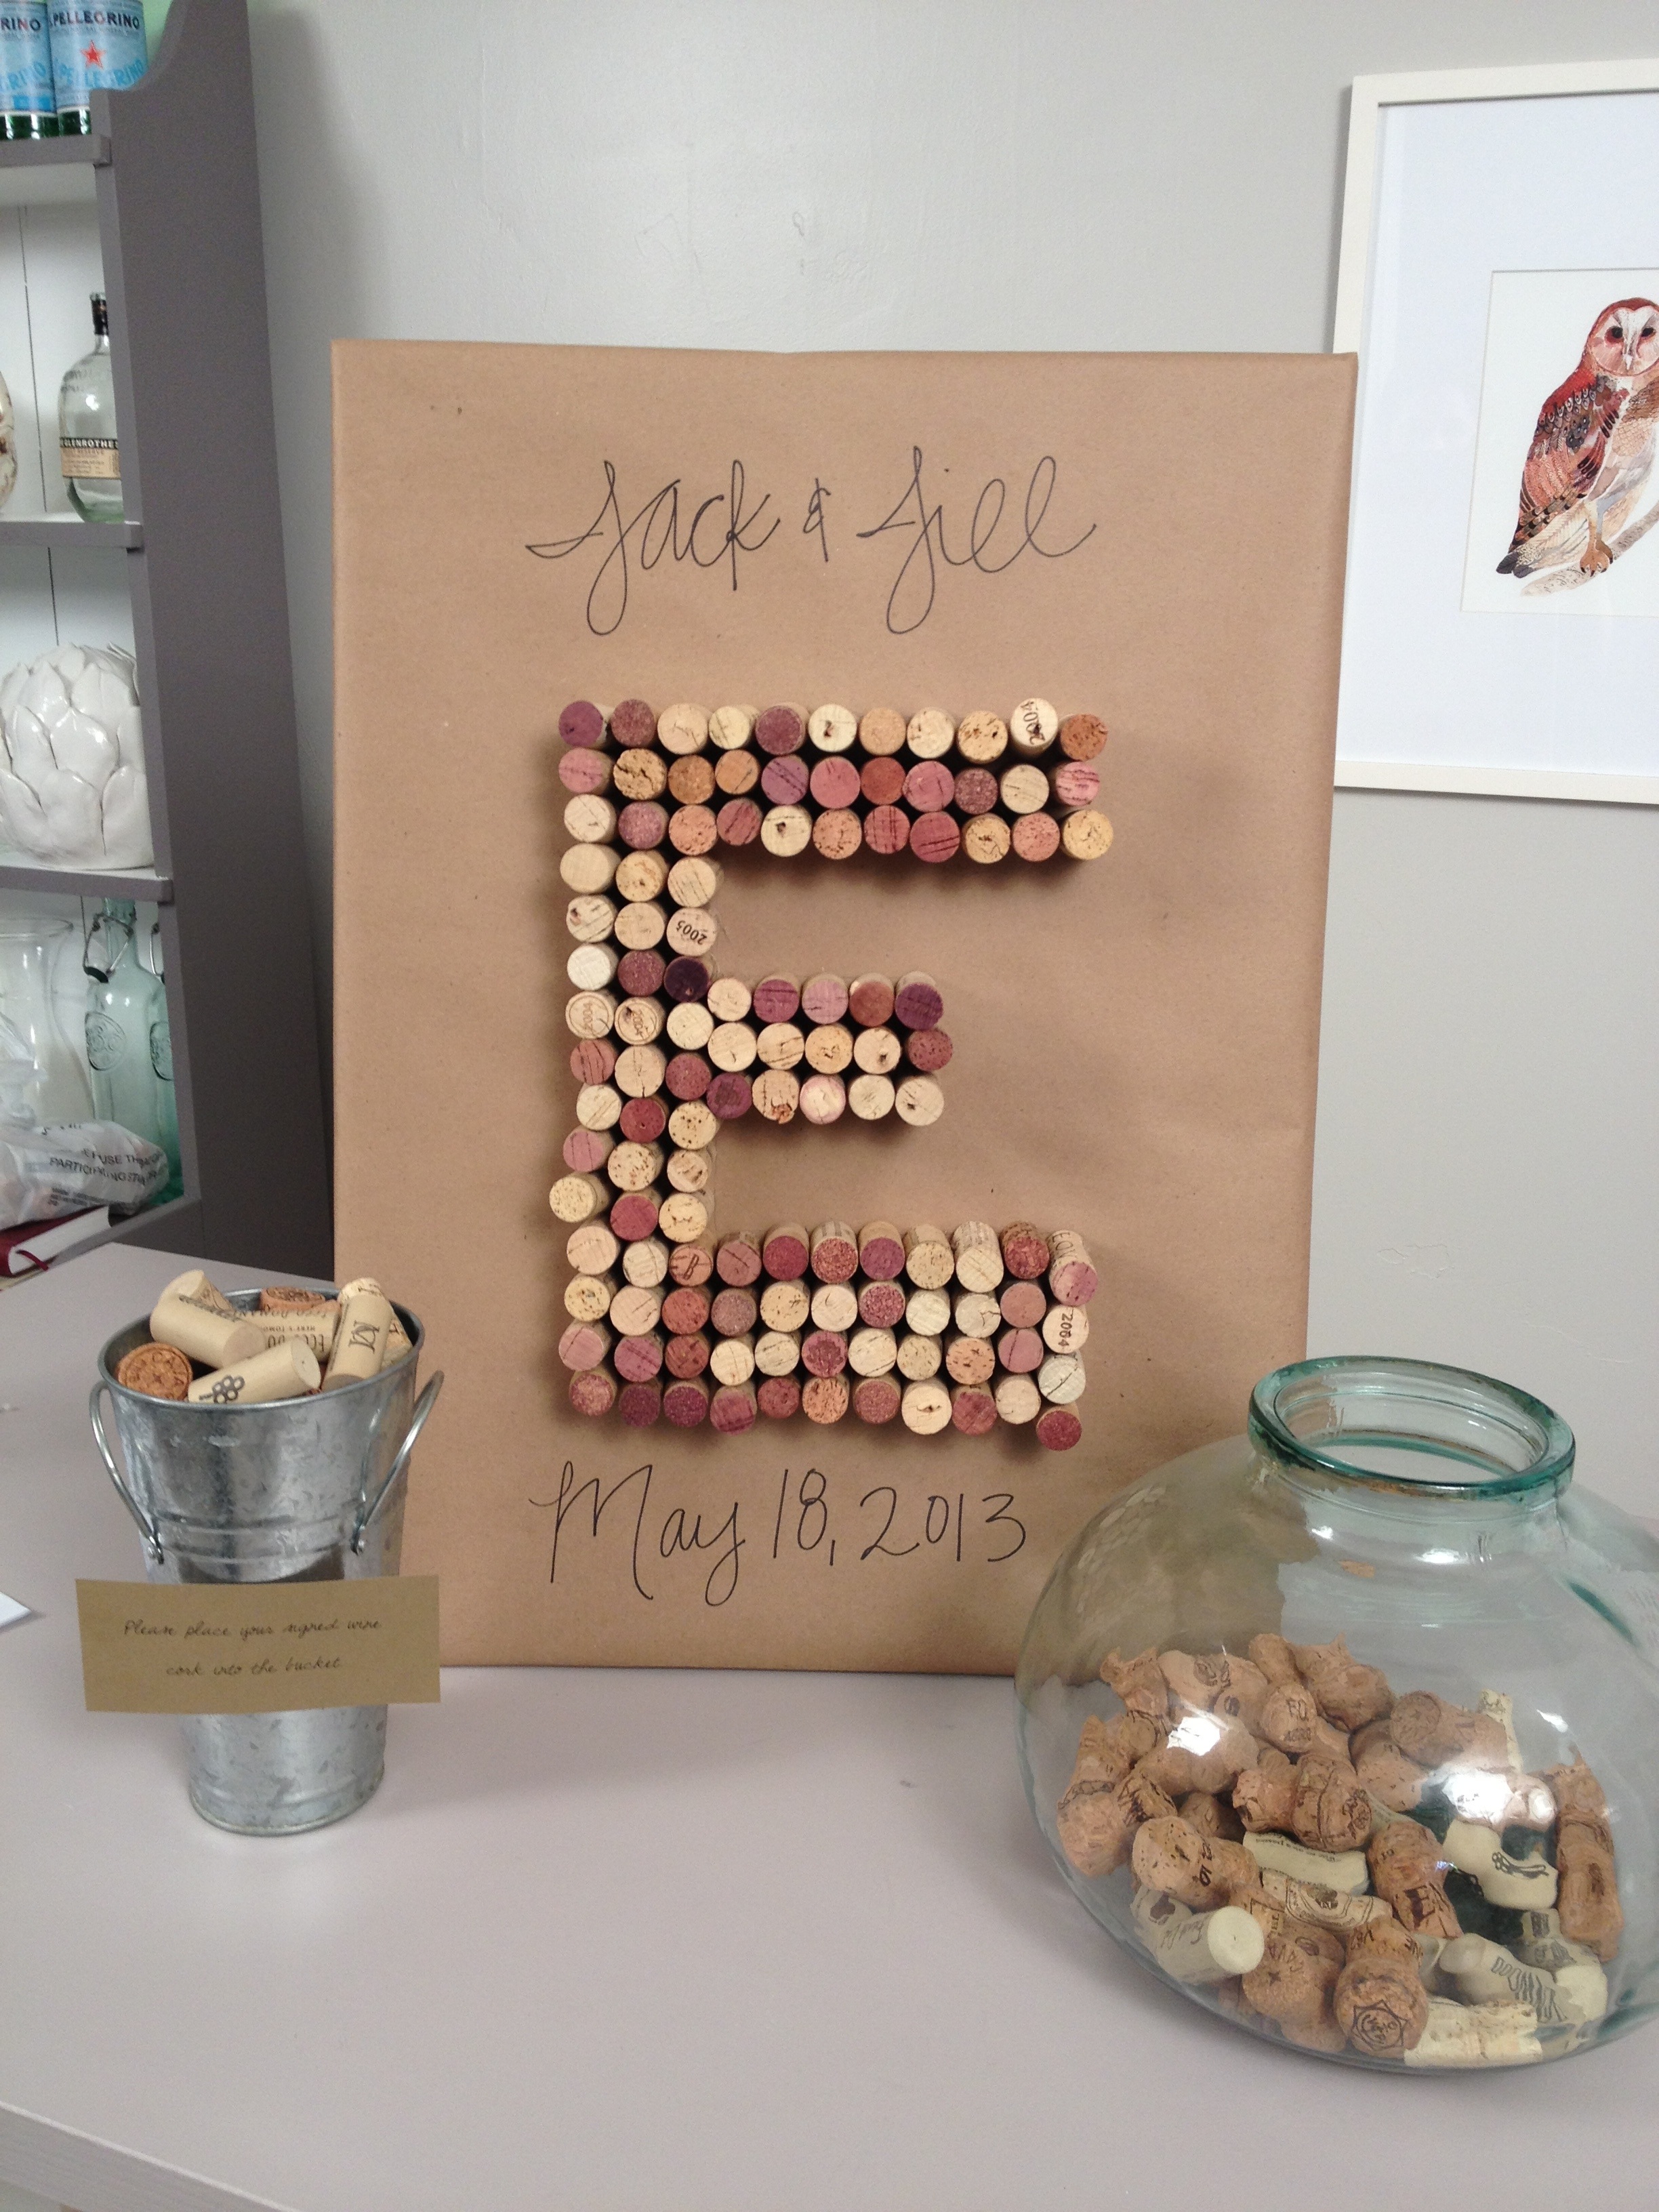
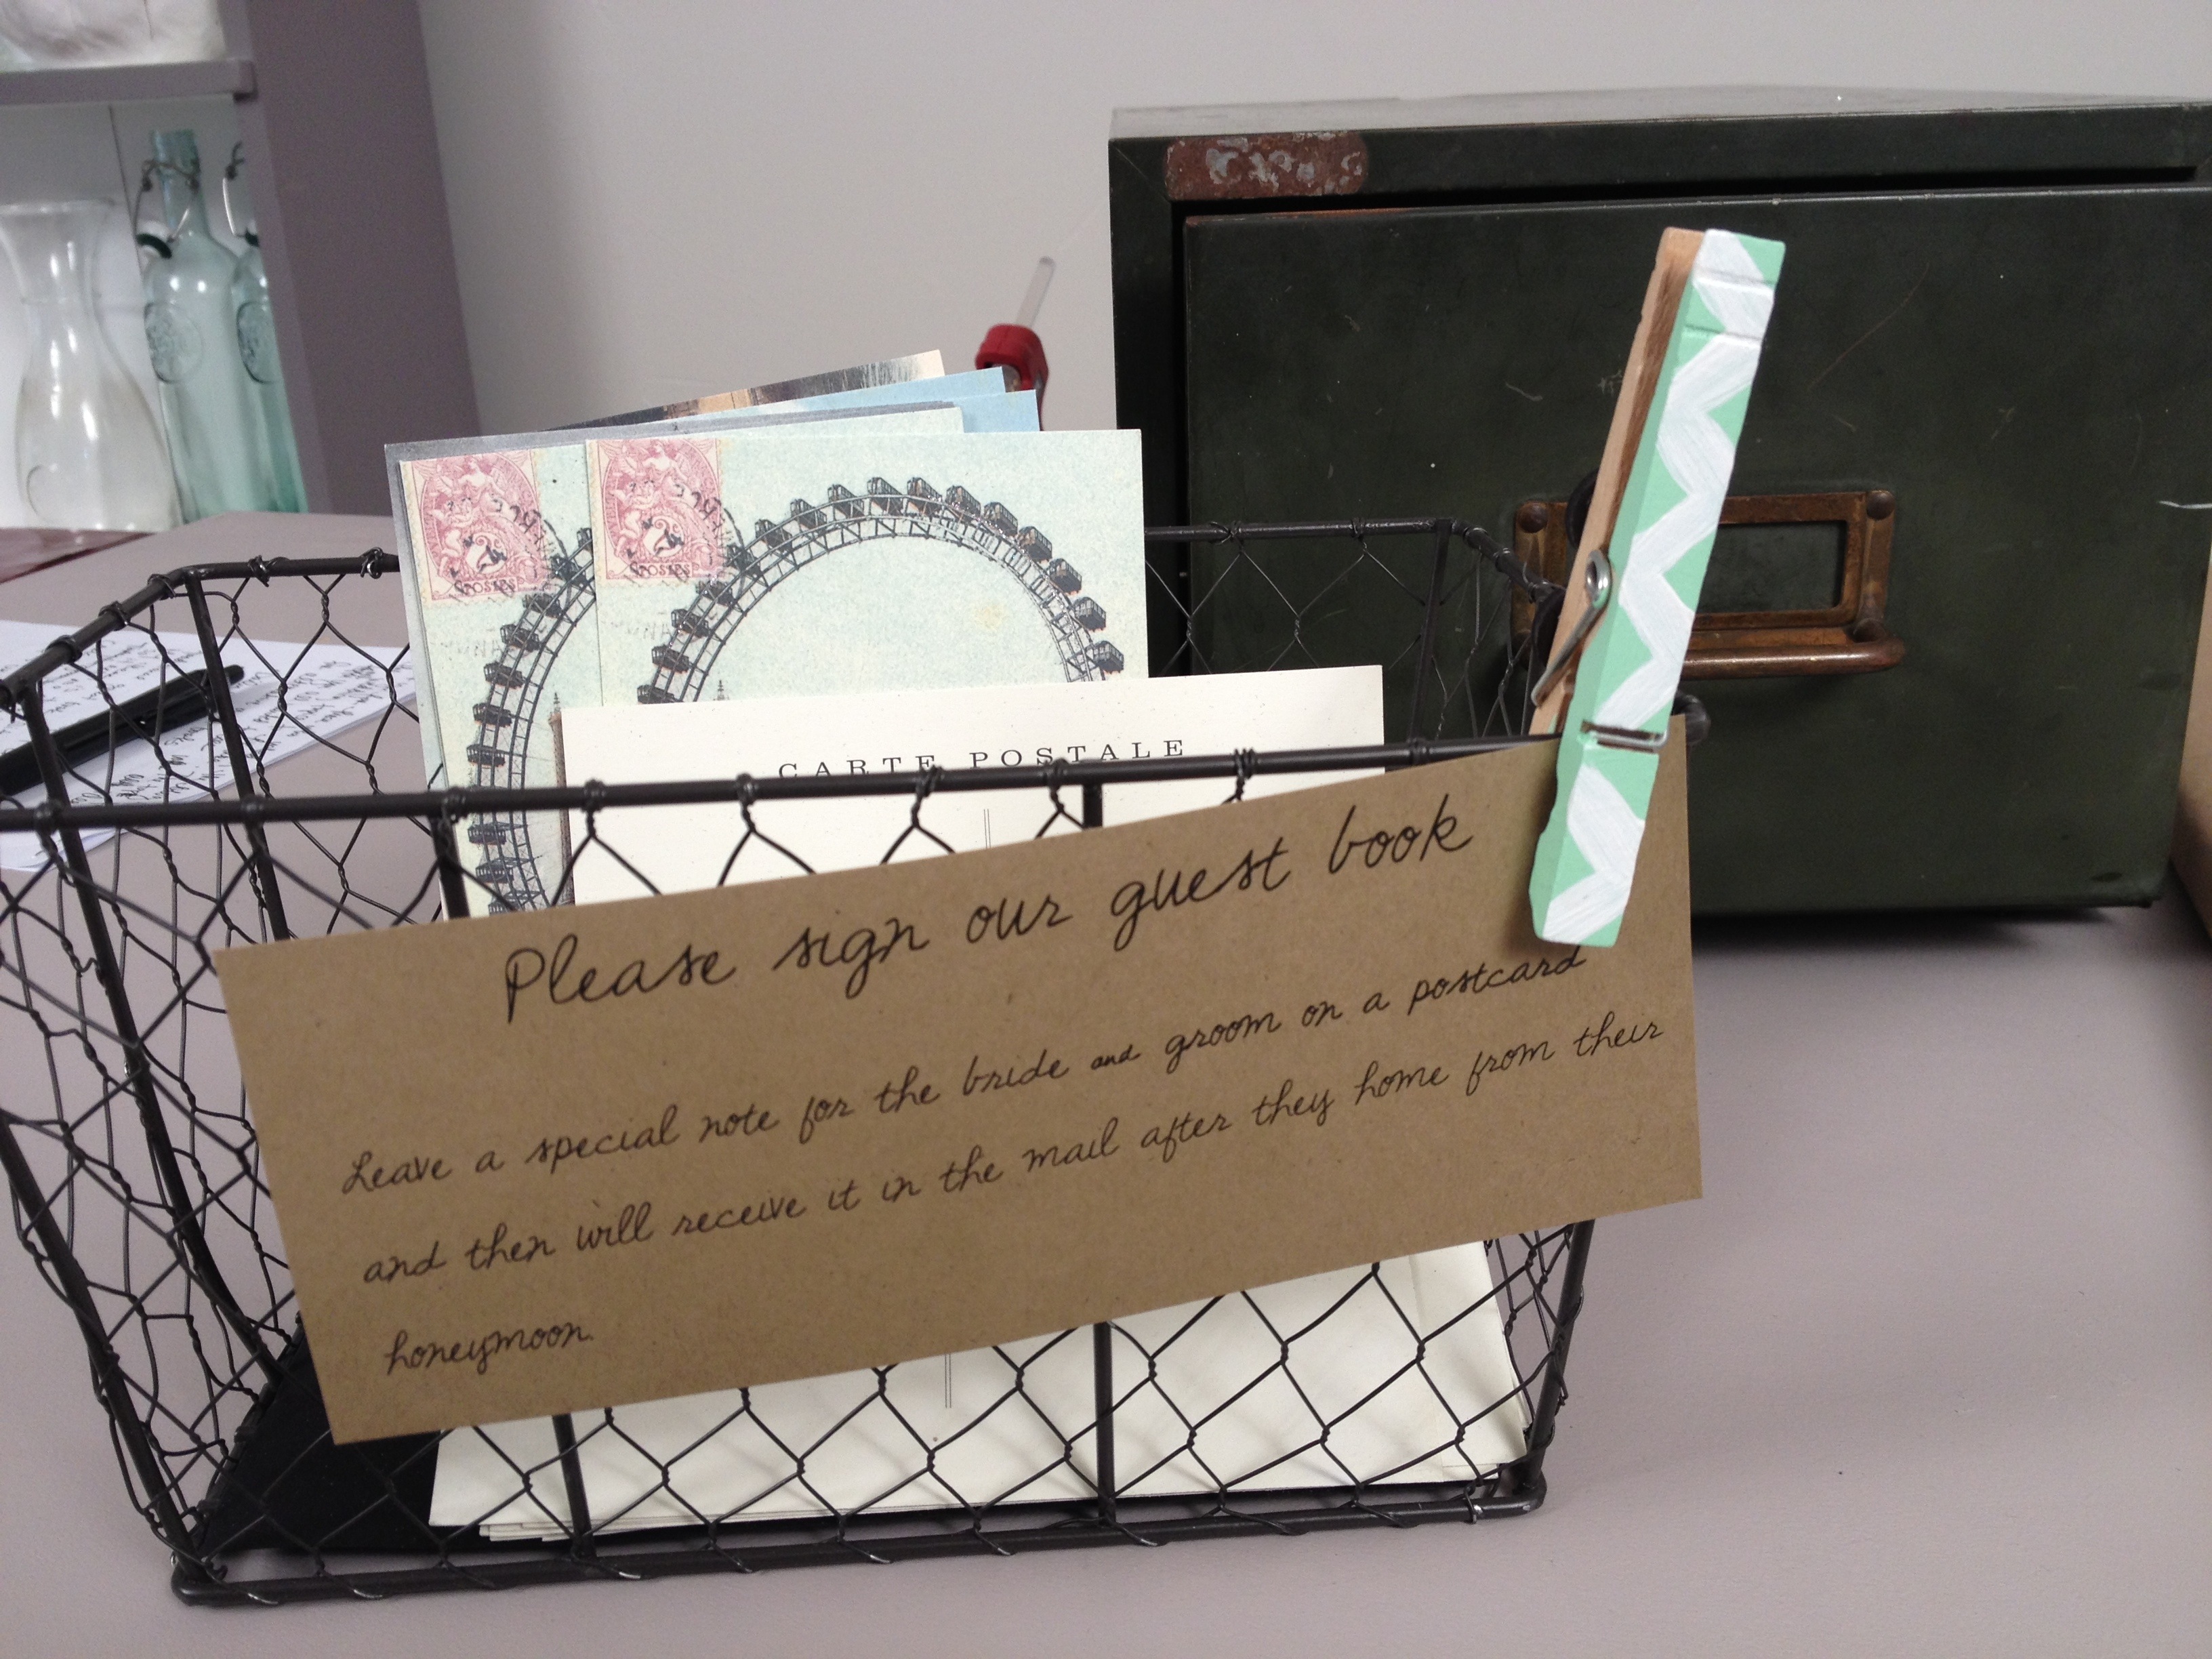
Instead of having a traditional guestbook that is going to sit on a bookshelf and collect dust, my theory is to turn it into something that can be on display and viewed daily. Hopefully these ideas will inspire you to do something unique for your big day.
Option 1: Lip & Mustache Silhouettes
Check out the photo booth tutorial on how to make the lip and mustache silhouettes, you can do any shape that matches the wedding theme: bow ties, hearts, birds, leaves, flowers, etc. Arrange the shapes in an interesting pattern to create a piece of custom artwork for the bride and groom’s home.
Option 2: Wine Corks
If the bride and groom are wine lovers or the wedding is taking place at a vineyard, have the guests sign wine corks. I wrapped a canvas in kraft paper and then hot glued wine corks into the first letter of the bride & groom’s last name or make free standing letters. Either way it’s a great decorative accent to the home.
If the theme of the wedding is more rustic, consider having your guests sign vintage postcards. After the wedding have your maid-of-honor drop them off at the post office so that when the bride & groom return from the honeymoon their mailbox is filled with well wishes from the guests. Plus, who doesn’t love snail mail? If you are looking for vintage postcards then check out this awesome Etsy shop.